Canning and Preserving For Dummies (6 page)
Read Canning and Preserving For Dummies Online
Authors: Amelia Jeanroy
Foam skimmer
A foam skimmer, shown in Figure 2-8, makes removing foam from the top of hot jelly, jam, or marmalade easy while leaving any pieces of fruit or rind in the hot liquid. (The openings in slotted spoons are too large to achieve quick and efficient foam removal.)
Figure 2-8:
A foam skimmer.

Home-canning jars
Over the years, many types of jars with many varieties of seals have been used for home-canning. The most commonly used jars bear the names of Ball and Kerr and are commonly referred to as Mason jars. They use a two-piece cap to produce a vacuum seal in the jar after heat processing.
 To ensure safe home-canning today, use only jars approved for home-canning and made from tempered glass.
Tempering
is a treatment process for glass that allows the jars to withstand the high heat (212 degrees) of a water-bath canner, as well as the high temperature (240 degrees) of a pressure canner, without breaking.
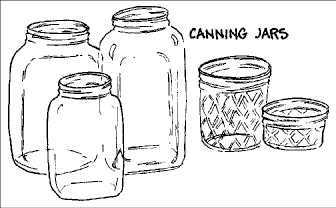
Home-canning jars come in many sizes: 4-ounce, half-pint, 12-ounce, 1-pint, and 1-quart (see Figure 2-9). They offer two widths of openings: regular-mouth (about 2 1/2 inches in diameter) and wide-mouth (about 3 1/8 inches in diameter). Regular-mouth jars are used more frequently for jelly, jam, relish, or any other cooked food. Wide-mouth jars are mainly used for canning vegetables and pickles and meats, because it’s easier to get the large pieces into the wide opening.
Figure 2-9:
Varieties of canning jars: wide-mouth, regular-mouth, and jelly jars.

Two-piece caps
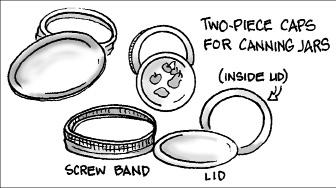
Two-piece caps consist of a lid and a metal screw band (see Figure 2-10). They’re made specifically for use with modern-day home-canning jars.
Lids:
The underside edge of the lid has a rubberlike sealing compound that softens when it’s heated. This compound adheres to a clean jar rim and creates an airtight seal after the heat-processing period. Lids aren’t reusable.
Screw bands:
The screw band holds the lid in place during the processing period and secures it in place when storing an opened jar in the refrigerator. After verifying that your cooled jars have successfully sealed (refer to Chapter 4), you remove the screw band before you store the canned food. The screw bands may be used many times as long as there are no signs of corrosion or rust and they aren’t bent or dented.
Figure 2-10:
Two-piece caps: lids and screw bands.

Mason jars
If the most commonly used glass home-canning jars bear the names of Ball and Kerr, why do we call them Mason jars? The Mason jar is named for its creator, James Landis Mason. He designed and patented a unique glass jar that uses a screw-top lid to create an airtight seal for food. This easy-to-seal jar replaced the large stoneware vessels that had previously been used for food storage.
The tapered jars we use today were introduced after World War II. They use a two-piece cap consisting of a lid and a metal screw band that fits the threaded jar top. Today, all home-canning jars are generically referred to as Mason jars. Thank you, Mr. Mason, for making the task of home-canning easy with the use of screw-top closures.
Lid wand
A lid wand (see Figure 2-11) has a magnet on one end of a heat-resistant stick. With it, you can take a lid from hot water and place it on the filled-jar rim without touching the lid or disturbing the sealing compound.
 Place your lids top to top and underside to underside to prevent them from sticking together in your pan of hot water. If they do stick together, dip them into a bowl of cold water to release the suction. Reheat them in the hot water for a few seconds before using them. Also offset the lids as you place them in the water. This keeps them fanned out and easier to pick up singly.
Figure 2-11:
A lid wand.

Thin plastic spatula
A thin, flexible plastic spatula is the right tool for releasing air bubbles between pieces of food in your filled jars (check out Figure 2-12). Buy a package of chopsticks for an inexpensive alternative.
 Don’t use a metal item or a larger object for this job because it may damage your food and crack or break your hot jar.
Figure 2-12:
A thin plastic spatula for releasing air bubbles.

Wide-mouth canning funnel
A wide-mouth funnel (see Figure 2-13) fits into the inside edge of a regular-mouth or a wide-mouth canning jar and lets you quickly and neatly fill your jars. This is an essential tool for canning.
Figure 2-13:
A wide-mouth canning funnel.

Jelly bag or strainer
A jelly bag is made for extracting juice from cooked fruit for making jelly. These bags aren’t expensive, but if you’d rather not purchase one, make your own using a metal strainer lined with cheesecloth. Use a strainer that hangs on the edge of your pot or mixing bowl and doesn’t touch the liquid. Head to Chapter 6 for instructions on making jelly.
Stoneware crocks
Stoneware crocks are available in sizes from 1 gallon to 5 gallons, usually without lids. They’re nonreactive and are used for making pickles and olives. Make sure you use only crocks that are glazed on the interior and certified free of lead and
cadmium,
a form of zinc ore used in pigments or dyes.