Electromagnetic Pulse (21 page)
Read Electromagnetic Pulse Online
Authors: Bobby Akart
Now that you’ve got everything you need, it’s time to start building:
Begin by wrapping everything you want to put in the cage in a heavy duty aluminum foil. You can add a piece of cloth before putting on the foil if the object you’re wrapping has sharp corners. Make sure you put at least two layers of aluminum foil on each item. It’s important to cover tears or holes in the foil.
Take the container you are using as the walls of the Faraday Cage and add a protection layer on the inside. Here, you can use a foam cushion or simply a cut up cardboard box. The cushion will be a better protective layer, especially if you need to grab the trash can handle in an expedited bug-out situation. If you’re not going to bang the cage against the walls, you should be fine with the cardboard box material. Make sure that you add this interior layer on the entire interior. The items inside cannot touch the walls of the container, especially if you’re using a galvanized trash can.
Place the moisture absorbent desiccant packs, and the items you want to protect, inside the container.
Secure the lid and add an extra layer of aluminum tape around the seal. The layer of tape is just to make sure that the seal is made, and there are no intrusions between the metal contacts. For the cage to work, this seal must be perfect.
A final test is recommended. Unless you are prepared to construct your own radio frequency weapon, you can’t produce an actual electromagnetic pulse to test the Faraday Cage you just built, but there are other ways to see if it is properly constructed. Place a portable AM/FM radio and turn up the volume so that it is loud. Before securing the lid in place you will still be able to hear the radio’s signal from inside the container. After everything is sealed up, the radio should lose signal. If this happens, it means your Faraday Cage will protect your electronics. You can try the test with a cell phone as well. If your phone rings while inside the sealed cage, look for holes in the container or in the aluminum foil used to wrap the items.
Now that we know how to protect our electronics, it’s time to learn a few alternative tips and techniques on how to create a Faraday Cage with materials at your disposal.
·
Use nylon stockings filled with crystal cat litter to absorb the moisture inside. It’s an inexpensive and effective alternative to make sure your Faraday Cage is moisture free.
·
Pack your items and put them in the can in the order that you are going to need them. If there are items you need to check on regularly, put them at the top.
·
You could embed a solar panel in a large Faraday cage to keep your electronics running even if the power lines are down. Some argue that a disconnected solar panel is not at risk. There is no definitive answer. Out of precaution, we shield ours.
·
Keep your devices charged, and store charged batteries.
Chapter Twenty-One
Sophisticated Shielded Rooms
Faraday Cages cannot block static or slowly varying magnetic fields, such as the Earthʹs magnetic field. To a large degree, though, they shield the interior from external electromagnetic radiation, if the conductor is thick enough and any holes are significantly smaller than the wavelength of the radiation. For example, certain computer forensic test procedures of electronic systems that require an environment free of electromagnetic interference can be carried out within a screened room. These rooms are spaces that are completely enclosed by one or more layers of a fine metal mesh or perforated sheet metal. The metal layers are grounded to dissipate any electric currents generated from external or internal electromagnetic fields, and thus, they block a large amount of the electromagnetic interference.
Shielded room
An ideal Faraday Cage or a shielded room is a sort of a metal box without any openings. Naturally, we need some openings for entering the shielded room, allowing for cable duct, and openings for vent and cooled air, etc. These aspects of a Faraday Cage relate to the cage’s attenuation—which refers to the reduction in strength of an EMP wave as it attempts to enter the cage.
Shielded rooms are constructed in two optional methods in order to function as a Faraday Cage:
·
A modular room with prefabricated 1‐2mm steel plates which are collected and assembled on site with EMP‐gaskets between all elements. This type gives very high attenuation and shielding effectiveness. It is also the most expensive option.
·
ʺThin plateʺ construction; on-site built shield with 26-gauge steel plates covering all room surfaces. This can be constructed on a DIY basis and gives a fairly high shielding effectiveness.
Both types of construction comply with most common regulatory attenuation requirements for civilian purposes. The shield itself must be constructed of an electric conductive material. Typically, thin galvanized steel plates are used, but in some cases, other metals like copper or brass foil are suitable. You can purchase 26-gauge steel sheets from your local steel fabricator or metal roof supplier.
Doors and Entryways
Doors in this type of shielded room are specially designed with high EMP attenuation performance. The door frame and leaf have a special EMP gasket for sufficient coupling and good sealing effect. An EMP proof door is expensive. There are DIY alternatives, but the cost of the door will be one of the biggest expenses of your shielded room.
There are two different types of such doors;
·
High performance, EMP shielding door with knife frame and copper finger gasket. They cost thousands of dollars.
·
A slightly less robust door designed like the lid of a Faraday Cage.
Option one is a professionally designed
shielding door
filled with special shielding materials to protect devices and human beings from invisible radioactive rays, electromagnetic waves, and microwaves. Depending on the purpose or use, the shielding door is categorized into
radiation shielding doors
which are installed in X-ray rooms, nuclear medicine rooms, Radioactive Isotope laboratories, or the radioactivity control rooms of industrial facilities, and
electromagnetic wave shielding doors
which are installed at magnetic wave shielding compartments, protecting medical instruments in hospitals or MRI rooms.
The electromagnetic wave shielded door protects a particular space against Radio Frequency or Conducted Noise which occurs due to unnecessary electromagnetic waves and hinders strong electromagnetic waves generated from an EMP. The conventional purpose of an electromagnetic wave shielded door is to protect devices at hospitals or laboratories from electromagnetic waves. They also are designed to withstand a high-altitude EMP attack.
Option two is to use a solid, pre-hung and fire-rated steel door with a steel welded frame. These can be purchased at any home improvement store for less than a thousand dollars. Cracks or openings should be filled with an EMP gasket and for added protection, the door frame and door handles should be sealed with aluminum foil tape when not in use.
We suggest a metal knit EMP shielding gasket which consists of a layer of knitted electrically conductive metal wires over a low-closure-force rubber or elastomer core. For heavy duty applications like an EMP, or for high temperature fire-proofing, the gasket is sometimes combined with an environmental seal.
These knitted wire mesh gaskets, available online, provide a cost-effective solution to high-shielding performance from an EMP. If you choose the all-metal knitted mesh or knitted metal mesh over an elastomer core, the door can be opened and closed frequently, as the gasket will allow recovery after compression. When combined with the pre-hung all steel entry door, you have a single entry system for roughly $1,200.
Single Entry Cabling and Ductwork
All cabling and ductwork for a cooling system is usually fed through the walls of the shielded room in one cable duct called the
Single Entry
. By reducing the number of cable entries to one, you can minimize the potential for low-frequency or high-frequency intrusion.
There are two types of Single Entry Cabling and Ductwork:
·
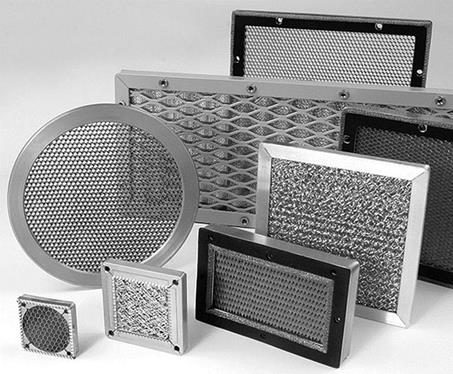
A honeycomb shielding vent panel can be directly welded to your shielded steel walls. These are available online for under $200.
·
Cable glands with mesh tube sealing; mounted directly on the shield wall. There are two types with different performances: a military grade that is outside of most budgets, and an industrial electromagnetic compatibility, or EMC glands. A single entry EMC gland plate is available online for around $200.
The EMP shielding vent panels consist of either a rectangular or a circular frame with a honeycomb structure inside. The honeycomb vent is series of hexagonal ʺtubesʺ that acts as a waveguide, guiding electromagnetic waves in/out of the shielded room and blocking the airflow. The airflow is led nearly unobstructed through the honeycomb while the electromagnetic pulses are stopped effectively.
Chapter Twenty-Two
Shielded Cables, Cabinets and Accessories
Electrical cables
As discussed in the prior chapter, all electric cables must be shielded when installed through a shielded room. This is an absolute requirement. Cables and wires act as an antenna during a geomagnetic storm event. Unshielded cables penetrating the shield will act as unwanted antennas and destroy the shield’s effectiveness. Poorly shielded cables will cause serious leakages and damages of the internal installed equipment in the shielded room in the event of a HEMP.
Be aware that some high quality, but less recommended cables are available . Some manufacturers advertise and promote their shielded cables as
EMC
, without disclosing that some of these are not recommended for EMP protection. Quad-dense, braid/mesh shield or a mesh/foil shield is highly recommended, such as this cabling:
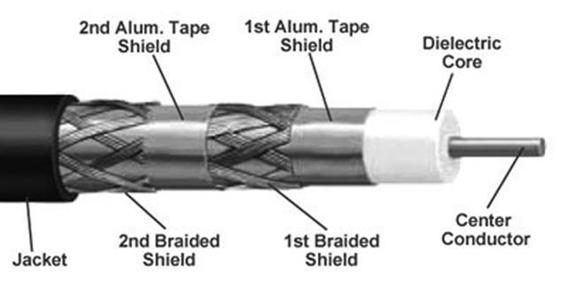
Shielded telephone wire is also suggested:
