Authors: Charlie Cascio
Esalen Cookbook (7 page)
Makes one 9-inch loaf
⅓ cup sourdough starter (see page 23)
2 cups lukewarm water
2 cups unbleached bread flour
2½ cups spelt flour
1½ tablespoons sea salt
1 cup raisins
¼ cup chopped walnuts
In a mixing bowl, whisk the starter and water together, and then whisk in the unbleached bread flour. Place in a warm, draft-free spot for about 10 minutes. Then knead the spelt flour and salt into the dough for 8 minutes. Add the raisins and walnuts and knead for a few minutes to incorporate. Cover with a kitchen towel and let sit for 6 to 12 hours in a warm, draft-free spot. The longer you let the bread raise, the more sour the bread will be.
Place the dough on a lightly floured work surface and knead it for 2 minutes. Put the dough into an oiled 9-inch bread pan, cover, and place in a warm, draft-free spot for another 2 to 3 hours. Bake in an oven preheated to 350 degrees F for about 50 minutes. There are two methods to test if the bread is done: One method is to place a thermometer in the bread—doneness is 190 degrees F interior temperature. The other method is to take the bread out of the pan and thump it with your fingers. The bread should have a hollow sound. When the bread is finished baking, remove it from the pan and place on a wire rack to cool.
HONEY WHOLE WHEAT BREADIf you have visited the bread bar at the Esalen dining lodge, you have probably come across this basic whole wheat bread. It is one of our staples, and every baker will use this recipe or a variation of it.
Makes 2 loaves
2½ cups warm water
¼ cup honey
1 tablespoon active dry yeast
3 tablespoons vegetable oil
1 cup dry powdered milk
1 tablespoon sea salt
6-8 cups whole wheat flour
Place the warm water in a mixing bowl; it should be barely warm to the touch. Pour in the honey and gently whisk in the yeast until both the honey and yeast have dissolved. Put bowl in a warm, draft-free spot until the yeast “blooms,” or forms a thick foam on the surface.
Mix in the oil, powdered milk, and salt. Stir in the flour, a cup at a time, until the dough becomes too stiff to stir, and then work the dough with your hands. Keep mixing in the flour with your hands until the dough starts to hold together in a ball and does not have a sticky feel when you touch it. Place the remaining flour on a kneading surface and drop the dough onto the kneading surface. Let the dough rest for 5 minutes.
Kneading the remaining dry flour into the wet dough is a very relaxing experience. Knead at least 10 minutes, or until the dough is smooth, firm, and elastic. To knead, push the dough away from you with the heel of one hand, and then fold it back over and toward you with the other hand. Turn the dough a quarter turn and repeat the process. This will stretch and develop the gluten. When the dough forms a smooth dough ball and stops taking up the flour, the kneading process is completed. (Another sign the dough is ready is that it springs slowly back into place when you poke it with your finger.)
Return the dough to the mixing bowl, cover with a clean kitchen towel, and place in a warm, draft-free place for about 1 hour or until the dough has doubled in size. Take it out of the bowl and knead for about 2 minutes more. Then divide the dough in half, shape into loaves, and place into 2 oiled bread pans. Cover and return pans to the raising place and let raise for about 40 minutes or until the dough has doubled.
Bake in a preheated oven at 350 degrees F for 40 minutes to 1 hour. There are two methods to determine when the bread is done: You can place a thermometer into a loaf; it should read between 190 to 200 degrees F. Or you can take a loaf out of the oven and tap it with your fingers on the bottom. It should have a hollow sound. When bread is done baking, remove it from the oven and cool on a wire rack.
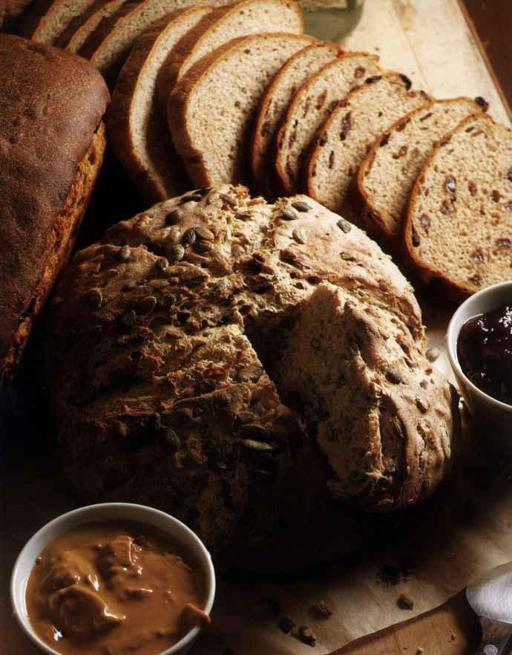
Semolina Sourdough Bread
This is a true sourdough bread, but because of the semolina flour it doesn’t have a dense texture like most sourdough breads. The pumpkin and sunflower seeds give it a nice crunch.
Makes one 9-inch loaf
2 cups lukewarm water
⅓ cup sourdough starter (see page 23)
1¼ cups unbleached bread flour
3 cups semolina flour
1 teaspoon salt
¼ cup pumpkin seeds
¼ cup sunflower seeds
In a large bowl, whisk the water and sourdough starter together, and then whisk in the bread flour and let it sit in a warm, draft-free spot for 10 minutes. Stir in the semolina flour and the salt and knead for 8 minutes.
Knead the seeds into the bread and cover with a kitchen towel. Let the dough sit in a warm, draft-free spot for 6 to 12 hours. The longer the bread is left to raise, the more sour the taste will be.
Lightly flour a work surface and knead the dough on it for 2 minutes; then place the bread into an oiled 9-inch bread pan and leave to raise for another 2 to 3 hours. The dough should raise another 70 percent of its original size. Bake in a preheated oven at 350 degrees F for approximately 50 minutes. There are two methods for testing if the bread is done: You can place a thermometer into the bread—doneness is 190 degrees F. Or you can take the bread out of the pan and tap the bottom with your fingers. It should sound hollow. When bread is finished baking, remove it from the pan and let cool on a wire rack.

BREAKFASTS
BISCUIT-MAKING TECHNIQUESAfter making several thousand biscuits, I’ve concluded good biscuits are more a result of technique rather than recipe. In a nutshell, the technique is to minimize the handling of the ingredients at all stages. The key steps are as follows:1. Butter handling: Grating frozen butter is a simple and efficient way to get it to almost the right size for biscuit making. The process of integrating butter into the flour mixture by hand then quickly completes the job and the butter remains chilled.2. Liquid incorporation: Combining the wet and dry ingredients is less about “kneading” than just forming the dough into a coherent mass.3. Biscuit cutting: Using a sharp-edged cutter leads to higher and more even raising of biscuits. Also, cut straight down; twisting the cutter can lead to uneven raising.
Bill Herr has done many jobs in the Esalen kitchen, from dishwasher to manager. He is an excellent baker and will always be known as Esalen’s best biscuit maker. Here, in his own words, is some of Bill’s biscuit talk: “Being raised in Texas, I got my share of biscuits and gravy as a kid. This made me aware of the amazing variety of what passes for a biscuit. When I first made biscuits in the Esalen kitchen, I got the first of several lessons in the difference between making a dozen and making 2 0 dozen. The one constant though is remembering to handle the dough gently.”
Makes 16 biscuits
3 cups unbleached all-purpose flour
2 tablespoons non-aluminum baking powder
½ teaspoon baking soda
1 teaspoon salt
6 tablespoons unsalted butter, frozen
1 cup buttermilk
Melted butter for brushing tops (optional)
Buttermilk for brushing tops (optional)
Combine the first four dry ingredients and mix well.
Grate frozen butter through large holes in grater. Very briefly, work butter into flour mixture by hand until the butter pieces are pea-sized. Make a well in the center of the dry ingredients and add the buttermilk. Combine just until the ingredients are moistened.
Turn out onto lightly floured board and form dough into a disk about 12 inches in diameter, kneading the dough only 3 or 4 times to bring it together. Cut the biscuits by pressing the cutter straight down. Don’t twist the cutter through the dough. Cut the biscuits so as to minimize the excess dough or “scrap.” For crispy-sided biscuits, place them 1 to 2 inches apart on an ungreased baking sheet. For soft-sided biscuits, place them only about 1/2 inch apart.
For a golden glaze, brush biscuits with melted butter. For a more brown crust, brush them with buttermilk. Bake for 12 to 15 minutes in an oven preheated to 425 degrees F.
FRUIT GLAZEFor a simple sweet glaze, top each biscuit with a sugar cube briefly soaked in fruit juice concentrate.
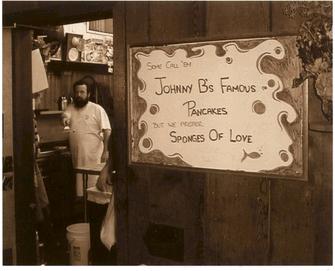
John Blunt has been working in the Esalen kitchen for the last 7 2 years, holding staff chef and manager positions during that time. Sponges of Love Pancakes is by far one of the best remembered breakfast recipes coming out of the Esalen kitchen. When asked about this recipe, here is what John said: “I was encouraged by the staff to serve pancakes for breakfast. I wanted to create a light, fluffy pancake and so I started to experiment on my Monday morning breakfast shift. It took me about 15 tries before I had the current recipe down. I wanted to call the pancakes Moon Cakes, because I served them on the day of the moon, Monday. But the staff gave them the name that has stuck today: Sponges of Love. The name came about because people loved how the pancakes soaked up the butter and maple syrup like a sponge. One of the staff members calculated that I’ve served approximately 300,000 pancakes since I started flipping them on the Esalen griddle.”
Makes 8 to 10 (6-inch) pancakes
4 cups unbleached all-purpose flour
¾ teaspoon sea salt
4 tablespoons non-aluminum baking powder
4 eggs
¾ cup vegetable oil
3 cups buttermilk
1 cup water
Sift the flour, salt, and baking powder into a 3-quart mixing bowl. In another mixing bowl, whisk the oil and eggs until well blended; then stir in buttermilk and water. Stir as you pour the wet ingredients into the dry ingredients. Mix only until the batter is blended. Don’t overmix.
Other books
The Killer Inside by Lindsay Ashford
MacRoscope by Piers Anthony
Grounded by R. K. Lilley
Murder Among the Angels by Stefanie Matteson
Deadly Diamond: A Murfy the Cat Mystery by Anna Kern
Hive III by Griffin Hayes
Christmas at Lilac Cottage: (#1 White Cliff Bay) by Martin, Holly
Stolen Kisses (Leap of Love Book 2) by Powers, Paige
Murder in the Palais Royal by Cara Black