Everyday Play (8 page)
Authors: Christy Isbell
More Fun!
Simon Says
More Fun!
Bead Jewelry
More Fun!
Make Your Own Lacing Cards
Tambourine
Beauty Salon and Barber Shop
More Fun!
Kite Flying
More Fun!
Making a Collage
More Fun!
Polka-Dot Shapes
More Fun!


• Encourage your child to use chalk to write your names on the shadows.
• Bring buckets of water and paintbrushes out to the sidewalk. Your child can make the shadows disappear by painting them with water.
Encourages your child to learn directional terms needed for writing and improves coordination
What You NeedNo materials needed
What to Do• Teach your child the rules of “Simon Says.”
• Play the part of Simon and give commands that include directional terms including up, down, under, and on top. For example:
• Simon says, “Put your hands UP in the air.”
• Simon says, “Put your feet UNDER your chair.”
• Simon says, “Put your chin ON TOP OF your hand.”
• Consider adding “left” and “right” terms to the game. Most four-year-olds have trouble differentiating between “left” and “right” so you should model the commands to help your child be successful. Stand with your back to your child and make the motions as you describe them. This will help him follow the directions.
Gives your child experience with stringing items, develops her bilateral hand skills, and improves her eye-hand coordination
What You Needvariety of small beads (½” diameter or smaller) | plastic thread | non-skid plastic drawer liner cut into a place mat-sized rectangle | child-safe scissors
What to Do• Place beads on the non-skid mat so that the beads will not roll away.
• After your child decides if she wants to make a bracelet or a necklace, give her child-safe scissors to cut the thread to the appropriate length. Help your child cut the thread, if necessary.
• Tie a knot in the end of the thread.
• She can string the beads to create a masterpiece.
• Help her tie the two ends of the thread together when she finishes stringing the beads.
• Challenge your child to make a repeating pattern with the beads.
• Place the beads on the non-skid mat and help her plan a pattern before stringing the beads. Talk with your child about the patterns.
Develops your child’s eye-hand coordination and his confidence in using tools
What You Needold greeting cards | child-safe scissors | 1-hole punch | yarn or string | duct tape
What to Do• Set out the child-safe scissors and old greeting cards and invite your child to choose one of the cards. Show him how to cut the card along the fold, so that he ends up with two pieces that are the same size.
• Show him how to use a 1-hole punch, and ask him to punch holes around the edges of the cards.
• Measure out a length of yarn that will cover the card, with a bit left over. Cut the yarn and cover one end with a piece of duct tape to make a tip. Your child may need help with some, or all, of this step.
• Encourage him to lace the yarn through his card.
Develops your child’s lacing skills and her ability to use various tools to create objects
What You Needpaper plates | fingerpaints, or paints and brushes | buttons | stapler | 1-hole punch | spoon | yarn and large markers or crayons
What to Do• Give your child two paper plates and invite her to decorate the bottoms of the plates with fingerpaints or paints and brushes.
• Help your child staple the decorated paper plates together, keeping the staples around the outside, but leaving approximately 1” along the edge for hole-punching. Leave a 2” opening at the top of the plates for filling.
• Help her use a spoon to put buttons inside joined plates, and assist her in stapling closed the remaining opening at the top.
• Encourage your child to use the 1-hole punch around the outside edge of the plate (beyond the staples so that buttons cannot fall out).
• Give her a length of yarn with a large knot at one end and she can lace up the tambourine.
• Tie off the end of the yarn and trim the excess, when finished (adult-only step).
• Turn on music or sing and shake the tambourine to the beat or have a parade!
Improves your child’s bilateral hand skills
What You Needlarge male and female dolls with hair | hairbrushes, combs, and curlers | foam soap and craft sticks for shaving | various decorative hair items such as clips, barrettes, rubber bands, and hair bows | cotton balls, cotton swabs, and makeup brushes or small paintbrushes
What to Do• Has your child ever been to a salon or barber shop? If so, ask him if he can tell you what types of things happen there. You may expand on your child’s ideas about the salon or barber shop by talking about different services that barbers and salon employees provide.
• Set out the various materials and encourage your child to use them to style his doll’s hair or pretend to cut it.
• Help him learn the correct ways to use the grooming tools.
• Add play money to the area so the dolls can pay for his services. Your child can manipulate, count, and sort the coins and paper money.
Develops your child’s eye-hand coordination
What You Needthick paper, such as oak tag, card stock, or construction paper | yarn or string | stapler, 1-hole punch, and tape
What to Do• Show your child what a large diamond shape looks like.
• Then, ask her to draw two large diamond shapes (as close to the same size as she can) on her paper to cut out.
Note:
Many four-year-olds will draw a square or shape other than a diamond, which will work fine for this project.
Many four-year-olds will draw a square or shape other than a diamond, which will work fine for this project.
• Show her how to put the matching “diamonds” together using a stapler or tape.
• Help her cut a piece of yarn or string for the kite tail and punch a hole at the bottom of the kite.
• Invite your child to thread the yarn through the hole and help her tie a knot to secure it.
• Next, help her cut another piece of string to fly the kite with. Punch a hole at the top of the kite, thread the yarn through the hole, and tie a knot.
• Encourage her to hold onto the kite string and run around to “fly” her kite inside or outside.
• Set out markers and other materials for her to decorate her kite.
Gives your child experience using scissors, and
experimenting with various materials
What You Needexperimenting with various materials
variety of materials to cut or tear, including construction paper, greeting cards, junk mail, foil, tissue paper, wrapping paper, and newspaper | poster board or oak tag cut in half- or quarter-pieces | glue sticks and school glue | child-safe scissors
What to Do• Talk to your child about how to make a collage.
• Set out the various materials and encourage him to choose, cut and tear, then glue the materials to the poster board or oak tag to make his own collage.
• Find a prominent place to display the collages that he makes.
• Provide collage items that do not need to be cut, such as cotton balls, small pom-poms, felt scraps, pieces of yarn, and ribbon.
Gives your child experience cutting with scissors and
improves her grasp strength
What You Needimproves her grasp strength
construction paper cut in half, 5” x 7” index cards, or 5” x 7” cardstock | marker | 1-hole punch
What to Do• Using a marker, draw a large shape (at least 4” across) on a piece of paper. Make sure the lines of the shape are close to the edges of the paper.
• Show your child a 1-hole punch and how to use it, and then have her try it herself.
• Encourage her to punch holes along the edge of the shape.
• Use the hole punch to create simple lines or letters.
• Use the “polka-dot shape” as a template. Show your child how to place the “polka-dot shape” on another piece of paper and use markers to color in each hole. Lift the template to see the shape. Connect the dots to form the shape.

Chapter 5
I’m Ready for Kindergarten!
Your five-year-old is becoming more confident in her ability to use tools and materials like scissors, tape, glue, and hole-punches. As she reaches her sixth birthday, she may have established a consistent grasp pattern that she will use for holding writing utensils and for self-care tasks. During the year, she may also develop a growing interest in writing as a form of self-expression, learning how to write her name and other letters of the alphabet that are relevant to her, such as letters for the words “mom” and “dad.”
At age five, your child may be interested in learning how to:
• Draw a person with facial features, limbs, and other details (proportions are unrealistic)
• Build steps with small blocks
• Imitate drawing a diamond shape
• Write his first name and a few letters (may include letter omissions and/or letter reversals—letters may not be in a straight line)
• Create symbolic representations of objects with clay or playdough (may not resemble the real objects)
• Create symbolic representations of objects through drawing or painting (may not resemble the real objects)
• Sign and label drawings (may include inventive spelling, letter omissions, and/or letter reversals)
• Lace shoes
• Use a knife to spread/apply butter, jelly, and so on
• Put together puzzles of at least six pieces
• Use scissors to cut out small shapes and various designs (approximately 1” across)
• Use scissors to cut non-paper materials such as yarn or tape
• Use tools such as glue stick, 1-hole punch, stapler, and tape, with little supervision
• Button/unbutton smaller buttons
• Snap/unsnap simple fasteners
• Use his fingers to act out fingerplays that require isolated finger movements, as in, “Where Is Thumbkin?”
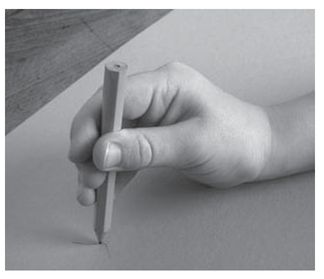
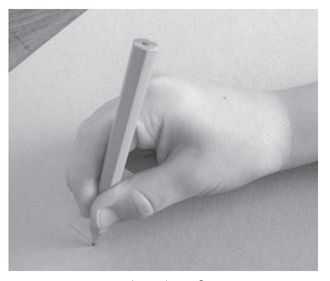
• Use dynamic tripod grasp (holds tool with tips of thumb, index, and middle fingers; ring and pinky fingers bent) or quadripod grasp (holds tool with tips of thumb, index, middle, and ring fingers, with pinky bent) when using writing utensils

Quadripod grasp

Other books
MASON (Second Chance Novels Book 2) by Michaels, Kemmie
The Whole Golden World by Kristina Riggle
The Abstinence Teacher by Tom Perrotta
Tango: The Tale of an Island Dog by Eileen Beha
Anton and Cecil by Lisa Martin
World Of Shell And Bone by Adriana Ryan
Jaded Touch (Vesper) by Sarina, Nola
Other People's Heroes (The Heroes of Siegel City) by Petit, Blake M.
Ricky's Business by Ryan Field
Her Stolen Past by Eason, Lynette