Foundation Game Design with ActionScript 3.0, Second Edition (30 page)
Read Foundation Game Design with ActionScript 3.0, Second Edition Online
Authors: Rex van der Spuy
Figure 3-19
. Load the image path into the backgroundLoader.
We've seen a method before in this book. Do you remember this line of code from
Chapter 1
?
trace(“Hello World! Can you read this?”);
trace is a method. It used the words in the parentheses that followed it to display that text in the Console window. Look for lower case words followed by parentheses and you'll have spotted a method!
ThebackgroundLoaderis a temporary storage container for files you want to load into your program. It's a necessary step for loading files, but it's not really much use as is. Let's make the image file more useful by adding it to our background Sprite.
background.addChild(backgroundLoader);
backgroundis a Sprite object. Sprite objects are things that you can actually see on the stage. Most of the programming you'll do in your games will be about controlling Sprite objects. You can think of a Sprite as a box than contains an image and moves around the stage.
Sprite objects have a method calledaddChild. If you think of the Sprite as a protective parent, whenever you useaddChildyou're giving the Sprite something to take care of. In this caseaddChildis adding the contents ofbackgroundLoaderto thebackgroundSprite. What is the content ofbackgroundLoader? It's our image.
Figure 3-20
illustrates how this line of code works.
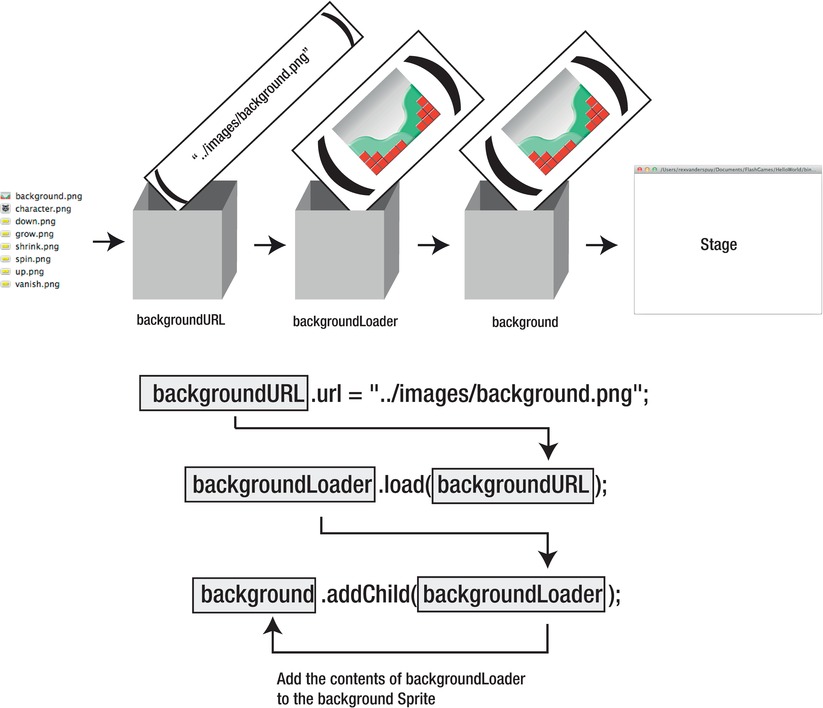
Figure 3-20
. Use the addChild method to add the image from the Loader to the background Sprite.
The image is now safely under the parental care of the background Sprite object, but we can't see it on the stage yet. That's the job of the last new line of code we wrote:
stage.addChild(background);
AS3.0 has a built in object calledstage. Whenever you use the stage.addChild() method, whatever is inside the parentheses will be displayed on the stage (as longs as it's aSprite,MovieClip, orBitmapobject.)
WhataddChildhas done in this line of code is take thebackgroundSprite object and add it to something called the
display list
. Any instances that are on the display list are visible on the stage. We can now see our background image… yay!
Figure 3-21
shows how this final hurdle in our little game of leapfrog results in a visible image.
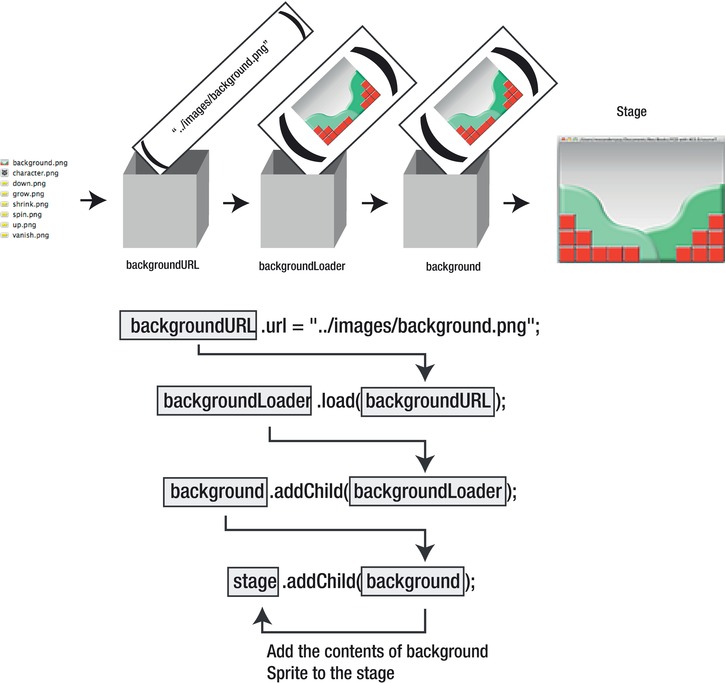
Figure 3-21
. In the final step, use addChild to add the image from the background Sprite to the stage.
You can see from
Figure 3-21
that it's really just a question of shuffling the image from one object to the next until it ends up on the stage. A little later in this chapter I'm going to show you some shortcuts to combine some of these steps together so you have much less typing to do. But for now, get to grips with this system because it clearly exposes the underlying mechanics of how variables become objects, and how objects are used to make things happen.
The structure that we've been using to write this code is identical to the structure we used in the HelloWorld project from chapter one. All of our code blocks are there: the package, the class definition, and the constructor method. We've been writing our code into this structure. Take a good look at the code you've written so far and see if you can spot the structure.
We've written certain bits of code into certain blocks. If you understand why, the program will start to make much more sense to you. Here's what code should appear in which block:
- The package block
: import statements and the SWF metatag. This is basic configuration that the program needs to run. - The class definition block
: Here's where you declare your variables and objects. These are all the things that you're going to make that you want to use in your program. - The constructor method block
: Here's where you make and do things to set up your game. All the fun starts here!
We're going to be adding many more blocks of code to our program, but they'll all be built on this basic structure. In fact, every AS3.0 game and program you ever write will use this basic structure.
Figure 3-22
illustrates this.
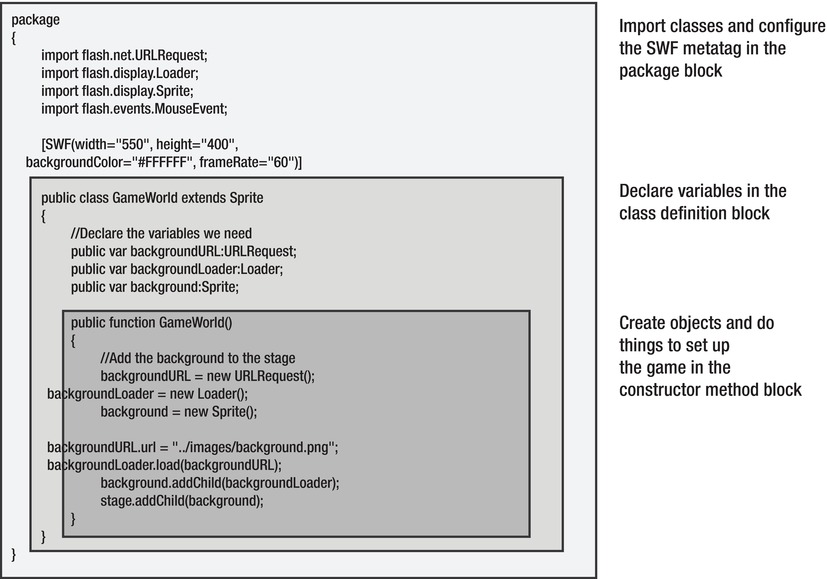
Figure 3-22
. The basic structure of an AS3.0 program
We have a total of seven images that we need to add to the stage. We're going to use exactly this same model to add the rest of them. Let's add the game character next.
Carefully add the following lines of code in bold to the class definition, just after the previous code we wrote:
public class GameWorld extends Sprite
{
  //Declare the variables we need
  public var backgroundURL:URLRequest;
  public var backgroundLoader:Loader;
  public var background:Sprite;
  //Character
  public var characterURL:URLRequest;
  public var characterLoader:Loader;
  public var character:Sprite;
  public function GameWorld()
  {...
Now add these new lines of code in bold to the constructor method, just after the code you added in the last section.
public function GameWorld()
{
  //Add the background to the stage
  backgroundURL = new URLRequest();
  backgroundLoader = new Loader();
  background = new Sprite();
  backgroundURL.url = "../images/background.png";
  backgroundLoader.load(backgroundURL);
  background.addChild(backgroundLoader);
  stage.addChild(background);
  //Add the character to the stage
  characterURL = new URLRequest();
  characterLoader = new Loader();
  character = new Sprite();
  characterURL.url = "../images/character.png";
  characterLoader.load(characterURL);
  character.addChild(characterLoader);
  stage.addChild(character);
}
You should see that this code is exactly the same as the code that we used to display the background. Its function is identical. The only differences are the variable names and the file path to the image. I've just replaced “background” with “character” for all the names.
Compile the program and you should see that your game character now appears at the top left corner of the Flash Player window, as you can see in
Figure 3-23
.
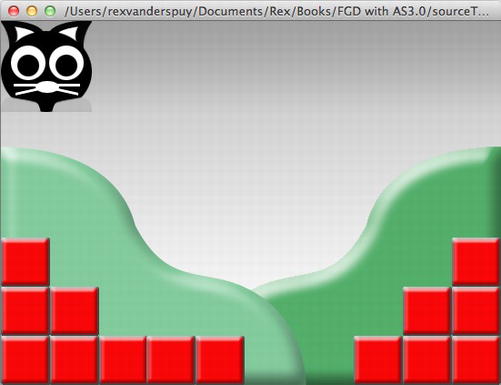
Figure 3-23
. Add the game character to the stage.
When you add objects to the stage, the objects you added last always appear above the objects you added first. This is called the
stacking order
, and you'll learn much more about how to control it in
Chapter 9
My cat character looks pretty cute sitting up there, but let's use some AS3.0 code to move it down to the center of the stage.
The stage is 550 pixels high and 400 pixels wide. We know that because those are the values we entered in the SWF metatag.
[SWF(
width="550", height="400"
,
backgroundColor="#FFFFFF", frameRate="60")]
What this means is that the stage is really just a 550 by 400 grid of pixels. The top left corner is position 0. When you add a Sprite to the stage, it always adds it at position zero, as you can see from
Figure 3-24
.
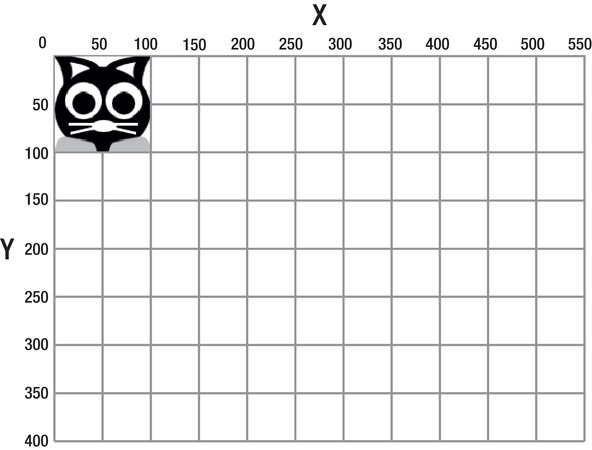
Figure 3-24.
The stage is a grid of pixels.
The horizontal position on the grid is referred to as X, and the vertical position is referred to as Y. You can refer to any position on the grid by referring to its x and y coordinates. For example, if you want to refer to the very center of the grid, you can describe it like this:
x = 275
y = 200
Figure 3-25
illustrates this.
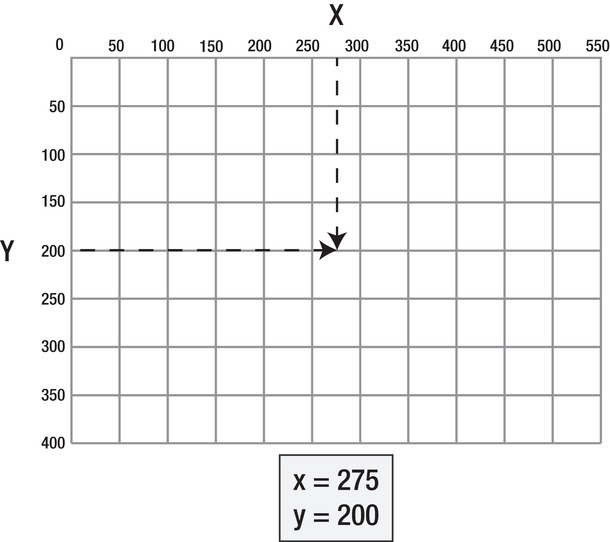
Figure 3-25
. Describe any point on the grid with an x and y coordinate.
We can move the character to the center of the stage by writing code that looks like this: