Foundation Game Design with ActionScript 3.0, Second Edition (59 page)
Read Foundation Game Design with ActionScript 3.0, Second Edition Online
Authors: Rex van der Spuy
But before you do go much further into this book, let's take a closer look at just what makeshitTestObjecttick. This must be said, dear reader:hitTestObjectholds a deep, dark secret that will cripple your games if you don't understand it.
How does AS3.0 actually know that two objects are touching? All display objects (objects you can see on the stage) are surrounded by imaginary rectangular boxes called bounding boxes. The
bounding box
defines the area of the object thathitTestObjectchecks for a collision. The bounding box is invisible, but it's there.
Figure 6-14
shows you the bounding boxes of the objects from the previous example

Figure 6-14.
Bounding boxes define the areas of an object that are sensitive to a collision.
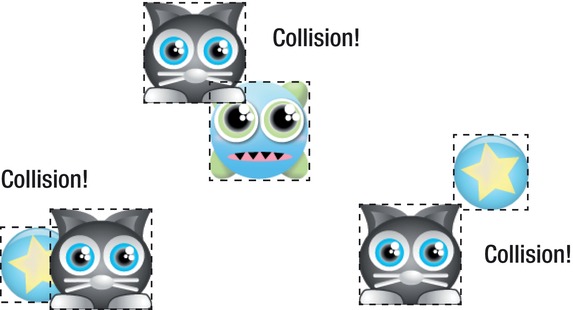
A collision is detected whenever any portion of the bounding box intersects with any portion of another object's bounding box.
Figure 6-15
shows some examples.

Figure 6-15.
Collisions are detected when bounding boxes touch or intersect.
This is all fine if the objects are square-ish or rectangular, but what if they're not? Have a good look at
Figure 6-15
: one of these collisions is not like the others! The bounding boxes of the third collisions overlap, even though the actual objects themselves don't touch. You can see this clearly in
Figure 6-16
.

Figure 6-16.
The bounding boxes determine a collision even if the images that represent the shape of the object aren't touching.
To be fair, this is not a problem withhitTestObject; its job is to check for collisions between the bounding boxes of two objects. That's just what it does. If it's not working for you, you need to decide whether you want to modify the structure of your game and objects so that it starts working or find another way of doing collision detection.
There are many other ways to do collision detection without usinghitTestObject, but let's look at some of the advantages it has over more complex methods and how you can make it work in your games.
There are two great things abouthitTestObjectthat make it the favored first choice for doing collision detection: it is easy to understand, easy to implement, and puts very little strain on the CPU or Flash Player. In game design, in which performance considerations can dictate many design decisions, this last reason alone is enough to spur you on to see how much mileage you can wring out of the humblehitTestObject.
So, can you usehitTestObjectand still make it work reasonably well for irregularly shaped objects?
Let's take a look at a few solutions.
The first solution, which is not really a solution at all, is to design your game according to the constraints thathitTestObjectimposes on you. Limitations can be an enormous strength in the same way that writing poetry according to the rules of a sonnet can be a strength. They can help you focus and streamline your design'just ask Shakespeare!
If you know thathitTestObjectworks best with square or rectangular objects, design your objects accordingly.
Have a look at the cat and monster game characters that are used in the examples in this chapter. They're both square shaped, but you wouldn't know that unless you actually saw a square outline traced around them. They've been designed so that most of the edges and corners meet the edges of the grid square in which they were designed. This means that there are very few places in which the shape of the character doesn't fill the bounding box, so the shapes of the objects almost always overlap when a collision occurs.
However, what do you do in the situation shown in
Figure 6-16
where the corner of a square-ish object intersects the corner of a round-ish object? There are a few spots on both of these objects where a collision will be detected even if the visible shapes don't overlap.
Isn't this the fatal Achilles heel in the whole system? Not if the objects are moving fast enough, and in most games they will be. The empty gap between the edge of the round star isn't more than about 5 pixels at its maximum. Remember that the character object in these examples is moving at the rate of 5 pixels every 1/60th of a second. That's really fast. It's so fast, and the gap is so small, that no one playing the game will ever notice that the collision isn't accurate.
Of course, if the objects are moving slower, you'll have a problem. But the point of this section is this: design your game so that it's
not
a problem. Make your objects short and stout, and make them move reasonably quickly. If you can do that,hitTestObjectwill be all you'll ever need.
Have a look at some of your favorite 2D games. Isn't it funny that all the characters and objects seem to be sort of plump and square-ish? They're dealing with exactly the same constraints you're dealing with here. Welcome to the video game designer's club!
The simplest way to improve collision detection usinghitTestObjectis to create subobjects inside the main object and use them to check for a collision.
Let's stick with the problem of collision between the square-ish cat and the round star. You could greatly improve the collision detection between them if you created a smaller rectangular object
inside
the cat Sprite that defined the collision area. You could give this subobject the instance namecollisionArea.
If you used it withhitTestObjectin an if statement, it might look something like this:
if(collisionArea.hitTestObject(star))
{
  //Collision directives…
}
Of course, you'll have to set the visible property of thecollisionAreasubobject tofalseso it will be completely transparent. You don't want to see it; you just want to use its shape inside the main object to define the collision area.
You'll find a working example of just such a system in the SubObjects project folder in the chapter's source files.
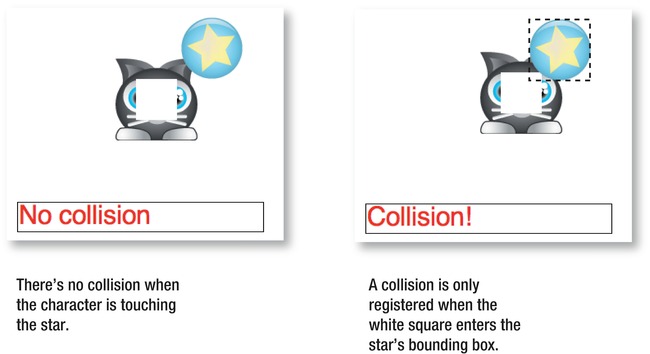
Figure 6-17
shows what you'll see when you run the SWF file. In the center of the cat is a small white square. It follows the cat everywhere it goes on the stage. When the image of the cat touches the star, there's no collision. But if the white square touches the star, a collision is registered. The white square is a child object of the cat and is the collision area that's used to determine whether a collision has occurred.

Figure 6-17.
Use a subobject to create a collision area inside the main object.
You could make a PNG image file of a square, embed it into your program, and useaddChildto make it a subobject of your character. That would work, and it's the same principle you used when you made the star a child object of the character in the previous example. However, for making simple shapes, AS3.0 has a better way. AS3.0 has built-in class calledShapethat lets you draw basic shapes on the stage. This example uses theShapeclass to draw a square using AS3.0 code and then adds that square to the character as a subobject. The collision detection code then checks for a collision between the square and the star, not the character and the star.
Here's how the code in the SubObjects example program works. First, it imports theShapeclass.
import flash.display.Shape;
The code then creates aShapeobject calledsquarein the class definition.
public var square:Shape = new Shape();
ThecreateGameObjectsmethod has the job of drawing the white 50 by 50 pixel square and adding it to the character Sprite.
square.graphics.beginFill(0xFFFFFF);
square.graphics.drawRect(0, 0, 50, 50);
square.graphics.endFill();
character.addChild(square);
square.x = 25;
square.y = 25;
It also centers the square inside the character Sprite by giving it an x and y position of 25.
The job of drawing the square is done by AS3.0's graphics package, which can be used by any Shape or Sprite objects. The code first uses thebeginFillmethod to choose a color for the square.square.graphics.beginFill(0xFFFFFF);
You can use any hexadecimal color code in its parentheses.0xFFFFFFis the hex code for white.
The next bit of code uses thedrawRectmethod to draw the square.
square.graphics.drawRect(0, 0, 50, 50);
The first two arguments, 0 and 0, determine by how much the shape should be offset from the top left corner. You don't want any offset, so these are set to 0. The second two numbers, 50 and 50, are the width and height of the square, in pixels. This is exactly half the size of the character object, which is 100 x 100 pixels. You can use thedrawRectmethod to draw any sized rectangle.
The last bit of drawing code uses theendFillmethod.
square.graphics.endFill();
It basically means, “We're done now, so stop filling the shape with color.”
These three lines of code have drawn a white 50 by 50 pixel square. The next bit of code adds the square to the character Sprite and offsets its position inside the character by 25 pixels from the top left corner. That neatly centers it.
character.addChild(square);
square.x = 25;
square.y = 25;
You can see the effect of this code in
Figure 6-18
. Charming!
