Good Cook (4 page)
Authors: Simon Hopkinson
serves 2
for the dill salting mixture
3 tbsp sea salt
1 tbsp dill seed
2 tsp sugar
for the cucumber
1–1½ cucumbers, cut into thick (¼ in) slices, unpeeled
1 tsp dill salting mixture (see below)
oil, for frying
1 tbsp self-raising flour
1 tbsp potato flour
¼ tsp baking powder
approx. ½ cup iced water
a little all-purpose flour, for dusting
for the sour cream and dill
150ml sour cream
a pinch or 2 of the dill salting mixture (see below), or to taste
1 tsp (heaping) freshly chopped dill
pinch of cayenne pepper
I am indebted to my friend and fellow cook Stephen Markwick for kindly introducing me to this lovely, unusual and dainty dish (who would ever have thought of deep-frying cucumber at all?). I first enjoyed it in his restaurant and deli, Culinaria, in Bristol, England, which he runs with his wife, Judy.
Stephen is one of the very best cooks I know, having that rare, intellectual understanding of how food can taste exactly right, and the description “honest cook” could not be more apt where Mr. Markwick is concerned. I can only hope that he won’t mind that I have fiddled about a bit with his original instructions; it is what interested cooks do, after all…
First make the dill salting mixture. Simply grind the 3 ingredients together in a small food processor or grinder, until well blended; the dill seeds are tough little
blighters and I have found that they just won’t pulverize completely, but no matter. Stored in a well-sealed jar in a cool, dark cupboard, the mixture will keep for weeks—but not for ever, naturally, as the dill flavor will dissipate over time. Let us say about 3 months.
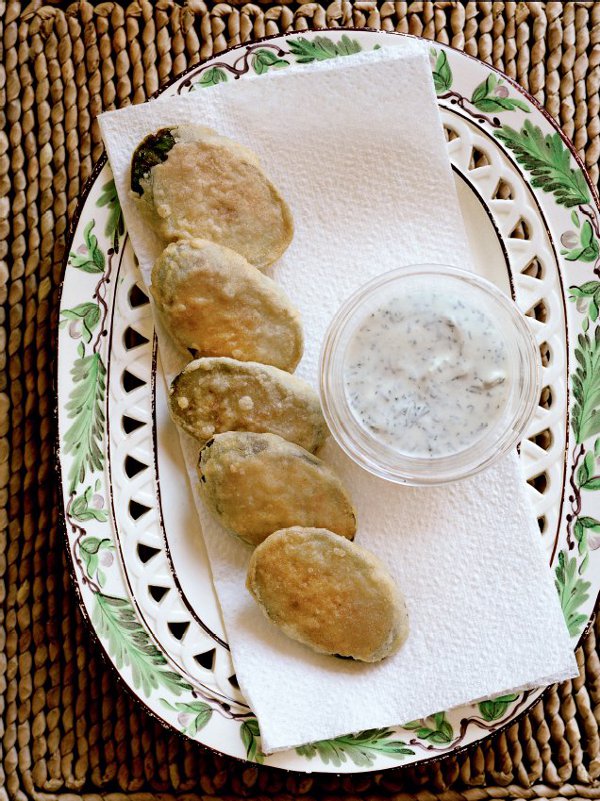
Place the cucumber slices in a shallow dish and sprinkle over 1 teaspoon of the dill salting mixture. Mix together well by hand, then leave to salt for at least 1 hour, turning the slices over and over from time to time. Do not drain. Meanwhile, make the sour cream and dill. Just mix the ingredients together in a small bowl and keep in the fridge until needed.
You will need to heat the oil for frying the cucumber in either a solid, deep pan or, for the absolute ease of it, an electric deep-fryer. Either way, aim for around about 350ºF, or when a small piece of bread turns pale golden in about a minute. Mix together both the flours and the baking powder in a bowl and whisk in the iced water until you have a smooth batter. Leave to sit for 20 minutes.
To fry the cucumber, lift out the slices directly from the dish, and do NOT rinse or dry them. Dust the slices first in the all-purpose flour, then dip them into the batter. Fry for about 3–4 minutes, turning occasionally, until pale golden and crisp. Drain on paper towels for a few moments before serving with the cool sauce.
You may wish to do the frying in 2 batches, but I would suggest rather that you eat the first batch, then cook a second batch. Eating two crisp and hot servings is far better than one serving crisp, and one not so crisp, eaten at the same time.
makes more than 3 cups—or a generous bowlful
2 medium cucumbers, peeled
2 tsp salt
18 oz tub of full-fat Greek yogurt
1 tbsp white wine vinegar or, if you prefer, the juice of 1 lemon
2 large cloves of garlic, crushed and finely chopped
5–6 tbsp extra virgin olive oil
freshly ground black pepper, plenty
2 heaped tbsp finely chopped dill, or mint, if you prefer
More dill!—in this evergreen Greek favorite. The son of my friends Robert and Jane Sackville-West, the honorable Arthur, aged eleven, almost cannot sit down to lunch without there being a large bowl of tzatziki nearby, and most excellently made by his mother. The boy, however, won’t countenance the merest whisker of dill in it, but then dill is a difficult taste for many grown-ups, too; those so afflicted should take the mint route.
Tzatziki is one of my most favorite ways with cucumber; so cooling and fragrant that it quite fills a dining room with its scent—especially if you grow your own, as does Lady Sackville. His Lordship barbecues a mean butterflied leg of lamb, too, and tzatziki goes particularly well with this. Have some with the marinated butterflied leg of lamb on
page 129
.
Coarsely grate the cucumbers and sprinkle over the salt. Mix well, put into a colander and suspend over a deep bowl. Leave to soak and drip for at least 1 hour—or a bit longer, it doesn’t matter. Manually, squeeze out as much moisture as you can from the cucumber, then place it in a bowl and mix in the yogurt, vinegar (or lemon juice), garlic, almost all the oil, the pepper and the dill (or mint). Decant into a serving dish and chill in the fridge for at least 30 minutes. When serving, trickle over a little more olive oil and grind over some extra pepper. Always serve very cold.

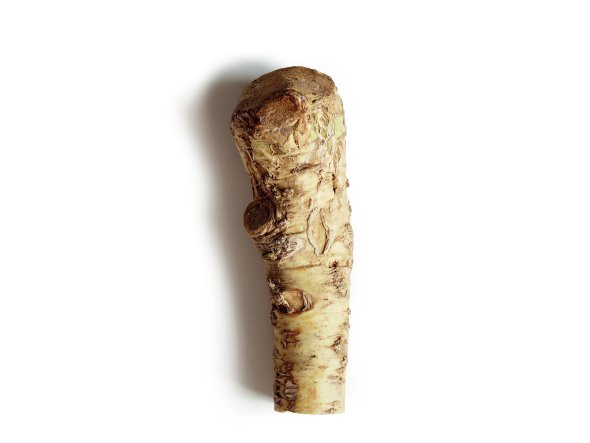
horseradish
½ lb horseradish root, peeled and finely grated
2–3 tbsp water
5 tbsp lemon juice
2 tsp Maldon (or other) sea salt
1½ tbsp superfine sugar
salt
I have been a fan of fresh horseradish since I was a boy. Even though it shocked my sinuses and made Dad cry while he was grating it, I couldn’t get enough of it—almost in a masochistic way. But I just adored the taste! Even now, I would rather not eat Sunday roast beef if there isn’t any creamed horseradish at hand. And lots of it, too.
The following can be made up, stored in a jar, and kept in the fridge for a few weeks. Just occasionally, it loses its nice cream color and takes on a kind of pale grey hue, but this never seems to affect the flavor. By the way, never attempt to process large lumps of horseradish root in a food processor without grating it first, as it turns horribly bitter. Don’t ask me why this is so, but hand grating seems the only way. If you find the tears really streaming down, try grating the root near an open window, so that the draft wafts the odors past your eyes.
So, here is the base recipe for all horseradish condiments:
Put everything into a small food processor and grind until smooth-ish. Decant into a sealable jar and store in the fridge until needed.
serves 4 as a first course
for the horseradish cream
2 tbsp horseradish base recipe (see
page 41
)
½ cup double or heavy cream
for the smoked salmon filling
1
/
3
lb smoked salmon (offcuts are fine, here)
1 tbsp finely chopped chives
2 tbsp sour cream
a little freshly ground pepper
for the potato pancake batter
¾ lb potatoes, peeled and cut into large chunks
3 tbsp milk
¼ cup all-purpose flour, sifted
2 eggs
2 egg whites
1½ tbsp double or heavy cream
salt and freshly ground black pepper
2–3 tbsp clarified butter, for frying (see below)
I love these dear little beauties. Granted, they can be a little bit tricky to make first time round, but once you have the knack they are fun to do. And very delicious to boot—or there wouldn’t be much point, would there?
You will need to make some clarified butter for cooking the pancakes. This is simple (and useful to have around anyway) and fashioned thus:
Melt a stick of unsalted butter. Skim off the froth with a spoon. Carefully pour out the clear butter—which lies beneath the froth and the milky residue below—into a bowl, while leaving the milky stuff behind. Discard both froth and residue. Voilà, clarified butter. The leftover butter should be poured into a small pot, covered and kept in the fridge for another day. It will keep for 2–3 weeks. Or freeze it, of course.
To make the horseradish cream, simply whisk both the ingredients together until thickened.
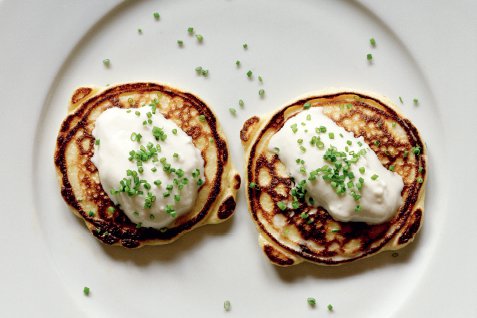
For the filling, finely chop the smoked salmon and, in a small bowl, mix together with the chives, sour cream and pepper. Put into the fridge to keep cool, but remove about 10 minutes before you begin to make the pancakes.
For the pancakes, preferably steam the potatoes (or boil carefully, drain and allow to dry out over a low heat for a few minutes). While they are still hot, put them through a potato ricer on the finest setting. Transfer to a mixing bowl and allow to cool. Now beat in the milk, flour, eggs, egg whites, cream and seasoning.
Preheat an overhead grill. Gently heat a little of the clarified butter in a large-ish, preferably non-stick frying pan. Pour in 4 tablespoons of batter, with a decent space between them. Once there is a pale browning at the edges of the pancakes and a few tiny bubbles on the surface—this will take about 30 seconds—spoon a little of the smoked salmon mixture into the middle of each pancake and only just push it into the surface. Now, carefully add a little more batter, but only enough to cover the salmon completely. Immediately, place the pan under the broiler for 20–30 seconds or so, to set the surface; the texture should be slightly springy to the touch, but still moist within.
Remove from the broiler and quickly flip the pancakes over with a palette knife on to a warm plate. Keep them warm while you make another 4 pancakes. If you like, brush them with a little clarified butter before topping each one with a teaspoon of the horseradish cream.