Read iOS Programming: The Big Nerd Ranch Guide, 3/e (Big Nerd Ranch Guides) Online
Authors: Aaron Hillegass,Joe Conway
Tags: #COM051370, #Big Nerd Ranch Guides, #iPhone / iPad Programming
iOS Programming: The Big Nerd Ranch Guide, 3/e (Big Nerd Ranch Guides) (83 page)
NSXMLParser
is the built-in XML parser in the iOS SDK. While there are plenty of parsers you can pick up on the Internet, adding a third party dependency is sometimes difficult. Many developers, seeing that
NSXMLParser
is not a tree-based parser (it doesn’t create an object graph out of the box), go searching for an alternative parser. However, in this chapter, you’ve learned how to make
NSXMLParser
into a tree-based parser.
To parse simple XML, all you need are the three delegate methods used in this chapter. More complex XML has element attributes, namespaces, CDATA, and a slew of other items that need to be handled.
NSXMLParser
can handle these, too. The
NSXMLParserDelegate
protocol includes many more methods that handle nearly anything XML can throw at you. There are also arguments to the methods you have already used that can handle more complex XML. For example, in
parser:didStartElement:namespaceURI:qualifiedName:attributes:
, we only used the first two arguments. For the other arguments, consider the following XML:
When the
foo:item
element is encountered by the parser, the values for the parameters to the delegate method are as follows:
- The
element
is
“
item.
”
The namespace is ignored, and the name of the element is kept.
- The
namespaceURI
is
“
BNR.
”
The element’s name is
item
, and it is in the
foo
namespace, which has a value of
“
BNR.
”
- The
qualifiedName
is
“
foo:item.
”
- attributes
is a dictionary that contains two keys,
“
attribute1
”
and
“
attribute2.
”
Their values are
“
one
”
and
“
two,
”
respectively.
One thing
NSXMLParser
can’t do is resolve XPaths. You have to use another library to handle this. (For more information, check out the Tree-Based XML Programming Guide in the Apple documentation.)
When
NSURLConnection
talks to a web server, it uses the HTTP protocol. This protocol says that any data you send or receive must follow the HTTP specification. The actual data transferred to the server in this chapter is shown in
Figure 25.10
.
Figure 25.10 HTTP Request Format
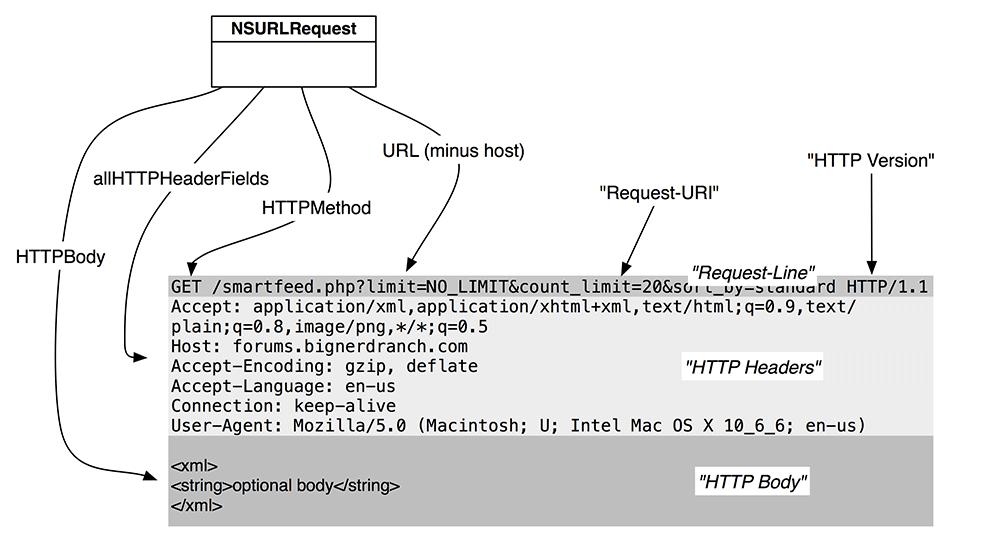
NSURLRequest
has a number of methods that allow you to specify a piece of the request and then properly format it for you.
Any service request has three parts: a request-line, the HTTP headers, and the HTTP body, which is optional. The request-line (which Apple calls a status line) is the first line of the request and tells the server what the client is trying to do. In this request, the client is trying to
GET
the resource at
smartfeed.php?limit=1_DAY&etc
. (It also specifies the HTTP specification version that the data is in.)
The command
GET
is an HTTP method. While there are a number of supported HTTP methods, you typically only see
GET
and
POST
. The default of
NSURLRequest
,
GET
, indicates that the client wants something
from
the server. The thing that it wants is called the Request-URI (
smartfeed.php?limit=1_DAY&etc
).
In the early days of the web, the Request-URI would be the path of a file on the server. For example, the request
http://www.website.com/index.html
would return the file
index.html
, and your browser would render that file in a window. Today, we also use the Request-URI to specify a service that the server implements. For example, in this chapter, you accessed the
smartfeed.php
service, supplied parameters to it, and were returned an XML document. You are still
GET
ting something, but the server is more clever in interpreting what you are asking for.
In addition to getting things from a server, you can send it information. For example, many web servers allow you to upload photos. A client application would pass the image data to the server through a service request. In this situation, you use the HTTP method
POST
, which indicates to the server that you are including the optional HTTP body. The body of a request is data you can include with the request – typically XML, JSON, or Base-64 encoded data.
When the request has a body, it must also have the
Content-Length
header. Handily enough,
NSURLRequest
will compute the size of the body and add this header for you.
UIImage *image = [self profilePicture];
NSData *data = UIImagePNGRepresentation(image);
NSMutableURLRequest *req =
[NSMutableURLRequest requestWithURL:someURL
cachePolicy:NSURLRequestReloadIgnoringCacheData
timeoutInterval:90];
// This adds the HTTP body data and automatically sets the Content-Length header
[req setHTTPBody:data];
// This changes the HTTP Method in the request-line
[req setHTTPMethod:@"POST"];
// If you wanted to set the Content-Length programmatically...
[req setValue:[NSString stringWithFormat:@"%d", [data length]]
forHTTPHeaderField:@"Content-Length"];
When you try to access a web service, it will sometimes respond with an
authentication challenge
, which means
“
Who the heck are you?
”
You then need to send a username and password (a
credential
) before the server will send its genuine response.
There are objects that represent these ideas. When the challenge is received, your connection delegate is sent a message that includes an instance of
NSURLAuthenticationChallenge
. The sender of that challenge conforms to the
NSURLAuthenticationChallengeSender
protocol. If you want to continue to get the data, you send back an instance of
NSURLCredential
, which typically looks something like this:
didReceiveAuthenticationChallenge:(NSURLAuthenticationChallenge *)challenge
{
// Have I already failed at least once?
if ([challenge previousFailureCount] > 0) {
// Why did I fail?
NSError *failure = [challenge error];
NSLog(@"Can't authenticate: %@", [error localizedDescription]);
// Give up
[[challenge sender] cancelAuthenticationChallenge:challenge];
return;
}
// Create a credential
NSURLCredential *newCred =
[NSURLCredential credentialWithUser:@"sid"
password:@"MomIsCool"
persistence:NSURLCredentialPersistenceNone];
// Supply the credential to the sender of the challenge
[[challenge sender] useCredential:newCred
forAuthenticationChallenge:challenge];
}
If you are dealing with a more secure and sophisticated web service, it may want a certificate (or certificates) to confirm your identity. Most, however, will just want a username and a password.
Credentials can have persistence. There are three possibilities:
- NSURLCredentialPersistenceNone
says to the URL loading system,
“
Forget this credential as soon as you use it.
”
- NSURLCredentialPersistenceForSession
says to the URL loading system,
“
Forget this credential when this application terminates.
”
- NSURLCredentialPersistencePermanent
says to the URL loading system,
“
Put this credential in my keychain so that other applications can use it.
”
Create a
UITableViewCell
subclass that has three labels. Parse the author and category elements into the
RSSItem
and display the title, author, and category for each row.
A
UIWebView
keeps its own history. You can send the messages
goBack
and
goForward
to a web view, and it will traverse through that history. Create a
UIToolbar
instance and add it to the
WebViewController
’s view hierarchy. This toolbar should have back and forward buttons that will let the web view move through its history. Bonus: use two other properties of
UIWebView
to enable and disable the toolbar items.
UISplitViewController and NSRegularExpression
The iPhone and iPod touch have a limited amount of screen real estate. Given their small screen size, when presenting a drill-down interface, we use a
UINavigationController
to swap between a list of items and a detailed view for an item.
The iPad, on the other hand, has plenty of screen space to present both views using a built-in class called
UISplitViewController
.
UISplitViewController
is an iPad-only class that presents two view controllers in a master-detail relationship. The master view controller occupies a small strip on the lefthand side of the screen, and the detail view controller occupies the rest of the screen.
In this chapter, you will have
Nerdfeed
present its view controllers in a split view controller when running on an iPad (
Figure 26.1
). We will also make
Nerdfeed
a universal application and have it continue to use a
UINavigationController
when run on the iPhone.
Figure 26.1 Nerdfeed with UISplitViewController