Joy of Home Wine Making (5 page)
Read Joy of Home Wine Making Online
Authors: Terry A. Garey
Tags: #Cooking, #Wine & Spirits, #Beverages, #General
Put the whole thing in a warm (75°F), preferably dark, place for one month to ferment. The temperature should be in the range of about 60-80°F. After the first day, you should see a bit of froth at the top of the liquid (or
must
, as it is called). This means the yeast is happily eating the sugar and making alcohol. It will be fairly active for the first couple of weeks, then it will settle down.
After a few weeks, you will notice a sediment at the bottom of the jug, and nearly clear wine above. You need to
rack
the wine, or separate the good stuff from the dead yeast and sediment. To do this, sanitize another jug and the tubing. I
strongly
recommend that you use the sulphite solution for the tubing, rather than boil it.
Then boil another cup or so of water.
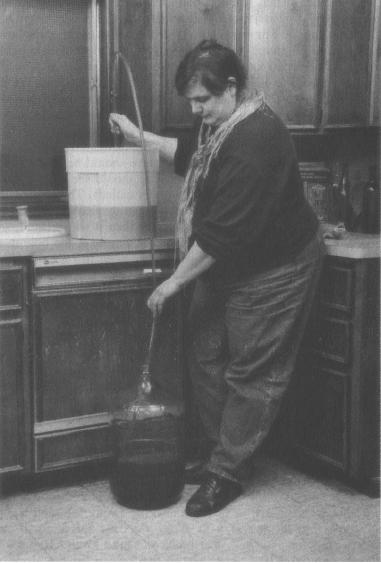
Place the jug of wine on a table, moving it carefully so as not to disturb the sediment. Put the empty jug directly below on the floor. Remove the plastic again, and carefully insert one end of the tubing down into the wine until it rests a few inches above the sediment and hold it there with one hand, or have a friend hold it. Squat down above the empty jug and suck gently on the end of the tube. Be sure to rinse your mouth out before you do this. (Some people swish out with vodka!)
The wine should start flowing up out of the high jug into the tube, heading for the lower point of gravity, which just happens to be the end of the tube, which is between your lips. Quickly remove it from your lips, insert it into the empty jug, and let the wine flow into the jug. Try to avoid vigorous splashing. If you have to stop for a second, just pinch the tube firmly. Be sure to keep the bottom of the upper part of the tube in the liquid, or, of course, the flow will stop. Continue to siphon until just before the sediment begins to enter the tube. Then remove the tube from both jugs.
Top up
the wine by adding the boiled water to it until the
mixture reaches the bottom of the bottle neck, replace the old plastic with new. Add the rubber band. Don’t fill the jar all the way up to the top. You need room for the gases. If you taste the wine it will probably taste pretty raw, but don’t worry. Time is on your side.
At the end of about two months (or sooner if the weather is warm), you should check the wine again. You can tell if the wine has finished fermenting (has eaten all the available sugar) by gently tapping the jug to see if any little bubbles rise to the top. If they do, it’s still fermenting. Be patient. There will be more sediment on the bottom of the jug, but not a whole lot. Later on you will acquire a hydrometer, and you can be a lot more scientific about the fermentation process.
When at last the wine is finished fermenting, and fairly clear (one to three months), you can do several things. You can rack the wine again and drink it. It won’t be too bad. You can rack it and leave it in the jug for another six months and then drink it. It will be lots better.
Apple wine tastes best chilled, though it’s awkward to store a whole gallon in the fridge. After you take some out of the gallon jug, the chances of the rest going bad rise quickly.
You see where I am gently leading you by the hand, don’t you? Yes, the solution is to bottle it.
B
OTTLING
Use old clean wine bottles, washed and sanitized. These days, they are mostly 750 ml, not the old fifths. You may have acquired some already. You can also get them from friends, caterers, some recycling centers, or, if all else fails, you can buy them rather expensively at the wine supply shop.
There is no point in using a bottle with any dubious matter in it, nor is there any point in using a bottle that has been used to store Uncle Joe’s Karburetor Kleener, vinegar, frogs, lead paint chips, or anything else of that ilk. The world is full of wine bottles. Get ones that have held only wine.
They must be the kind that came with a genuine cork. You want four or five. If they have mold on the bottom, or any specks of weird stuff, soak them in the mild solution of water and chlorine bleach we spoke of earlier, overnight, submerging them. Rinse out
with hot water until you get all the stuff out. Use a bottle brush if necessary. Or you can use the old trick of putting in a handful of dry beans and swishing them around inside with a little water to dislodge any crud. You can avoid all of this mess by rinsing out wine bottles after you use them, and storing them upside down in a wine carton to avoid the entrapment of curious centipedes and spiders.
After getting them very clean, it’s best to sanitize them again, just before you want to bottle. Use the Campden tablet solution or the bleach treatment, if you must.
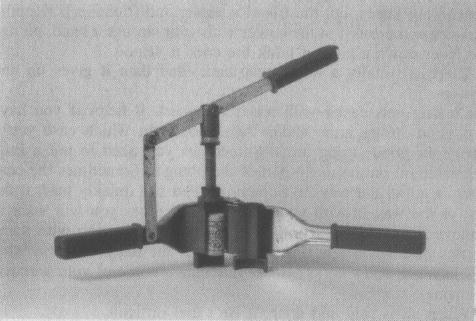
Now you need a corker and new corks from the wine supply store. The corker costs about fifteen dollars. A package of corks costs about three dollars for twenty-five. NEVER use old corks. False economy. Corks are porous and should be used for wine only once. After that, they are cat toys and hat decorations.
Buy the best-quality corks you can. You might have to buy a whole bag of twenty-five. Bring in your bottle and ask the clerk to help you figure out the right size. Sometimes you can get coated corks that do not need soaking, but they are not always easy to find.
Buy a lever action corker while you are at it. There is a simpler, cheaper plunge corker, which I have never used because it takes a lot of work and time. Then there’s the old method of banging the cork in with a rubber mallet, left over from the days of smaller corks and dangerous living best left to history.
There are also nice bench corkers available in some areas and by mail, running from $70 to $100. They are an investment that you should consider if you make more than twenty gallons of wine a year.
If you want to justify the cost of the corks and corker, remember that you can now buy bulk wine in jugs and bottle it yourself. On the other hand, you can borrow a corker if you know anyone else who makes wine, or possibly rent one from a wine supply place.
Heat up five or six corks in some boiling water, simmer them very gently for a few minutes, turn off the heat, and submerge the corks with a saucer that is a little smaller than the pan. Soak the corks for four hours, or overnight.
Why soak extra corks? (They aren’t cheap!) Well, things happen. You may drop them. They aren’t as firm looking once they are soaked, so you may mis-cork and have to recork a bottle. Who
knows? You don’t want to be caught with full bottles and not enough corks.
OK. Got the wine, got the time, got the bottles nice and clean, got the corks, got the racking tube…we’re off!
Rack the wine into the wine bottles. Put down some newspaper on the floor to catch any spills. Carefully bend or squeeze the tube so the wine doesn’t overflow. Fill the bottles up to about two to three inches below the top. You have to leave room for the cork!
Overfilled? Don’t panic. Just tip some out. Do the best you can and don’t worry.
There will be some sediment (dead yeast) at the bottom of the jug. Better to throw out the last inch or two than have a bottle of cloudy-looking wine. It also might develop an off taste.
What usually happens, depending on the size of the jug and the size of the bottles, is that you end up with three or four full bottles and a half bottle. Ignore the half bottle for right now.
Take one of the soaked corks out of the soaking water, fit it into the corker and squeeze the handles to compress the cork. Depending on the model, you’ll see how the cork fits in.
Place one end of the corker on top of the filled wine bottle,
having a friend hold the bottle steady on a flat surface (if you are fresh out of friends, you can kneel and put the bottle firmly between your knees, but the friend is easier and friendlier). Keeping the cork compressed in the corker with your strongest hand, plunge the lever down until you think the cork is seated.
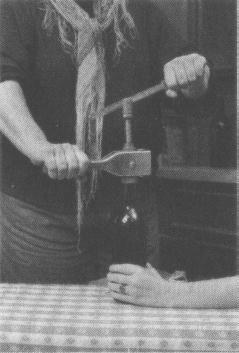
There is usually a lot of resistance, and then it gives up and goes in.
Corking gets easier with practice, honest. It helps if you have two good strong arms and/or two people, in which case you’ll have four good strong arms. Sometimes you need to put a little vegetable oil on the metal part of the plunger. Sometimes the cork doesn’t go all the way in. Sometimes you can quickly push it the rest of the way in with your thumb, other times you will want to remove the cork and try again. I advocate practicing with some bottles of water a few times till you get the hang of it. So what if you waste a few corks? Better that than a bottle of your wonderful wine.
When all is said and done, it isn’t that difficult.
Rinse off the bottles of newly corked wine to get rid of any spills that might make mold. Let the bottles dry, then label them clearly. I use gummed labels when I can get them, and stick on
name tags or computer labels when I can’t. My wine labels frequently look like this:
HELLO MY NAME IS
High Pitched Wines
FREEZER ROSÉ
12%
Made Aug 93
Bottled Feb 94
Now that I have a laser printer, I think I’ll try to make them look better. Many people use labels they buy in the wine supply store, or they make their own, sometimes using rubber stamps for elegant or silly effects. If you have access to a computer with a drawing program or graphics, you’re in business.
On the label you want the name, the date bottled, and later, when you know it, the percent of alcohol. I have also come up with a code for the cork end, because these bottles will be joining others on their sides and reading the labels is not always easy. I use a ballpoint pen and ink to write, for example, A1 94, which stands for Apple—batch #1, 1994. It isn’t foolproof because you run out of letters, but it saves quite a bit of trouble and shifting of bottles, anyway. (I keep thinking AP 93 is apple, but it’s the apple peach I made—nothing’s perfect.)
Lay your wine in a dark, cool place for a few months, and let your friend time do its work.
Chill the leftover wine and drink it with lunch or supper. If you are bottling two or more gallons, you can bottle the leftover stuff together and thus do your first blending. Sometimes these can be quite good. I remember that one bottle of Potato-Mint…well, I’ll tell you about that later.
It’s amazing how much better the wine is after even just a month in a bottle (six months is preferred). It is also amazing (though not preferred) to come down to the cellar and find a cork blown out and the floor sticky with wine.