Read Making It: Radical Home Ec for a Post-Consumer World Online
Authors: Kelly Coyne,Erik Knutzen
Making It: Radical Home Ec for a Post-Consumer World (26 page)
As you pluck, the chicken begins to take on the familiar appearance of a grocery store chicken, and that is something of a comfort. It’s difficult for the mind to process the changes the bird undergoes in a very short time. It goes from being a beautiful, bright-eyed creature to a bloody, dangling corpse (though still magnificent, in a way) to an anonymous piece of flesh—a plucked chicken.
At some point, you need to chop off the head. Some people do it before plucking, some after. It’s best to pluck while the bird is hot out of the water, so unless you can do this part fast, wait until you’re done plucking. Just stretch out the neck and bring your cleaver down with considerable force, aiming right above the shoulders.
The tail stub also has to come off. It doesn’t have to be chopped off with the cleaver. Instead, tease it off with the scalpel. You might notice the yellow oil gland that sits at the base of the tail. This should come off along with the tail.
GUTTING THE CHICKEN
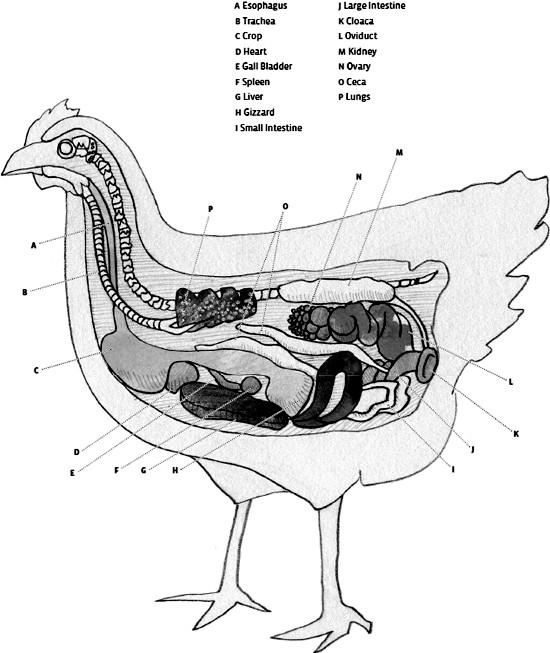
Turn the chicken on its back and face the hind end toward you. Using the scalpel or razor blade, cut a circle around the chicken’s cloaca, or vent, so you can remove it like a plug. Attached to the back of the cloaca is a ropelike tube, which looks like a colon, but which is actually the bird’s intestinal, urinary, and reproductive tract combined. There may be poop in there, especially if the bird did not fast, and that will leak out as you manipulate the organs. You don’t want any waste spilling into the body cavity, so handle with care. Tug on the cloaca. All of the intestines attached to it will slither out in a group. This is definitely the stinky part of this business. Use your scalpel to cut away any clingy membranes or connective tissue. Push all that into the wastebasket.
After this, you will be working blind with your hand far up the chicken. You might want to enlarge the first hole you cut to accommodate your hand. Feel around—gently—and find the liver, gizzard, heart, and lungs. Pull them out as best you can, again using your blade to cut connective tissue. The liver will come out with the green bile sac attached. Don’t puncture that green sac. You can’t eat any flesh that bile spills on, so if you want to eat the liver, cut the bile sac away carefully. The gizzard is the largest organ. It should be cut in half and cleaned out if you plan to eat it. The lungs are the most difficult to remove. They sort of adhere to the ribs. You have to fiddle them off with your fingers. Bits that you miss can be rinsed away later. When you’re moving your hand inside the carcass, don’t be surprised if you force air through the larynx and inadvertently cause the carcass to give a sorry crow. Put any organs you wish to save in a covered container and put it in the cooler.
Turn the bird around so you are facing the neck end. Using your scalpel, cut out the neck muscle and the remains of the larynx and esophagus. At this point the main body cavity should be clean.
The last thing to do is find the crop. This is the grit-filled sac that chickens use to help digest their grain. It is located high on the breast, near the base of the neck. If the chicken hasn’t fasted, it might be swollen, full of grain. If it’s empty, it’s just a little tissue that needs to be cut away.
Finally, you will cut off the lower legs, the feet, and the scaled portion of the leg. The joint between this part of the leg and the drumstick is where feather meets scale. Using the scalpel, delicately carve your way around that joint. You don’t have to saw through the leg. All you have to do is pare away the cartilage until the lower leg works free. You’ll recognize the rounded end joint of the drumstick when you see it.
You’re almost done!
WASHING
Take the bird inside, wash your hands well, and give the carcass a thorough rinsing in the sink, inside and out. Pluck out the remaining pin feathers and rinse again.
Wrap the bird well and put it in the fridge or freezer—or brine it.
BRINING
Brining makes fowl taste good and can help tenderize a bird that is a little past its prime. It takes a day to brine a bird, which is conveniently about how long it may take you to recover from butchering the bird.
Submerge the bird in a stainless steel or enamel stockpot (never aluminum) and cover it with brine mixed to these proportions: ½ cup sugar and ½ cup salt for every gallon of water. You can liven up your brine by adding citrus wedges or spices. Place the pot in the refrigerator and soak for a maximum of 14 hours, then take out the carcass. Rinse well and pat dry, then prepare as you usually would.
Projects for the Garden
Starting seeds, preparing the soil, planting the bed, tending the plants, and saving seeds when harvest is over: This is the basic rhythm of gardening, played out season after season.
46>
Starting Seeds and Planting Your Garden

WAITING:
4-6 weeks
The best way to guarantee a thriving garden is to start with good soil and healthy seedlings. Prepping the soil requires some work, but it pays off tenfold in the long run. Growing vegetables from seed also requires more time on the front end, but that effort is also well rewarded.
We start most of our plants from seeds these days, for the following reasons:
VARIETY
Growing from seeds offers you a greater selection of vegetables, and isn’t that why you garden? Seeds give you access to rare, heirloom vegetables never seen in the supermarket. Nurseries and garden centers usually offer only standard varieties as seedlings.
COST
Seeds are much cheaper to buy than seedlings. Get together with some friends and go in on an order of seeds, since one packet will likely produce more plants than you can grow in a small space. Most seeds last at least a year or two, so you can use them over multiple seasons.
SAFETY
Purchased seedlings can bring diseases into your garden. In 2009, a soil pathogen called late blight fungus (a strain of which was responsible for the Irish potato famine) was spread throughout the Northeast and Mid-Atlantic states of the United States in the soil of tomato seedlings propagated by a wholesale gardening company and sold at big-box retailers. Soil pathogens are hard to eradicate, so we like to minimize our chances of bringing them into our yard. For this reason alone, we now grow all of our vegetables from seed.
YOU’LL NEED
- Plastic nursery flats or homemade wooden flats (Project 56)
- Commercial potting mix or a 50/50 blend of garden soil and finished compost
- Seeds
- Chicken wire mounted in a wooden frame (optional)
- Humidity dome (optional)
- Heating mat or cold frame (optional)
WHAT’S THE BEST CONTAINER FOR STARTING SEEDS?
There are a lot of gimmicky products touted for starting seeds. We’ve tried multicelled trays, newspaper pots, and peat pots, but we have had much better luck with simple flats made out of scrap wood. See Project 56 to learn how to build your own flats. The second-best alternative would be a standard plastic nursery flat.
PUTTING IT TOGETHER
STEP 1: PLANTING THE SEEDS
Make sure that your flats have drainage. Wooden flats drain between the slats. If the plastic flats lack drainage, poke several evenly spaced holes in them.
Choose your soil mix. In our experience, seeds sprout more readily in commercial potting mix. But later on, after transplanting, seedlings grown in a garden soil/compost mix acclimate more readily to the garden bed. So each choice has its advantages and drawbacks. If you buy potting mix, be sure the package says it’s for starting seeds. If you want to make your own mix, combine equal parts of soil from your vegetable bed with well-decomposed compost. Make sure you only use good garden soil for this—dark, loose soil filled with organic matter. This kind of soil only comes out of an active garden bed. If you don’t have one yet, use potting mix. Keep in mind that what seeds and seedlings like best is light, fluffy soil. If your homemade mix is dense because you have clay soil, lighten it up by adding a few cups of sphagnum moss or coconut coir from the nursery.
Fill the containers with your chosen soil mix, flatten, and lightly compress—don’t pack it in. The soil should be just below the top of the container.
The seed package will state how deeply to plant your seeds. A good rule of thumb is to plant the seed to a depth twice the diameter of the seed. Poke the seed down into the soil and cover it. If the seeds are tiny, just sprinkle them over the surface of the soil and then, using a colander, sift a thin layer of soil on top of them.
Use the seed-spacing guidelines on the seed package as your primary reference for spacing the seeds in the tray. If the directions say the seeds should be 1 inch apart, try to sow them approximately that far from one another. Each plant is a little different. Some make delicate seedlings; others grow big and brawny. Ideally, the seeds will be spaced so that the leaves of the seedlings just touch when ready to transplant. In other words, not too close, but not so far apart that you’re wasting space. The more you do this, the easier it will become. Don’t worry about it too much, though. If the seedlings look crowded when they come up, you can always pinch off the extras.
When sprinkling really small seeds on top of the soil, there’s no need to plant them in rows. Just cover the designated area of your flat with a scattering of seeds, doing your best to follow the spacing recommendation on the seed package. Again, any stray seeds can be thinned out later when they sprout. Larger seeds should be poked into the soil in offset rows at the distance recommended on the seed packet. Offset rows means the spacing is staggered, the way cookies are positioned on a baking sheet. That way each seedling has more elbow room.
MAKE A PLANTING GUIDE
A handy suggestion we’ve taken from gardening guru John Jeavons is to make a planting guide using a piece of chicken wire attached to a frame. The frame should be the same size as an average seedling flat. Each cell of chicken wire is 1 inch wide. Lay the frame on the soil and plant one seed in the middle of each open cell: You’ll have perfect staggered 1-inch spacing. Plant in every other cell and you’ll have 2-inch spacing, and so on. It’s worth the little trouble it takes to make the guide to be able to plant seeds so quickly and easily.
Mark what you planted. Trust us, you’ll forget what’s in the tray otherwise. We like to save plastic forks, knives, and spoons and use them as plant labels. Use a permanent marker to write on them. You could also use popsicle sticks or plastic containers (like yogurt containers) cut into strips. Mark on your calendar what you planted and when you planted it. Also take note of when you transplant the seedlings and when you get your first harvest. These notes will be valuable when you plant your seeds next year. Knowing how long it takes to get to harvest can help you keep a constant supply of veggies in the garden.
Be prepared for gardening surprises: Always plant more seeds than you need to transplant and keep some in reserve. If some critter goes on a rampage in the vegetable bed or the weather turns against you, you can use the extra seedlings as backup. Many types of unused vegetable seedlings can be enjoyed in salads as microgreens. Compost all the leftover soil. Don’t reuse it until it has had a go-around with mother nature.
STEP 2: SPROUTING THE SEEDS
Whether starting seeds indoors or outdoors, you need to pay attention to the ambient temperature, because it’s critical for getting good germination rates. The seed package should tell you the temperature range at which your seeds will germinate. Starting seeds indoors in the winter usually provides enough warmth for seeds to sprout, but if your house is especially cold, or the seeds are housed in a cool room, like a basement, you may need to purchase special seedling warming mats that you place under the flats. When starting seeds outdoors, cold frames (basically mini greenhouses) may be needed to get seeds off to an early start. Clear plastic lids for flats, called humidity domes, may offer just enough protection from the cold and enough additional solar heat by day to sprout your seeds outdoors in the early spring.
Too little light will produce weak, leggy seedlings—but too much will bake them. Aim to split the difference. When growing indoors, consider using florescent lights to make sure seedlings get enough light every day (see Project 48). Light from a south-facing window should be enough, but if the weather is gray, that light might not be sufficient. When starting seedlings outdoors, position the flats where they get partial sun exposure. In the summer, when shade is hard to find, protect seedlings from the intense sun with shade cloth, a lightweight mesh cloth that you can buy at the nursery. It comes in different grades of protection.
The number-one mistake beginners make when starting seeds is overwatering. Heavy watering can compress the soil and starve your seedlings of the oxygen their roots need to thrive. It can also create conditions that cause “damping-off,” a general term for the effects of a group of pathogens that thrive in wet soil and kill seedlings. Seedlings suffering from this condition either fail to thrive or rot through the stem. Aim to keep the soil as moist as a wrung-out sponge. Even when the soil is wet, it should still be a little springy. Letting the seedlings dry out is obviously a bad thing, too, but easier to recognize and correct. Water gently. We recommend you buy a hose attachment with a gentle shower setting. Or use a Haws watering can, which has an upward pointing nozzle that generates a delicate shower perfect for seeds and seedlings.
STEP 3: TIMING YOUR PLANTING
We wish we could tell you when to plant your veggies, but the right timing varies greatly from place to place. Consult local gardening experts to get vegetable planting schedules. In climates where the growing season is short, there’s a narrow planting window just after the last frost, by which time you need to have all your seedlings ready to transplant. In southern climates, you can grow many vegetables year-round. This may render the planting information on the back of seed packets irrelevant. Here in Los Angeles, we start seeds when northern gardeners are closing their operations for the winter. This is why we like to say,
all gardening advice is local.
Get to know other gardeners in your area and consult gardening books written for your region.

An appropriately sized triangular template makes planting a snap.
The seedlings are ready to transplant when their first true leaves have emerged. These are their second set of leaves, the ones that look like miniature versions of their adult leaves. You can leave the seedlings in the flats a little longer, but don’t let them get too old or they’ll run out of room for their roots.
STEP 4: HARDENING OFF
Seedlings started indoors or in a cold frame need to be acclimated to the great outdoors. This is called hardening off. For a few days before planting the seedlings in the garden, take them out for a few hours to show them the world, then bring them back inside to recover. It’s a big change for them to move outside. The temperatures, humidity, and brightness are all different. If you move them directly from their cloistered life indoors to the garden, they’ll likely go into shock. So start slow, lengthening the time spent outside, until you can leave them overnight. After that, they’re ready to plant. If you’re using a cold frame, open the top for longer periods each day.
While hardening off, watch for signs of distress, like wilting. Seedlings are delicate. An unexpectedly hot day, a violent rainstorm, or an overnight cold snap can kill them. Once they’re in the ground and a little bigger, they’ll be much more sturdy.
Fit hardening off into your workweek by doing the first, crucial introductions over the weekend, leaving the seedlings outside in a sheltered place during the day and taking them in at night. By midweek, they’ll probably be ready to stay out all night, and they’ll be ready to plant the next weekend.
STEP 5: TRANSPLANTING
Before transplanting, be sure to read the next project on preparing your garden bed.
When planting time comes, gently scoop the plants out of the flat, taking a clump of soil with the plant. For this purpose, we like to use discarded plastic spoons, often the same utensils we use to label the plants. Handle seedlings gently, cradling the rootball in your palm or, if necessary, picking them up by the leaves. Never grasp a seedling by the stem. Open up a little hole in your garden bed and gently set the seedling down in it. Tap the soil down around the roots, firmly enough that there are no air pockets but not so hard that you compact the soil. Transplant the seedlings one by one. Don’t expose their roots to sun and air longer than necessary. Water when you’re done with all your transplants.