Muscle Medicine: The Revolutionary Approach to Maintaining, Strengthening, and Repairing Your Muscles and Joints (34 page)
Authors: Rob Destefano,Joseph Hooper
Tags: #Health & Fitness, #General, #Pain Management, #Healing, #Non-Fiction
HIP RESURFACING (PARTIAL HIP REPLACEMENT)
Younger patients facing hip replacement may want to investigate an alternative to the standard surgery called hip resurfacing, or sometimes, a partial hip replacement. With the standard procedure, the femoral head (the ball that fits into the hip socket) is cut off and replaced with a metal prosthesis. With the newer procedure, which has been done in Europe for two decades but in this country only since 2006, the femoral head is shaved down and given a metal cup covering. More bone is preserved and the fit in the hip socket is closer, which may allow a greater range of motion and more active lifestyle. Both approaches have pros and cons. Research both options and discuss them with your orthopedist.
had no interest in exercise. Her goals were modest. All she wanted was to be able to walk without pain. Unfortunately, X-rays showed that her osteoarthritis was well advanced. She may have been genetically predisposed to the early onset of the disease, which had eaten away most of the cushioning cartilage in her hip joints. Or her weight and sedentary lifestyle may have been enough to send her over the edge. All the X-rays could tell Dr. Kelly was that the femoral heads, the balls in the ball-in-socket joint, were no longer round but flattened like a mushroom against the hip socket, bone on bone.
In Marilyn’s case, Dr. Kelly appreciated that hip replacement surgery was inevitable, but that the timing was not yet right. Because the body will tolerate only a limited number of hip replacement operations in a lifetime, he wanted to buy as much time for Marilyn’s God-given hips as he could. He referred her to Dr. DeStefano for regular treatment. Muscle therapy can relieve pain from the surrounding muscles, which contract in response to the distress signals sent out by the diseased joints. Marilyn can help herself by monitoring her diet (less weight means less pressure on the damaged joints) and engaging in low-impact exercise.

HIP
The major movements of the hip joint are flexion and extension (bend and straighten), adduction and abduction (move toward and away from the body), and external and internal rotation (twist the leg out and in). In other words, bringing the leg forward and back, bringing the legs together and apart, and twisting so the knee faces away from the body or toward it. The ball-and-socket joint makes all these variations possible, although the complex network of connective tissue also keeps the hip stable. Because so many muscles are attached to the hip, imbalances among them can affect the way the joint functions.
POSTERIOR THIGH
Purpose:
To target and remove any restrictions and restore a full range of motion to the hamstring muscles and the whole kinetic chain of back muscles by manually releasing tight, short, and damaged muscles.
Starting out:
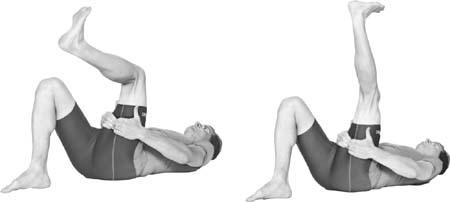
Start by lying on your back with the both legs bent to ninety degrees at the hip and knee. Relax the muscles and grasp the treatment thigh with both hands with the fingers curved around the posterior leg. The pressure should be angled in and toward the hip. This large-muscle group can be divided into three zones: medial (inside), lateral (outside), and middle; and each long section can be divided into thirds or fourths, starting at the knee and moving toward the hip.
How to do it:
Maintaining the angled pressure, lift the treatment leg off the floor, then straighten your knee, as far as is comfortable, without moving the thigh or causing pain. Hold for two seconds after the movement is completed. Repeat with your other leg. Complete three to four passes in each zone.
Troubleshooting:
Don’t press too hard too fast; let the hand “sink in.” Avoid letting the skin slide under the hands by using angled pressure. The body should remain still and stable on the ground. Don’t lower the thigh as the leg is straightened. It’s better to start the movement with the bent leg lower, and straighten completely from there.

BUTTOCKS
Purpose:
To target and remove any restrictions and restore a full range of motion to the gluteal region, including the piriformis and the external rotators, by manually releasing tight, short, and damaged muscles.
Starting out:
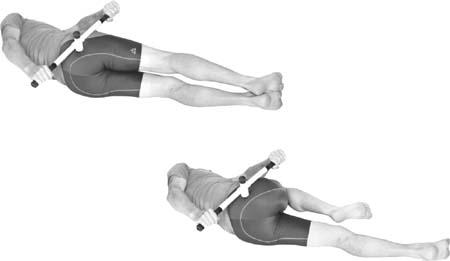
Start by lying on your side with both legs extended. Grasp a tool (here we use a F.A.S.T. Stick™, but you can use a ball, etc.) and place it on the top hip in the muscle mass there. Stay off the bone at the side of the hip. The pressure should be angled in and up toward the back. This large-muscle group can be divided into three zones: medial, lateral, and middle; and each long section can be divided into thirds or fourths, starting at the base of the butt and moving up toward the back in each zone.
How to do it:
Maintaining the angled pressure, bring the treatment knee up to the chest, as far as is comfortable, without causing pain. Hold for two seconds after the movement is completed. Repeat on the opposite side. Complete two to three passes in each zone.
Troubleshooting:
Don’t press too hard too fast; let the tool “sink in.” Avoid letting the skin slide under the tool by using angled pressure. Keep the back and neck relaxed; don’t strain and twist to hold the tool in place.

INNER THIGH
Purpose:
To target and remove any restrictions and restore a full range of motion to the adductors by manually releasing tight, short, and damaged muscles.
Starting out:
Start by lying on your back with one leg extended and the treatment leg bent up toward the chest. With pressure place the fingers of both hands on the inside of the thigh. (A F.A.S.T. Stick™ or other tool can also be used.) The pressure should be angled in and toward the hip. This large-muscle group can be divided into three zones: upper, middle, and lower; and each long section can be divided into thirds or fourths, starting at the base of the thigh and moving up toward the hip in each zone.
How to do it:
Maintaining the angled pressure, allow the treatment leg to drop out to the side, as far as is comfortable, without causing pain or rolling to the side, then straighten the leg, also without causing pain or rolling. Hold for two seconds after the movement is completed. Bend the knee as you return to the starting position. Repeat with your other leg. Complete two to three passes in each zone.
Troubleshooting:
Don’t press too hard too fast; let your hand “sink in.” Avoid letting the skin slide under your hands by using angled pressure. Keep your back and neck relaxed; don’t strain and twist to hold your hands in place. Gently and slowly control the movement.

ANTERIOR THIGH
Purpose:
To target and remove restrictions and restore a full range of motion to the quadriceps muscles, which can become contracted, notably the rectus femoris, which crosses the hip.

Starting out:
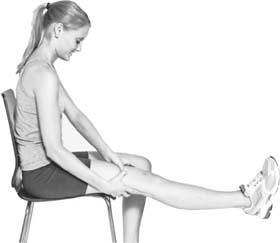
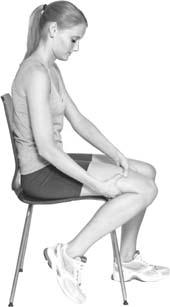
Sit with one knee bent to ninety degrees, the foot flat on the floor. Extend the treatment leg out to the front. Place your hands on the quadriceps, grasping underneath the leg with the fingers and pushing the thumbs down and pulling up toward the body. An alternative grip for this large muscle is to grasp the quadriceps muscle as above, but place one thumb on top of the other, supporting and adding additional pressure to the first thumb. You can also use a tool. Because the quadriceps is a large muscle, the area must be broken down into three separate zones: inside, middle, and outside. Start working each zone about an inch and a half up from the knee and at three-inch intervals from there.
How to do it:
With angular pressure applied to the quadriceps, bend the knee to ninety degrees, bringing the foot back past the other foot alongside the chair as far as is comfortable. Repeat with your other leg.
Troubleshooting:
Do not apply too much pressure directly down into the muscle. Keep the pressure consistent and angled toward the hip. Do not slide the fingers over the skin and make sure to bend the knee as far as is possible without pain.

POSTERIOR THIGH
This stretch lengthens the hamstring, but the first part targets the attachment at the hip, gradually introducing more stretch as the knee extends. The straight leg stretches the whole muscle and both attachments at once and should only be done after the bent-knee stretch has warmed up the muscle. If the muscle is tight, this bent-knee stretch might be enough on its own.