Pro Oracle Database 11g Administration (94 page)
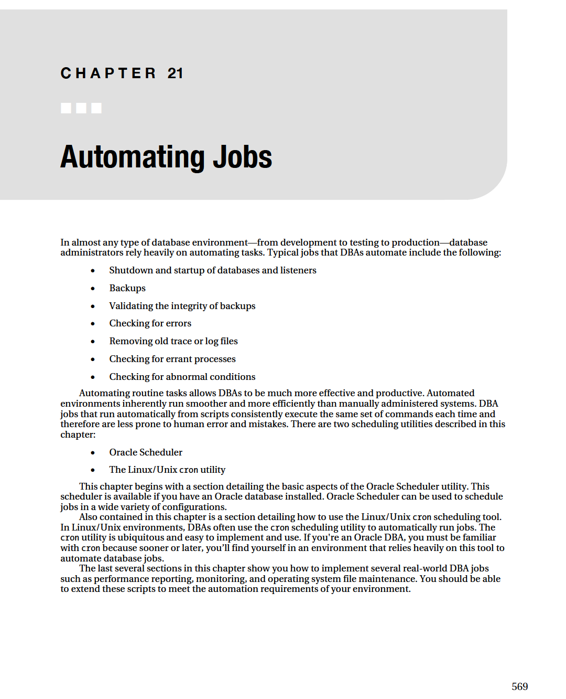
Encryption: awaiting job completion
Scheduled time: none
Introduction time: 2010/10/21.22:12
Earliest exec time: 10/21.22:12
Last update time: 2010/10/22.22:15
Expire time: never
State: running since 2010/10/22.22:15
Priority: 100
Run on host: BLLNX3
Requires: family APRESS_RMAN and any device
Attempts: 4
Processed: 744.7 MB
Log:
2010/10/22.22:12:35 Dispatching job to run on BLLNX3.
2010/10/22.22:12:46 Drive or volume on which mount attempted is unusable.
2010/10/22.22:13:52 Dispatching job to run on BLLNX3.
2010/10/22.22:14:05 Drive or volume on which mount attempted is unusable.
2010/10/22.22:14:52 Dispatching job to run on BLLNX3.
2010/10/22.22:15:11 Drive or volume on which mount attempted is unusable.
2010/10/22.22:15:52 Dispatching job to run on BLLNX3.
In the output shown above, the lsjob command displays all active jobs using the -a option. Aside from showing the information about the job ID, scheduled time, contents and job state, the -l option shows more information, such as the RMAN backup piece, media family, encryption status, priority number, the host where the job runs, and number of times OSB attempted to run the job. The --subjobs or -j shows the subordinate job (subjob), which is apress_oracle/83.1. The --progress or -o option shows the progress of the active job, which is 744.7 MB processed so far. The --requires or -R option show resources required to run each job, which is media family APRESS_RMAN and any device. The --log or -L option shows the log associated for the job, which is the log information shown at the bottom of the output. The --times or -C option shows all relevant times for each job, such as introduction time, earliest exec time, last update time, and expire time.
Showing Job Transcripts
Aside from the lsjob command to help monitor the OSB job, you can issue the catxcr command to gather detailed information about the operation of the job. The --folow or -f option shows the transcript as the file grows, which is useful when monitoring active jobs. The --msgno or -m shows the number for each line in the transcript. The --level or -l option indicates the message level, which is useful to generate additional messages for debugging or troubleshooting. For example: ob> catxcr -f -m -l 0 apress_oracle/88
If you run an RMAN backup and allocated two RMAN channels for SBT_TAPE, then two sub-jobs are created. The lsjob command with the --subjobs option displays details for each sub-job. For example: 565
CHAPTER 20 ■ ORACLE SECURE BACKUP
ob> lsjob --active --subjobs
Job ID Sched time Contents State
---------------- ----------- -------------------- -----------------------------
apress_oracle/88 none database DB11R2 (dbid=4187425583) processed; Oracle job(s) scheduled
apress_oracle/88.1 none incremental backup running since 2010/10/22.23:34
apress_oracle/88.2 none incremental backup running since 2010/10/22.23:34
The prior output shows two sub-job IDs, namely apress_oracle/88.1 and apress_oracle/88.2, which is one for each of the two RMAN channels. To show the transcript of a particular sub-job, provide the sub-job ID apress_oracle/88.2, as shown here:
ob> catxcr -f -m -l 0 apress_oracle/88.2
Virtual Test Devices
You may relate to the expression “experience is the best teacher.” You have read this chapter, and you want to try the OSB commands and examples yourself. However, you don’t have a physical tape device connected to any test servers in your environment. In this situation, where you are going to install and experiment with OSB? Well, you can configure a virtual test device solely for testing purposes.
■
Caution
You should not implement virtual test devices in a production environment. Oracle Support does not provide support for virtual test devices.
To configure a virtual test device, perform the following steps. In this example, the hostname of the media server is BLLNX3.
1. Logon as the oracle OS user at your designated media server of the OSB
administrative domain.
$ su - oracle
2.
At the OSB media server, create a directory that hosts the virtual storage elements and virtual tape devices. Make sure you have enough disk space on the mount point where you are going to create the directory.
$ mkdir /osb_vdevices
3. Logon as admin user to the obtool utility, and provide the corresponding password.
$ obtool -u admin
Password:
566
CHAPTER 20 ■ ORACLE SECURE BACKUP
4. Configure the virtual tape library by running the following mkdev command using the -t option to specify the device as a tape library and the -v option to specify as a virtual tape library. The -S option specifies the number of storage elements. The -I option specifies the number of export and import elements.
The -o option specifies that the tape device is logically available to OSB. The -B
option with the yes value specifies that the barcode reader is present. The -a option attaches the virtual library vlib1 to directory /osb_vdevices/vlib1 of host BLLNX3.
ob> mkdev -t library -v -S20 -I2 -o -B yes -a BLLNX3:/osb_vdevices/vlib1 vlib1
5. Configure the virtual tape devices by running the following mkdev command using the -t option to specify the device as a tape device and the -v option to specify as a virtual tape device. The -o option specifies that the tape device is logically available to OSB. The -l option specifies the name of the associated tape library. The -d option specifies the data transfer element (DTE). The -a option attaches the virtual tape vdrive1 to directory /osb_vdevices/vdrive1 of host BLLNX3. To configure additional virtual tape devices, run the same mkdev command. However, for the second virtual tape device, change the name vdrive1 and directory /osb_vdevices/vdrive1 to vdrive2 and directory
/osb_vdevices/vdrive2, respectively, and so on.
ob> mkdev -t tape -v -o -l vlib1 -d1 -a BLLNX3:/osb_vdevices/vdrive1 vdrive1
6. Run the insertvol command to manually insert a volume to the tape library.
The -L option specifies the library name, which is vlib1. Since there are 20
storage elements defined when the virtual library is created, then issue unlabeled 1-20 to insert 20 new volumes.
ob> insertvol -L vlib1 unlabeled 1-20
7. Issue the lsvol command to display the volumes in the tape library vlib1.
ob> lsvol -l -L vlib1
OSB Software Upgrades
You have an older version of the OSB installed and you want to upgrade to the current release. To perform an OSB upgrade, perform steps similar to installing OSB. However, before performing the OSB
upgrade, make sure to backup the OSB catalog in the admin server and stop the OSB daemons and services at all hosts in the administrative domain. Also, upgrade the admin server first, then the media servers and client hosts.
For OS-specific commands to start and stop OSB services, refer to Table 20–7. You must have root privilege on Linux/Unix or be a member of the Administrators group for Windows to run these commands.
567
CHAPTER 20 ■ ORACLE SECURE BACKUP
Table 20–7.
OSB Service Shutdown and Startup Commands
Operating System
Shutdown Command Startup
Command
Linux
/etc/init.d/observiced stop
/etc/init.d/observiced start
Solaris
/etc/init.d/OracleBackup stop
/etc/init.d/OracleBackup start
AIX
/etc/rc.d/init.d/OracleBackup stop
/etc/rc.d/init.d/OracleBackup start
HP-UX
/sbin/init.d/OracleBackup stop
/sbin/init.d/OracleBackup start
Windows
net stop observiced
net start observiced
■
Note
Oracle Secure Backup release 10.3 is not backward compatible with previous releases, such 10.1 and 10.2.
Summary
OSB is a tool you can use to back up and restore operating system files to and from tape. OSB is a full-featured tape management utility. OSB can be integrated with RMAN to facilitate the backup of database files directly to tape. This provides you with extra data protection in the event that the entire server or data center experiences a failure.
OSB is available in two editions: Oracle Secure Backup Express and Oracle Secure Backup. The Express version is available for use without extra licensing costs and is suitable for small shops with one server and one physical tape device. The full-fledged Oracle Secure Backup edition is suitable for distributed servers across multiple platforms (Linux, Unix, Windows).
You can access OSB through graphical tools like Enterprise Manager and OSB Web tool or through command line tools such as obtool. This chapter focused on demonstrating how to use the command line obtool for backup and restore operations.
This chapter concludes the section covering backup and recovery. The next chapter focuses on automating jobs and database troubleshooting.
568
CHAPTER 21 ■ AUTOMATING JOBS
Automating Jobs with Oracle Scheduler
Oracle Scheduler is a tool that provides you a way of automating the scheduling of jobs. Oracle Scheduler is implemented via the DBMS_SCHEDULER internal PL/SQL package. Oracle Scheduler provides you with a sophisticated set of features for scheduling jobs. The following sections of this chapter only cover the basics of using Oracle Scheduler to automate jobs with simple requirements.
■
Tip
There are currently nearly 70 procedures and functions available within the DBMS_SCHEDULER package. See the Oracle Database PL/SQL Packages and Types Reference guide (available on OTN) for complete details.
Creating and Scheduling a Job
In Listing 21–1, a shell script is created that contains an RMAN backup command. This shell script is named rmanback.bsh and is located in the /orahome/oracle/bin directory. The shell script also assumes that there is a /orahome/oracle/bin/log directory available.
Listing 21–1.
A Shell Script Containing an RMAN Backup Command
#!/bin/bash
# source oracle OS variables; see chapter 2 for an example of oraset script
. /var/opt/oracle/oraset RMDB1
rman target / <
spool log to '/orahome/oracle/bin/log/rmanback.log'
backup database;
spool log off;
EOF
exit 0
In Listing 21–2, you use the CREATE_JOB procedure of the DBMS_SCHEDULER package to create a job.
Run it as SYS (from the SQL*Plus).
Listing 21–2.
Using the CREATE_JOB Procedure
BEGIN
DBMS_SCHEDULER.CREATE_JOB(
job_name => 'RMAN_BACKUP',
job_type => 'EXECUTABLE',
job_action => '/orahome/oracle/bin/rmanback.bsh',
repeat_interval => 'FREQ=DAILY;BYHOUR=14;BYMINUTE=11',
start_date => to_date('21–OCT-10'),
job_class => '"DEFAULT_JOB_CLASS"',
auto_drop => FALSE,
comments => 'RMAN backup job',
enabled => TRUE);
END;
/
570
CHAPTER 21 ■ AUTOMATING JOBS
In Listing 21–2, some of the parameters warrant additional explanation. The JOB_TYPE parameter can be one of the following types: STORED PROCEDURE, PLSQL BLOCK, or EXTERNAL. In this example, an external shell script is executed so the job is of type EXTERNAL. If you have a PL/SQL stored procedure that you want to run, you use the STORED PROCEDURE type. The PLSQL BLOCK type allows you to directly run an anonymous block of PL/SQL.
The REPEAT_INTERVAL parameter is set to FREQ=DAILY;BYHOUR=14;BYMINUTE=11. This instructs the job to run daily, at 1400 hours (military time) at 11 minutes after the hour (in other words, to run daily at 2:11 p.m.). The REPEAT_INTERVAL parameter of the CREATE_JOB is capable of implementing sophisticated calendaring frequencies. For example, it supports a variety of yearly, monthly, weekly, daily, hourly, minutely, and secondly schedules. The Oracle Database
PL/SQL Packages and Types Reference
guide contains several pages of syntax details for just the REPEAT_INTERVAL parameter.
The JOB_CLASS parameter specifies which job class to assign the job to. Typically, you would create a job class to provide a method for a job to automatically inherit attributes by virtue of being assigned to a particular class. For example, you might want all jobs in a particular class to have the same logging level or purge log files in the same manner. There's a default job class that can be used if you haven't created any job classes. This example uses the default job class.
The AUTO_DROP parameter is set to FALSE in this example. This instructs the Oracle Scheduler to not automatically drop the job after it runs. I want this job to persist and run at the scheduled frequency.
Viewing Job Details
To view details about how a job is configured, query the DBA_SCHEDULER_JOBS view. Listing 21–3 selects information for the RMAN_BACKUP job: