The Essential Book of Fermentation (34 page)
Read The Essential Book of Fermentation Online
Authors: Jeff Cox
Serves 6
1½ cups all-purpose flour, chilled in the freezer for 1 hour
¼ teaspoon salt
9 tablespoons unsalted butter, cut into ½-inch pieces, chilled in the freezer for 1 hour
1
⁄
3
to ½ cup ice water
1 tablespoon extra-virgin olive oil
2 bunches green onions, white and green parts, thinly sliced
5 ounces fresh goat cheese
4 ounces ricotta cheese
¾ cup coarsely grated mozzarella cheese
¼ cup crème fraîche
¼ cup grated Parmigiano-Reggiano cheese
Salt and freshly ground black pepper
1.
Preheat the oven to 375ºF.
2.
Combine the flour and salt on a cold work surface. With a pastry scraper, cut the butter into the flour until half is the size of peas and the other half is slightly larger. Make a well in the center and add half of the ice water. Push together with your fingertips and set aside any dough that holds together. Add the rest of the water and repeat. Form the mixture into a rough ball. Roll out the dough on a well-floured surface into a 14-inch diameter circle and trim up the edges. Place on a large baking sheet and place in the refrigerator.
3.
Heat the oil in a large skillet over medium heat. Add the green onions and cook until softened, 4 to 5 minutes. Remove from the heat and let cool.
4.
In a medium bowl, mix together the green onions, goat cheese, ricotta, mozzarella, crème fraîche, and Parmigiano-Reggiano. Season with salt (easy on the salt—you might not even need any—since the cheeses have lots of salt) and pepper.
5.
Remove the pastry from the refrigerator. Spread the cheese mixture over the pastry, leaving a 2½-inch border around the edge uncovered. Fold the uncovered edge of the pastry over the cheese mixture, pleating it to make it fit. There will be an open hole in the center revealing the cheese mixture. Bake the galette for 35 to 40 minutes, until golden brown. Let cool for 5 minutes, then slide the galette off the pan and onto a serving plate. It may be served hot, warm, or at room temperature.
CHAPTER 12
The Vegetable Ferments

Making Your Own Kimchi
In Korea, the traditional process of making and storing kimchi is called
gimjang
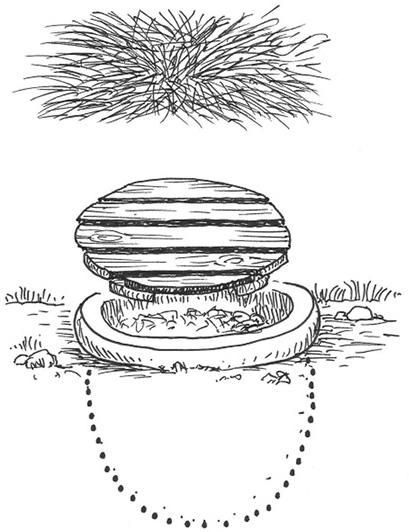
. In the era before refrigeration, and as far back as 1000 BC, Koreans prepared for the winter by filling large earthenware jars with chopped, brined Chinese cabbage, plus carrots, garlic, onions, turnips, leeks, daikon radishes, scallions, and other vegetables, mixed with a paste made with dried shrimp, fish sauce, ginger, and—after peppers from the Americas were imported in the sixteenth century—cayenne pepper. The jars were buried up to their necks in the earth and covered with thick layers of straw so they wouldn’t freeze. Fermentation started in the fall when temperatures were above freezing, but as the winter set in, the kimchi stopped fermenting, allowing it to be used as a staple food during the cold months. In the spring it would start fermenting again and the winter kimchi soon would be used up. As spring and summer vegetables became available, fresh kimchi would be made, maturing in a week so that fresh batches were made as needed with no need for storage.
As kimchi goes through its seasonal phases, different bacteria predominate, resulting finally in a stable spicy pickle that will last in the fridge for a month or more. There’s an analog to this process in nature. Imagine a virgin forest in the eastern United States, undisturbed since pre-Columbian times. Let’s say you take a bulldozer to such a climax ecosystem, like the mixed hardwoods, evergreens, understory trees and shrubs, perennial plants, and annual forbs in a mid-Atlantic forest, and you scrape it clean of all plants. A climax ecosystem will not grow back. First will come the opportunistic sun-loving rough weeds like giant ragweed, greenbrier, and pigweed. Then the tough grasses and brambles will return. Within a few years you’ll get sumac and sun-loving woody shrubs like sassafras. Eventually trees like tulip poplars, quaking aspen, moosewood, and ailanthus will grow, throwing shade so understory woody shrubs that prefer shade, like the dogwoods, will be able to grow. Eventually, over many years, the evergreens like hemlock, plus birches, hardwoods like oak and hickory, and ash trees, hophornbeam, and beech will come back, but it will take many centuries for all these denizens of the eastern forests to settle into a climax ecosystem—stable, renewing itself year after year, supporting the rest of the flora and fauna native to the region.
The same kind of phases, where a host of microbes take turns bringing the kimchi to delicious maturity, happens when you make this spicy Korean pickled cabbage at home, only at a much more rapid time scale: weeks instead of centuries. Cabbage is held under the surface of salty brine. Certain bacteria of the genus
Lactobacillus
that happen to be floating in the air start to ferment the cabbage. As they work over a few days, they make the brine more and more acidic, which prevents pathogenic microbes from growing and encourages more and different acid-loving bacilli. The mix of microorganisms keeps changing until the kimchi is ready to be refrigerated. These microbes are also found in the fermentation of other foods, such as yogurt and cheese, and they are very, very good for us, as they add to the diversity and strength of the ecology of our intestinal flora. They also make kimchi taste great.
But here’s the thing: The mix of bacteria, yeasts, and other microbes floating in the air in my kitchen will most likely be different from the microbes floating in your kitchen. And so every batch of kimchi is unique to the place where it’s made. When you make it yourself, you are allowing the particular mix of microbes in your house or apartment to produce a pure expression of your very own locality. The French call this
terroir
and prize wines that show a taste of a certain place.
In Korea, the bacillus that ferments kimchi is called
Lactobacillus kimchii.
This bacteria produces bacteriocins (see
here
), which are proteins that destroy disease-causing bacteria and yeasts, and so help keep the kimchi wholesome as they also support our immune systems.
I first made kimchi at a gathering of the Fermenters Club at a winery in Santa Rosa. Austin Durant, the founder of the club in San Diego, flew up to Sonoma County for the get-together, but it was Jennifer Harris, a bundle of energy and a passionate fermenter, who put the session together. A generous handful of interested folks got a fermentation pep talk from Austin, and then Jennifer set us to work. She had previously filled a crock with three heads of shredded cabbage (she wanted to use the typical Korean napa cabbage, but the organic farm was fresh out so she substituted regular ballhead cabbage) and poured in enough brine to cover. The brine wilted the cabbage and pulled some of its juices into the liquid to make it crunchier.
We were instructed to bring a cutting board and knives, and we sat at long tables with vegetables that needed cutting. Within a half hour, many hands made short work of chopping whole carrots, daikon radishes, turnips, garlic, scallions, and jalapeño chiles into thin rounds. I asked Jennifer how I should cut my carrots, and she said, “As thin as possible.” To me that sounded like a challenge, and I cut rounds so thin they were translucent. The guy next to me was cutting carrots into rounds a few millimeters thick, but I suppressed the urge to lecture him on how to cut thin rounds, since, at that point, I wouldn’t have known what I was talking about. When all the vegetables were chopped, Jennifer and Austin tipped the crock and poured off the brine into a waiting container, then mixed the chopped vegetables into the cabbage. The brine wasn’t discarded. There would be use for it later on. You can make the shredded cabbage soak ahead of the final assembly of the kimchi if you wish, but it’s not required. It does help soften the cabbage for the squeezing and crushing that’s coming later, but the kimchi will still be fine without that step.
Now Jennifer made the paste. This is a mixture of a thumb of ginger, a handful of garlic cloves, an optional ½ cup dried shrimp (you can get these at a Southeast Asian market), a couple of tablespoons of ground cayenne, and equal parts of sugar, sea salt, and fish sauce. But not just any fish sauce. According to Jennifer and Austin, Red Boat Fish Sauce is best because its quality is high and it contains no preservatives that would shut down the fermentation. Visit www.redboatfishsauce.com and hit the “where to buy” button. I entered “Santa Rosa, California” in the search box and found that the sauce is sold at five stores within easy driving distance from here. This sauce of fermented anchovies is about the closest thing we have to garum these days. Although it sounds yucky, it’s a wonderful condiment and helps make kimchi the addictive side dish that it is. If you have a few minutes, google “garum” and enjoy a step back in time when ancient Greeks and Romans adored this sauce made from the fermented entrails of fish.

These ingredients are placed in a food processor or blender and whizzed into a paste. This paste is then turned into the crock with the vegetables and thoroughly mixed in by crushing, massaging, and kneading the paste-vegetable mixture with strong hands for about five minutes. You can wear latex gloves if you wish, but if Italians and Portuguese can mash grapes with their feet to make their wine, we can use bare hands to squeeze and crush our kimchi, no? Just wash your hands well before starting and don’t touch your eyes if you’re including hot peppers. Jennifer and Austin then filled a number of quart-size canning jars with the mixture and added enough of the original brine back so that the mixture of vegetables was covered. Jen pointed out that dry vegetables protruding above the liquid offer bad bacteria and yeasts a place to grab a toehold.
Each of the attendees at this meeting of the Fermenters Club got a quart jar of this kimchi to take home, with some instructions. As the lactobacilli that are naturally floating in the air colonize the kimchi and start the fermentation, they will produce carbon dioxide bubbles in the mixture. These need to be evacuated. Jennifer did it by removing the lid and plunging a slender knife into the mixture here and there, allowing the bubbles to rise to the surface and the gas to escape. She said that when we arrive home with our quart of kimchi, we should remove the lid, cover the top of the jar with a square of paper toweling, and screw on the band that holds the lid but without the lid itself. Gases will be able to escape through the paper, but fruit flies or other unwanted visitors won’t be able to get in. And store the kimchi in a cupboard that has a moderate temperature—not too hot and not too cool, with the ideal about 75ºF. Taste it after a week, and if it seems about right (a previous batch she made a week before tasted great) to your taste, put on the metal lid and band and store it in the fridge. But every day or two, open the jar not only to eat some of the kimchi, but to let any accumulated gases escape.