The Essential Book of Fermentation (43 page)
Read The Essential Book of Fermentation Online
Authors: Jeff Cox
2.
Set the bowl aside on a warm kitchen counter covered with a clean dish towel for 2 to 3 days, until it’s bubbly and fermenting by the wild yeast that’s colonized it, turning it slightly tangy. If it fails to bubble after 3 days, stir in 1 teaspoon of commercial yeast.
3.
After fermenting, add the salt and mix to incorporate.
4.
Find your largest, smoothest-surfaced pan or skillet and lightly oil it. Heat it over medium heat until a water drop dances on the surface. Spoon about 4 to 5 tablespoons of batter into the center of the pan, and tilt it gently in all directions so the batter thins out.
5.
Watch for bubbles to form on the surface of the injera. When they’ve broken and the surface of the flatbread is just about dry, remove from the heat and lift off the flatbread with a spatula. Injera should be thicker than a crepe but thinner than a pancake. Repeat until the batter is gone. Serve hot.
CHAPTER 14
The Bean and Seed Ferments

Homemade Miso
Miso is the wonderfully nutritious and tasty fermented soybean and rice paste that the Japanese use to make their staple miso soup. You can make it yourself at home, but you need the special fungus, called koji in Japan, whose scientific name is
Aspergillus oryzae.
If that name sets off alarm bells, it’s because
Aspergillus oryzae
’s cousin,
Aspergillus flavus,
is the source of the potent carcinogen aflatoxin. However, the koji mold does not produce aflatoxin. It’s been used for a thousand years in Japan to make not only miso, but also sake, amazake, bean paste, and other foods, all without recorded incidence of illness other than in the infrequent person who shows an allergic reaction to the soybeans used with it. For those people, it can be made by substituting lima beans or garbanzo beans. The following recipe also works fine with either canned or dried garbanzos. Canned garbanzos need no cooking, but they do need a good rinse to wash the salty packing water off them. If using dried garbanzos—also called chickpeas—figure that a cup of dried garbanzos is equivalent to about 2 or 2½ cups of cooked beans. Put the beans in filtered water and soak overnight. Pour off the water, add fresh filtered water to cover, and set to a medium boil for 3 hours. You don’t need to add salt to the water, as you’ll be using lots of salt when you make miso. The garbanzos will be done when a bean squishes fully when pressed between thumb and forefinger.
While you can use your homemade miso to make miso soup, you may find that it has many other uses in your kitchen. You’ll find some ideas for using it after the recipe for homemade miso.
Look for koji rice (dried rice colonized by
Aspergillus oryzae
) in Asian and Japanese markets, or order it by mail from an online source, such as South River Miso Company: www.southrivermiso.com. It’s possible to get koji fungus spores and inoculate the rice yourself, but it’s a lot easier to buy the koji rice that’s already colonized.
Look for organic soybeans, which are not allowed to be genetically modified. It’s a shame that the FDA has not promulgated a rule that food labels must state if they are genetically modified or contain genetically modified organisms (GMOs). Monsanto has patented a GMO soybean that can withstand applications of Roundup (glyphosate) herbicide, and currently about 90 percent of American soybeans have been so modified. I personally don’t want to put GMO foods into my system, and so the only way to guarantee that a food like soybeans is non-GMO is to buy organic.
For the fermentation, you’ll need a small glazed ceramic crock with no cracks. Mine is a 3-gallon crock about 2 feet tall and 18 inches in diameter. Wash all your utensils well and pour boiling water over them to prevent unwanted microbes or spores. Wash your hands well before handling the food. Read all these instructions before starting.
Your homemade miso will have great power to warm you when made into soup. Its restorative powers make it a favorite for midwives to give to laboring mothers. Because you chose organic soybeans, it has no preservatives, and it hasn’t been pasteurized. You’ll find it has a sharper, cleaner umami flavor than most mass-produced kinds. This makes it excellent for any broth-based soup, as a glaze for fish or pork, and for some of the recipes that follow.
Makes about 4 quarts
1 pound whole dry organic soybeans
3 cups spring or filtered water
5½ ounces sea salt, about ¾ cup
11 ounces dried koji rice, about a quart
1.
Soak the soybeans for 3 hours in the water, until they about double in size.
2.
Add the beans and soaking water to a pressure cooker and cook for 40 minutes, using your heaviest weight on the top of the cooker. If you don’t have a pressure cooker, boil the beans for 4 hours, or until they are very soft, adding more water to maintain the original level. Allow the pressure cooker to cool, then open the pressure cooker and transfer the beans to a colander set over a bowl to catch the cooking water. Set the cooking liquid aside and put the beans in a bowl or stainless-steel pot for mashing.
3.
While the beans are still hot, use a potato masher or—even better—a wooden mallet plunged headfirst into the beans, to crush them until just a few beans are still whole. Allow this mashed mixture to cool to lukewarm (about 95ºF, or close to body temperature).
4.
Reserve 2 teaspoons of the salt and dissolve the rest in about ¾ cup of the cooking water. Add the salty water to the soybeans, mixing it in thoroughly.
5.
Using your hands, pour the koji rice into the bean mixture and work it through the paste until it’s thoroughly incorporated.
6.
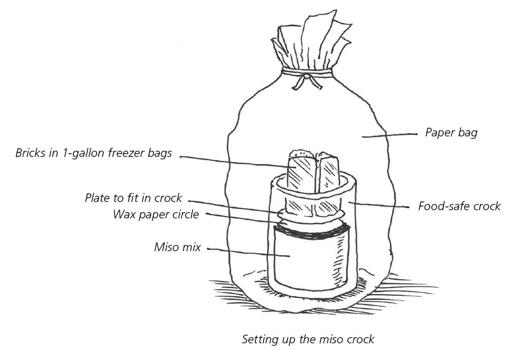
Wet the inside of the ceramic crock and rub it with 1 teaspoon of the salt. Add the prepared miso mixture. Level the surface and sprinkle it all over with the second reserved teaspoon of salt to prevent the growth of unwanted organisms. Cover the surface with a piece of wax paper cut roughly to size. Set a plate that just fits into the container on the wax paper. Weight it with about 10 pounds of well-washed bricks placed in a plastic bag. I found that a 1-gallon plastic freezer bag can be zip-locked closed over one brick, so I put bricks into two of these bags and set them on the plate. This makes a small batch, and small batches are easiest to process. If you want to make a larger batch and fill your crock up to three-quarters full, repeat steps 1 through 5 as needed, following the remaining steps over the next day or two until the crock is at least three-quarters, or a little more, full. I have made a nearly full crock at one time by quadrupling the above recipe, but it’s much more difficult than making smaller batches. If you do quadruple the recipe, be prepared to spend several hours mashing and mixing.
7.
When you remove the weights, plate, and wax paper to add more of the miso mixture, rub the inside exposed surface of the crock with a little salt and sprinkle just a little more salt on the new surface, then replace the wax paper, plate, and weights. Place the crock in a paper bag and close the bag with a length of string. If the crock and bricks are too tall for the paper bag to close, slip a tall plastic kitchen garbage bag over the top and tie it tightly to the paper bag with string. The bag with the crock should be placed in a cool room or, even better, in a dark closet. After a month or two, open the bag, take off the weights, plate, and wax paper and check to see if liquid tamari has formed on the surface. If it hasn’t formed, increase the weight. If it has, mix it down thoroughly into the miso, wipe the inside exposed walls of the crock with sterile cloth, and rub just a little salt onto the walls and sprinkle a scant ½ teaspoon on the new surface. Replace the wax paper with a fresh piece of wax paper, the plate, weights, and bag, and set it back in the closet for another 9 months, until it is a year old. (For red miso, store for up to 3 years; the longer it ferments, the darker the color.) Pour off the tamari and store it in the fridge. Taste the miso to make sure it’s to your satisfaction. It should smell clean and have good color. After it’s finished, store the miso in 1-pound tubs in the fridge or store some for future use in the freezer. It will keep for 2 years or more in the fridge or indefinitely in the freezer.
Miso Salad Dressing or Asian Marinade for Chicken
Makes about ½ cup, enough for 3 to 4 pieces of chicken
1 tablespoon
miso
2 tablespoons rice vinegar
2 tablespoons tamari
2 tablespoons toasted sesame oil
½ teaspoon minced ginger
½ teaspoon minced garlic
Place all the ingredients in a bowl and mix thoroughly. If you marinate chicken in the sauce, discard the sauce after marination (don’t use it for salad dressing). Marinate the chicken in the fridge for 4 to 12 hours before cooking.
Marinade for Grilled Beef