The Vertical Gardening Guidebook (7 page)
Read The Vertical Gardening Guidebook Online
Authors: Tom Corson-Knowles
A small compost pile could be about five feet wide and three feet tall. The length and size of your compost pile will vary based on how much food scraps and organic material you throw in and how quickly you use it in your garden.
Heaps should be used if you have sufficient space in your yard. Simply add scraps to the pile that you accumulate daily, or keep them in a container and dump them into a heap once you have generated enough. By creating a heap in the fall, your compost will continue to decompose throughout the winter months.
If space allows, you should try to create two heaps of compost. Once the first heap is large enough, then allow it to decompose, while you work on building the second heap. It’s not required for you to turn the compost in your heaps, it is entirely up to you. But keep in mind that the decomposition process will take longer if you don’t.
Avoid throwing food scraps onto a heap of compost that has not been turned because it will attract insects (mostly flies). Wood can also be added, but make sure that they are chopped up, so that the pile doesn’t become brush. Wood takes longer to decompose, sometimes up to a couple of years – but it will make a richer compost when you combine as many kinds of compostable organic material as you can find.
S
HEET
C
OMPOSTING
If building heaps of compost isn’t something you want to do, you can use this method instead. All you have to do is spread a thin layer of organic materials on an area of your garden – this can be materials like leaves, food and garden scraps and cut grass, all of which should be shredded or chopped before being added. Once this is done, you will then till the layer of materials using a spade, hoe or other tool.
One issue with sheet composting is that it tends to release carbon residues, which will pull nitrogen from the soil to help with decomposition. Also, if you have items in your compost that are high in nitrogen and could end up releasing nitrogen too fast; this could slow down the decomposition process.
The best time to do sheet composting is in autumn. The compost should be spread out in a two inch by four inch layer. The best tool to use for tilling is a rotary tiller, if you’re planting a vegetable garden. A garden fork or hoe would be best if you’re planting perennial or bulb flowers.

Sheet composting in action.
T
RENCH
C
OMPOSTING
Trench composting is known to be one of the easiest ways to create compost from food scraps. All you need to do is dig a hole in your yard that is about a foot deep, then simply chop up and mix the food scraps with the soil you dug up. Afterward, you will place about eight inches of additional soil on top. If the temperature is warm enough, the compost will take between one month and a year to decompose.
There are some people who randomly make trenches of compost, while others create an organized system. One system that is commonly used is to bury food and garden scraps inside of holes that were dug near the drip line of bushes and trees.

Trench composting in action.
In England, they use a trench composting system that involves a three-season rotation, known as vertical composting. The garden is divided up into rows that are three inches wide. Here is how the system works:
Year One
– A hole is dug that is a foot wide and then filled with compostable materials. Once the compost is an inch high, the hole is covered with soil. A one inch section is left open as a path right next to it. Next in line is another one inch strip that is used to plant your garden items. In all there are three rows.
Year Two
– Unlike with year one, the third section is the one used for the trench. The same steps are used to create the compost. Your garden is planted in the second row and the first row is now the walking space.
Year Three
– The section that was used for the trench in year one and the walking path in year two now becomes the planting area, which should be rich because the compost should be fully decomposed. The second space is now the trench and the third space is now for walking.
M
ORE
A
DVANCED
C
OMPOSTING
S
UPPLIES
There are other different methods of composting that you can use that require certain equipment. Some equipment is cheap, while others are more on the expensive end. First on the list are holding units, which are bins that are used to throw your kitchen scraps into.
Little maintenance is needed with most models and they’re small enough to be used on of apartment and condo balconies. You should use non-wood materials for your compost in holding units. Just throw in the scraps as you get them, instead of trashing them.
Holding bins are easy to use, but require time to generate ready compost. They don’t require you to turn them at all, which is why the process is a lot slower – sometimes taking as long as six months to two years. The process will work much faster if you add earth worms to your compost bins!
Portable units can be purchased that can be turned and aerated. They can be moved about easily. These usually come in the form of plastic, wire fencing / hardware cloth, wood with wire frames or snow fencing.
You can try increasing the aeration of the compost in the holding units by poking holes into the soil and placing ventilating stacks in the center. It will look like pipes sticking out of the middle of the dirt which will allow oxygen into the soil, further decomposing the organic matter.
You will have to place the pipes down before pouring in the compost. The pipes can be made out of wire mesh or even grouped together sticks that are tied together loosely. If you decide to use PVC pipes, make sure that they are about an inch in diameter or bigger. Drill holes throughout the sides of the pipes to give more aeration to your pile.
Some people place down a plastic aeration mat or wooden pallet before dumping in the compost. Since you will be continually placing in new organics into your compost, the finished compost will usually be found near the bottom of the pile.
When needed, you can remove the compost at the bottom of the heap for your garden. Some holding bins have removable doors at the front or bottom, so that this can be easily done. If you want, you can remove the completed compost and place it in a separate bag.
Keep in mind that holding units that are heavier or permanent and have no removable doors will require more effort to create the compost. You will have to remove the finished compost to another container. It’s a good idea to have about three of these bins – one could be for finished compost, another for maturing compost and the third for fresh compost.
You have the choice of buying a holding bin that is made of plastic or wood, or building one yourself using hardware cloth, pallets, metal barrels, limber and tires. These permanent structures can also be made with bricks, rocks and concrete blocks.
If you decide to build one yourself using wood, avoid using those that are penta, creosote or copper arsenate (CCA). Don’t use these types of wood around your edible gardens either! These heavy metals can leak into your soil and go straight through your skin, giving you heavy metal toxicity or poisoning! I highly recommend you use wood that is naturally resistant to decay, such as cedar or pine that hasn’t been treated.
T
URNING
U
NITS
Unlike typical compost bins, the turning units are made specifically for aeration. You are able to spin this to keep oxygen flowing through your compost. If you’re looking to create compost faster then turning units are the kind you’ll love. All of the aeration forms bacteria that decompose the compost quicker.
You will find two different types of turning units available – a series of bins or a rotating barrel. By turning the bins every five to ten days and within two months or less, your compost will be ready – if your compost has a good mixture of carbon, nitrogen and moisture.
By heating up the compost between 90 and 140 degrees Fahrenheit, it will kill diseases, fly larvae and weed seeds. This is also a good environment for the compost to decompose. Turning units will cost a bit more than holding units. If you decide to build one on your own, it will take a little more effort upfront.
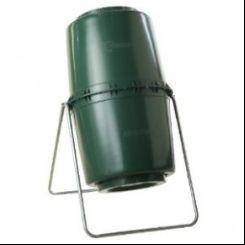
A small compost turning unit.
Those who buy the turning bins that have multiple bins and rolling balls sometimes find it hard to operate, especially if they have problems with their back or physical limitations. There are some turning bins that are created to have easier use and maintenance. Barrel turning units are smaller in size than the other types of bins, so if you don’t require too much compost, then this could be the option for you.
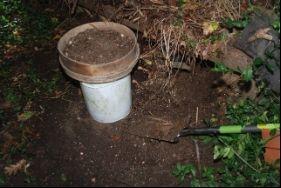
With the turning units, make sure to accumulate your food waste in a container so that when you place it into the bin it is filled to the prescribed level. The container you save it in should be pest-proof.
If you’ll be keeping the compost container indoors, there’s a neat trick you can use to reduce the smell – just throw a light layer of saw dust on top of the scraps.
W
HAT
C
OMPOST
S
HOULD
L
OOK
L
IKE
You want your compost to be rich, dark and earthy like in the picture below from my compost pile at home. It shouldn’t have any bad smell from food scraps – the bacteria should have broken all that down by the time you use it for your garden.
C
HAPTER 8.
H
OW DO
Y
OU
S
TART
S
EEDS FOR A
V
ERTICAL
G
ARDEN?
Starting seeds for your vertical garden is just like with starting seeds for traditional gardening methods. If you are new to gardening and starting seeds, then this chapter will teach you what you need to know!
You can either start seeds yourself or you can purchase plants that have already started to grow. Here are a couple of reasons why starting seeds is a great idea: