Windows Server 2008 R2 Unleashed (161 page)
Read Windows Server 2008 R2 Unleashed Online
Authors: Noel Morimoto
and Data Warehouse, and then click Check.
NOTE
The prerequisite checker findings will be displayed and will have active links that can
be clicked to get specific guidance, as well as links to download software and hotfixes.
6. When you are finished with the Prerequisite Viewer, click Close.
Follow the corrections in the prerequisite checker to resolve any problems before proceed-
ing to the installation. Some of the guidance will be warnings, particularly with some of
the hotfixes. Leaving out hotfixes might allow the installation to proceed, but might make
the OpsMgr application less stable. It is highly recommended that all the recommenda-
Installing Operations Manager 2007 R2
817
tions be applied to ensure the most stable platform possible. If any of the installations
require a reboot, it is recommended to run the prerequisite checker again.
Once the server meets all the prerequisites and is ready for installation, the steps to run
the install are as follows:
1. Logon with the OpsMgr service account.
2. Launch SetupOM.exe from the OpsMgr installation media.
3. Click Install Operations Manager 2007 R2.
4. Click Next.
23
5. Accept the license agreement and click Next.
6. Enter the CD key if required and then click Next.
7. When the Custom Setup page displays, leave the components set to their defaults,
and then click Next.
8. Type the management group name in the Management Group text box and click Next.
9. Select the instance of SQL Server on which to install the Operations Manager 2007 R2
database (the local system because this is a single-server install), and then click Next.
10. Leave the default database size of 1,000 MB, and then click Next.
11. Select Domain or Local Computer Account, type the user account and password,
ptg
select the domain or local computer from the list, and then click Next.
12. On the SDK and Config Service Account page, select Domain or Local Account, type
the user account and password, select the domain or local computer from the list,
and then click Next.
13. On the Web Console Authentication Configuration page, select Use Windows
Authentication and click Next.
14. On the Operations Manager Error Reports page, leave the Do You Want to Send Error
Reports to Microsoft option cleared and click Next to not send Operations Manager
2007 R2 error reports to Microsoft.
15. On the Customer Experience Improvement Program page, leave the default option
of I Don’t Want to Join the Program Selected, and then click Next.
16. On the Ready to Install page, click Install.
17. When the Completing the System Center Operations Manager 2007 R2 Setup Wizard
page appears, leave the Backup Encryption Key check box selected to back up the
encryption key.
NOTE
A copy of the encryption key is needed to promote a management server to the role of
the Root Management Server in the event of a failure of the RMS.
18. Leave Start the Console selected to open the Operations Console.
19. Click Finish.
818
CHAPTER 23
Integrating System Center Operations Manager 2007 R2 with
Windows Server 2008 R2
Operations Manager 2007 R2 is now installed in a single-server configuration. This config-
uration can manage up to 250 servers.
Importing Management Packs
After the initial installation, OpsMgr only includes a few management packs. The manage-
ment packs contain all the discoveries, monitors, rules, knowledge, reports, and views that
OpsMgr needs to be able to effectively monitor servers and applications. One of the first
tasks after installing OpsMgr 2007 is to import management packs into the system.
There are a large number of management packs in the Internet catalog on the Microsoft
website. These include updated management packs, management packs for new products,
and third-party management packs. It is important to load only those management packs
that are going to be used, as each additional management pack increases the database
size, adds discoveries that impact the performance of agents, and, in general, clutters up
the interface.
The key management packs for a Windows Server 2008 R2 environment are as follows:
. Windows Server Operating System MPs
. Active Directory Server MPs
ptg
. Windows Cluster Management MPs
. Microsoft Windows DNS Server MPs
. Microsoft Windows DHCP Server MPs
. Microsoft Windows Group Policy MPs
. Microsoft Windows Hyper-V MPs
. Windows Server Internet Information Services MPs
. Windows Server Network Load Balancing MPs
. Windows Server Print Server MPs
. Windows Terminal Services MPs
. SQL Server MPs (to monitor the OpsMgr database roles)
There might be other management packs that are appropriate for the environment,
depending on the applications that are installed. For example, if the organization has
deployed Exchange Server 2010 and HP Proliant server hardware, it would be good for the
organization to deploy the Exchange management packs and the HP Proliant manage-
ment packs.
For each of these management packs, it is important to load the relevant versions only.
For example, if the environment includes Windows Server 2008 only, only load the
Windows Server Core OS 2008 management pack. If the environment includes both
Windows Server 2003 and Windows Server 2008, load both the Windows Server Core OS
Installing Operations Manager 2007 R2
819
2003 and the Windows Server Core OS 2008. In addition, a number of language packs
don’t need to be loaded unless those particular languages are supported by the organiza-
tion at the server level.
Some collections of management packs require that all versions be loaded, but the
Management Pack Import Wizard will check and warn if that’s the case.
In versions of OpsMgr prior to R2, the management packs had to be downloaded from the
Microsoft website one by one, the MSI installed one by one, and the management packs
imported one by one. Dependencies would not be checked unless additional steps were
taken to consolidate the management pack files prior to importing. This was a very labor-
23
intensive process. Also, there was no easy way for checking for updates to already installed
management packs.
In OpsMgr 2007 R2, a new Management Pack Import Wizard was introduced. This wizard
connects directly to the Microsoft management pack catalog and will download, check,
and import management packs. It even does version checks to ensure that the manage-
ment packs are the latest versions. This is a huge improvement over the old method of
importing management packs.
To import the key management packs, use the following steps:
1. Launch the Operations Console.
ptg
2. Select the Administration section.
3. Select the Management Packs folder.
4. Right-click the Management Packs folder and select Import Management Packs.
5. Click the Add button and select Add from Catalog.
6. Click the Search button to search the entire catalog.
NOTE
The View pull-down menu in the Management Pack Import Wizard includes four options,
which are All Management Packs in the Catalog, Updates Available for Installed
Management Packs, All Management Packs Released in the Last 3 Months, and All
Management Packs Released in the Last 6 Months. The Updates option checks
against the already installed management packs and allows the download of updated
versions of those.
7. Select the key management packs from the previous bulleted list and click the Add
button for each of them. Each of the major management packs might include a
number of submanagement packs for discovery, monitoring, and other breakdowns
of functionality.
8. When done adding management packs, click OK.
9. The wizard now validates the added management packs, checking for versions,
dependencies, and security risks. It allows problem management packs to be
removed and dependencies to be added to the list.
820
CHAPTER 23
Integrating System Center Operations Manager 2007 R2 with
Windows Server 2008 R2
10. Click Install to begin the download and import process. Progress will be shown for
each of the management packs being imported.
11. After all the management packs are imported, click Close to exit the wizard.
After the import completes, the management packs take effect immediately. Agents will
begin discovering based on the schedule specified in the management packs and monitors
and rules will begin deploying.
Deploying OpsMgr Agents
OpsMgr agents are deployed to all managed servers through the OpsMgr Discovery
Wizard, or by using software distribution mechanisms such as Active Directory GPOs or
System Center Configuration Manager 2007. Installation through the Operations Console
uses the fully qualified domain name (FQDN) of the computer. When searching for
systems through the Operations Console, you can use wildcards to locate a broad range of
computers for agent installation. Certain situations, such as monitoring across firewalls,
can require the manual installation of these components.
The Discovery Wizard can discover and configure monitoring for Windows computers,
UNIX/Linux computers, and for network devices. It will push agents to Windows and
UNIX/Linux computers, as long as the proper rights are provided, such as an account with
local administrator rights or a root account.
ptg
To install domain member agents using the Discovery Wizard, run the following steps:
1. Launch the Operations Console and select the Administration section.
2. Right-click the top-level Administration folder and select Discovery Wizard.
3. Select the Windows computers and click Next.
4. Select Automatic Computer Discovery and click Next. This scans the entire Active
Directory domain for computers.
5. Leave the Use Selected Management Server Action Account and click Discover. This
starts the discovery process.
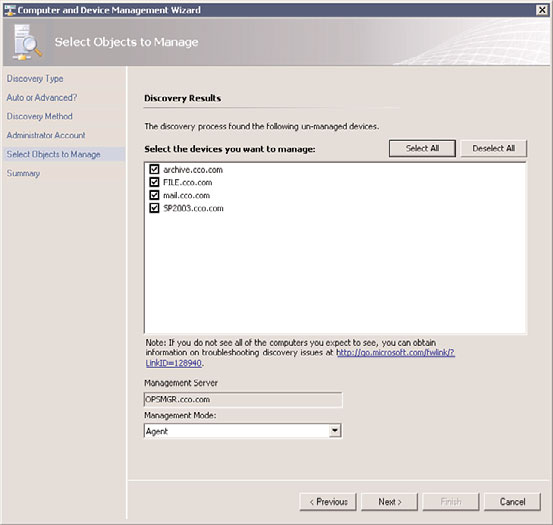
6. After the discovery process runs (this might take a few minutes), the list of discov-
ered computers is displayed. Select the devices that should have agents deployed to
them, as shown in Figure 23.7.
NOTE
The list only includes systems that do not already have agents installed. If a computer
has an agent installed, the wizard excludes it from the list of devices.
7. Click Next.
8. Leave the Agent Installation Directory and the Agent Action Account at the defaults,
and then click Finish.
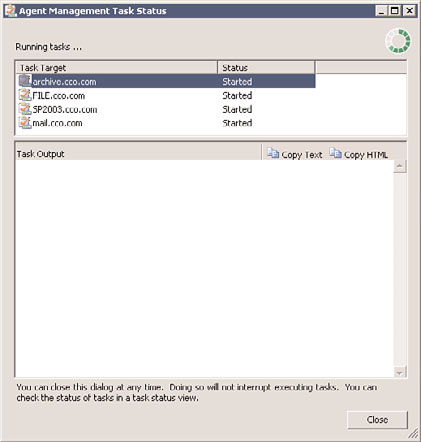
9. The Agent Management Task Status window appears, listing all the computers
selected and the progress of each installation. As shown in Figure 23.8, the agent
installation task started for the selected computers.
10. Click Close when the installation completes.


Installing Operations Manager 2007 R2
821
23
ptg
FIGURE 23.7
Discovered computers.
FIGURE 23.8
Agent installation progress.
822
CHAPTER 23
Integrating System Center Operations Manager 2007 R2 with
Windows Server 2008 R2
Even if the window is closed before the installs complete, the results of the installs can be
viewed in Task Status view in the Monitoring section of the Operations Console.
The agent deployment is very efficient and a large number of computers can be selected