Windows Server 2008 R2 Unleashed (262 page)
Read Windows Server 2008 R2 Unleashed Online
Authors: Noel Morimoto
configuration. Typically, remote attestation is used by third-party applications such as
BitLocker to ensure a machine’s state has not been tampered with. Sealed storage is used
to encrypt data such that it may only be decrypted once the TPM chip releases the appro-
priate decryption key. This release is only done by TPM chip once the required authentica-
32
tor for that data has been provided. Lastly, a TPM chip can also be used to authenticate
hardware devices.
In BitLocker, a TPM chip is used to protect the encryption keys and provide integrity
authentication for a trusted boot pathway (that is, BIOS, boot sector, and so on). This type
of TPM-supported protection is only performed when BitLocker is in either Transparent
Operation mode or User Authentication mode. When in either of these modes, BitLocker
uses the TPM chip to detect if there are unauthorized changes to the preboot environment
(trusted boot pathway protection) such as the BIOS and MBR. If unauthorized changes
were made, BitLocker will then request that a recovery key be provided before the Volume
Master Key can be decrypted and bootup of the machine can continue.
NOTE
Because of how a TPM chip is used, it is often referred to as a “root of trust.”
ptg
Comprehending BitLocker’s Drive Encryption Hardware Requirements
Configuring BitLocker Drive Encryption is not as simple as clicking through a few screens
on a Windows Server 2008 R2 wizard. A number of prerequisite steps must be fulfilled
before BitLocker can be configured and implemented.
Before you implement BitLocker Drive Encryption, make certain the following hardware
requirements and prerequisites are met and understood:
. The system should have a Trusted Platform Module (TPM) version 1.2 or higher.
. A Trusted Computing Group (TCG)-compliant BIOS, which can also support USB
devices during startup.
. If the system does not have TPM, a removable USB memory device can be used to
store the encryption key.
. There must be a minimum of at least two partitions on the system. One partition is
an active partition, referred to as the “system partition,” which is used by bootmgr
to boot Windows. This partition should be at least 100MB and not be encrypted.
The second “primary partition” is where the Windows binaries are installed.
. All drives and partitions must be formatted with the NTFS file system.
NOTE
The TPM and BIOS requirements only come into play when you want to use the TPM as
a root of trust for a machine’s BitLocker configuration.
1326
CHAPTER 32
Optimizing Windows Server 2008 R2 for Branch Office
Communications
Understanding BitLocker Deployment Scenarios
Similar to an RODC, branch office domain controllers are great candidates for implement-
ing BitLocker. BitLocker can be exploited at the branch office to protect against physical
breaches or theft of a domain controller or hard drive, and it can secure data during ship-
ment of a branch office domain controller from a hub site to a branch office location.
BitLocker can also be used to protect against data theft using disk cloning by maintenance
or outsourcing techniques.
Configuring BitLocker Drive Encryption on a Windows
Server 2008 R2 Branch Office Domain Controller
The following sections cover step-by-step procedures on how to implement BitLocker by
first configuring the system partitions, installing the BitLocker feature, and then enabling
BitLocker Drive Encryption. The enabling section includes steps for enabling BitLocker
when using TPM hardware, when not using TPM hardware, and enabling BitLocker on
additional volumes beyond the scope of the volume hosting the operating system. The
final step-by-step procedures include how to utilize the BitLocker recovery password in the
event of an issue and how to remove BitLocker after it has been installed and configured.
ptg
Installing the BitLocker Drive Encryption Feature
Now that the system partition has been configured, there are different ways to install
BitLocker. Install it during the initial configuration through Server Manager or through a
command prompt. The next sections illustrate how to execute both of these installations.
Installing BitLocker with Server Manager
To install the BitLocker server role using Server Manager, follow these steps:
1. Click Start, Administrative Tools, and Server Manager. The Server Manager tools
appear.
2. Right-click Features in the left pane of Server Manager, and then select Add Features.
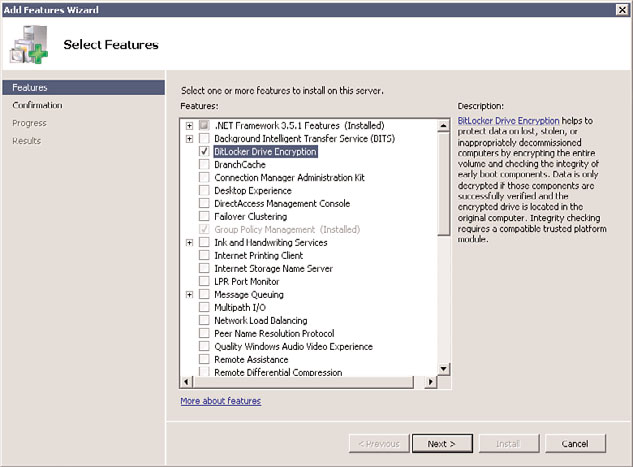
3. On the Select Features page, install BitLocker by selecting BitLocker Drive Encryption
in the Features section, as shown in Figure 32.7, and then click Next.
4. On the Confirm Installation Selections page, review the roles, services, and features
selected for installation, and then click Install to initiate the installation process.
5. Ensure the installation succeeded by reviewing the messages on the Installation
Results page, and then click Close.
6. After the BitLocker feature has finished installing, restart the system.
NOTE
Alternatively, the BitLocker Drive Encryption feature can also be installed by selecting
Add Features in the Initial Configuration Tasks Wizard.

Configuring BitLocker Drive Encryption on a Windows Server 2008 R2 Branch
1327
Office Domain Controller
32
FIGURE 32.7
Selecting the BitLocker feature for installation.
ptg
Installing BitLocker via the Command Line
Another alternative to installing BitLocker is via the command line (PowerShell). This
methodology should be reserved for branch office implementations using Windows Server
2008 R2 Server Core installation because a graphical interface to manage the server does
not exist. To install the BitLocker feature using PowerShell, follow these steps:
1. From within a PowerShell console session, execute the ImportSystemModules function.
2. After the PowerShell has finished loading all of the system modules, execute the
following command: Add-WindowsFeature BitLocker.
3. After the BitLocker feature has finished installing, restart the system.
Configuring the System Partitions for BitLocker
As mentioned earlier, one of the prerequisite tasks when configuring an operating system
for BitLocker is configuring a nonencrypted active partition also referred to as a system
partition. In Windows 7 and Windows Server 2008 R2, the necessary disk partitions are
automatically created when Windows is installed.
Enabling BitLocker Drive Encryption
By default, BitLocker is configured to use a Trusted Platform Module. To recap, however,
BitLocker’s full functionality will not be witnessed unless the system being used is compat-
ible with the TPM chip and BIOS. This next section looks at how to enable BitLocker Drive
Encryption with TPM. Microsoft recognizes that many laptops and computers do not have
TPM chips (or are not “TPM enabled”). If you are in this situation, don’t despair because

1328
CHAPTER 32
Optimizing Windows Server 2008 R2 for Branch Office
Communications
you can use BitLocker without a compatible TPM chip and BIOS. As such, this section also
covers information on how to enable BitLocker without TPM.
Enabling BitLocker Drive Encryption with TPM
The first step to enabling BitLocker with TPM is to turn ON the TPM. Use the following
steps to complete this task:
1. Go into the system’s BIOS setup and set TPM Security to ON.
2. Next, save the changes in the BIOS setup, and reboot the system.
3. Lastly, reenter the system’s BIOS setup and activate the TPM.
Once the TPM has been enabled, the next step is to enable BitLocker. Use the following
steps to complete this task:
1. Click Start, Control Panel, and double-click BitLocker Drive Encryption.
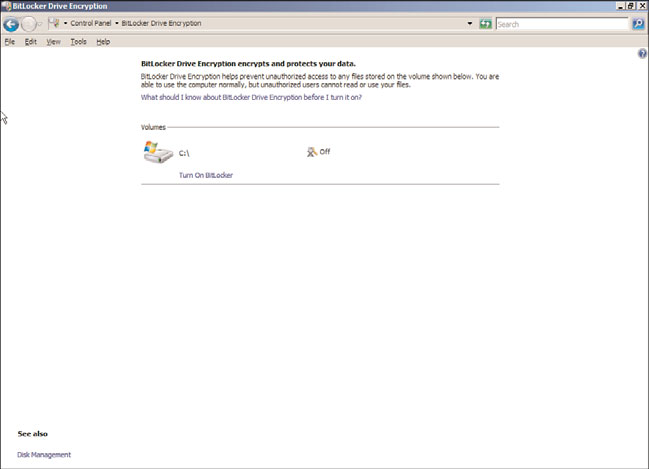
2. Enable BitLocker Drive Encryption for the operating system volume by clicking
Turn On BitLocker on the BitLocker Drive Encryption page. This is displayed in
Figure 32.8.
ptg
FIGURE 32.8
Turning on BitLocker via Control Panel.
NOTE
The Initialize TPM Security Hardware screen will be displayed if the TPM is not initial-
ized. Launch the wizard to initialize the hardware and then restart your computer.

Configuring BitLocker Drive Encryption on a Windows Server 2008 R2 Branch
1329
Office Domain Controller
3. Review the message on the BitLocker Drive Encryption Platform Check page, and
then click Continue with BitLocker Drive Encryption to start the BitLocker process.
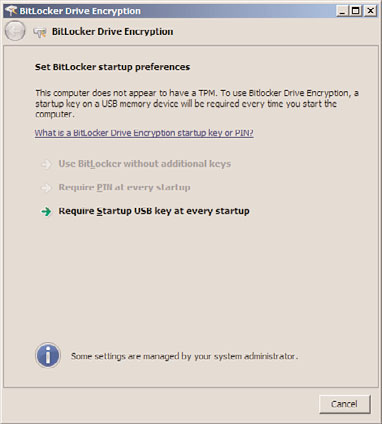
4. Because TPM hardware is present on this system, select the option to Use BitLocker
Without Additional Keys, and then click Next. This option can be found on the Set
BitLocker Startup Preferences page, as displayed in Figure 32.9. Additional keys such
as a PIN or USB are not required as BitLocker stores both encryption and decryption
32
keys within the TPM chip.
ptg
FIGURE 32.9
Specifying BitLocker startup preferences.
5. The Save the Recovery Password page is invoked. The administrator has the ability to
save the BitLocker recovery password on a USB drive or to a folder on the system. In
addition, the third option allows for printing of the password. Choose the desired
storage alternative for saving the recovery password, and then click Next to continue.
6. On the Encrypt the Volume page, ensure the Run BitLocker System Check option is
enabled, and then click Continue. The system check guarantees that BitLocker can
access and read the recovery and encryption keys before encrypting the volume.
7. The Encryption in Progress status bar is displayed. Restart the system when the
encryption process is finalized.
Enabling BitLocker Drive Encryption when TPM Is Not Available
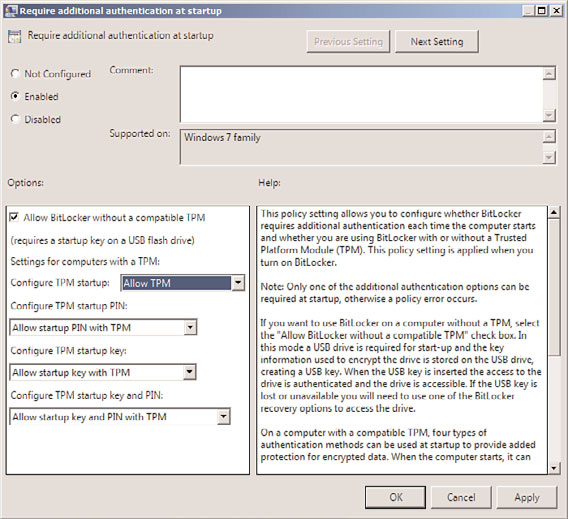
If TPM hardware is not available on the system, BitLocker must be configured to leverage a
USB key at startup. The following example configures a local group policy for the Group
Policy Object titled “Enabling Advanced Startup Options: Control Panel Setup.”
1. Click Start, Run, and then type gpedit.msc. Click OK and the Local Group Policy
Object Editor is invoked.
