Foundation Game Design with ActionScript 3.0, Second Edition (23 page)
Read Foundation Game Design with ActionScript 3.0, Second Edition Online
Authors: Rex van der Spuy
Now save your work in a format that's good for using in Flash games.
To use the image you've just created in an AS3.0 game or program (which you'll do in the next chapter) you have to save it in PNG format. PNG is a
compressed file format
.
Compressed files
have a very small file size, which means that they load quickly over the Internet and don't take up much space on a hard drive. PNG is a high-quality image file format that has a small file size but preserves any areas of the image that are transparent. (Other compressed file formats like JPEG or GIF don't preserve transparency, although GIF has limited 1-bit transparency that doesn't preserve any gradual changes in opacity, like those in shadows or semi-transparent gradient effects.)
The only problem with PNG files is that you can't edit them. This means that if you decide you want to make changes to an image, all the layers, styles, or other settings you might have saved while working in Photoshop will be gone.
For that reason, you need to save two versions of the image file. The first should be in PSD (Photoshop Document) format. PSD files are big, but you can make changes to them. The second file should be the compressed PNG file. You won't be able to edit this file, but it's the one that you'll use in your games. If you need to make any changes to an image, first make the changes in the PSD file and then create the PNG file from that PSD file.
Here's how to save your work and make the PNG file that you'll use in the next chapter:
Select File Save As from Photoshop's main menu. If this is the first time you've saved your work, give it the name “background”, and make sure that “Photoshop” is selected from the Format menu. Choose a location on your computer to save your work and click the Save button. (If a Maximize Compatibility window opens while you do this, just ignore it by clicking OK.)
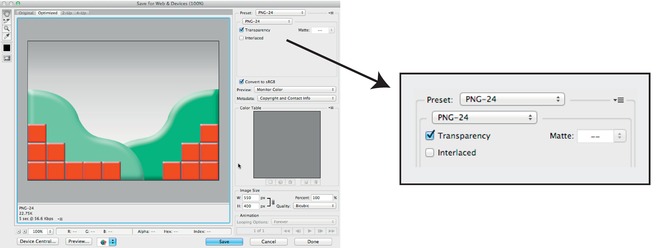
Let's next save the image as a PNG file. Select File Save for Web and Devices from the main menu. A new window will open, showing many different settings to optimize the quality and file size of the image. In the Preset menu at the top right of this window, select PNG-24.
Figure 2-76
shows what this should look like. Click the Save button. A new window will open to allow you to change the file name, if you need to, and choose a save location. Pick a location for the file and then click the Save button.

Figure 2-76.
The Save for Web and Devices window lets you save your work as a compressed PNG file.
You now have two versions of the image file saved: a PSD version that you can edit and a PNG version that you can use in your AS3.0 games and programs.
Check the location(s) where you saved these images. You should see these two files:
- background.psd
- background.png
You've got a background image for your game world; now you can put all your new Photoshop skills to work and make a game character.
If you've worked through all the exercises and instructions in this chapter, you now have a comprehensive set of skills for making game graphics with Photoshop. Photoshop is capable of much more but, for the purposes of drawing and making graphics, I've just about covered everything. The rest is mostly just a question of practicing what you've learned, refining your skills, and tweaking some settings.
Let's use these techniques to make a game character. I'll get you started on creating a new file and give you a few pointers along the way, but I'm going to leave you on your own for most of this one. Hey, you've got the skills, imagination, and the all-important History panel, so don't be scared. Go for it!
Before you start drawing, open a new Photoshop document file.
Select File New from Photoshop's main menu.
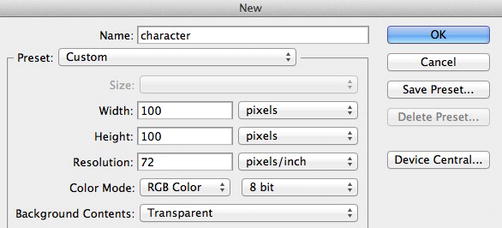
Give this new file the name “character.” Set both the width and height to 100 pixels.
Very importantly, set the Background Contents to transparent. This allows any transparent or unfilled areas of your drawing to let the background show through. You'll be able to tell you're drawing on a transparent background because the background will be filled with a checkerboard pattern.
Figure 2-77
shows what the new window should look like.

Figure 2-77.
Create a new file with the dimensions 100 by 100. Set the Background Contents to Transparent.
Click the OK button to open a new blank canvas.
It's going to be a little small, so select View Zoom In from the main menu until you find a size you like. More conveniently, hold down Ctrl (Windows) or Command (Mac OS X) and press the plus (+) and minus (-) keys on your keyboard to zoom in and out.
There are many more magnification options in Photoshop. You can use the magnifying glass from the Tools panel to draw an area around part of your image you want to zoom into. Double-click on the magnifying glass to make your image return to normal magnification. At the very bottom left of the canvas you'll find a number with a percentage next to it—that's the amount that you're zoomed in. You can enter any zoom percentage here that you like. You can also change the zoom percentage from the Application bar, which is directly above the Options bar.
You're now ready to start drawing!
Your new canvas is 100 by 100 pixels square. When you draw your game character, try to fill all the space right up to the borders of the canvas. This is especially important in later chapters in this book so that the edges of your game characters will appear to touch the edges of the game world.
Using only the techniques in this chapter,
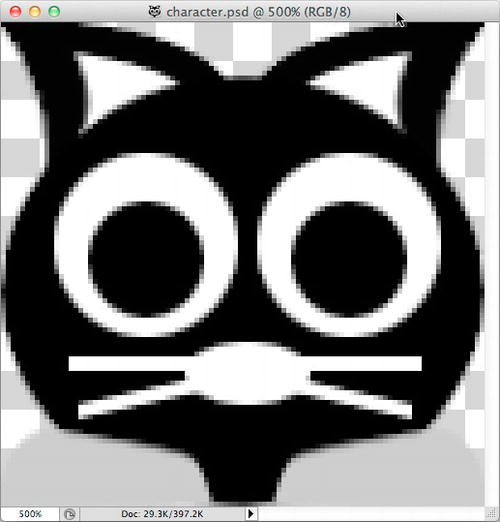
Figure 2-78
shows the game character I created.

Figure 2-78.
A game character
Notice that the background is filled with a grey and white checkerboard pattern. This shows that the background is transparent, which is what you need for the game world show through the character's edges. Your Photoshop canvas will look like this if you selected Background Contents Transparent when you created the new file. If you forgot to do this, you can make it transparent by clicking the eye icon in the Background layer.
You're going to learn a lot about Photoshop while you work on this character, and you'll probably have quite a few more questions by the time you finish. Let's look at a few more techniques that might help you with this project.
Circles? Yes, of course! You haven't made any circle shapes in this chapter so far, but they're extremely easy to make. Just choose either the Circle Tool (which is part of the same button set as the Rectangle Tool) or the Elliptical Marquee Tool (from the same button set as the Rectangular Marquee Tool.) Then just follow the same techniques you followed for making rectangular shapes. You can force your circular shapes to be perfect circles by holding down the Shift key while dragging with the mouse. You can start a drawing a circle from its center point by holding down the Alt (Windows) or Option (OSX) key while dragging.
Sometimes your graphics will have complex features that involve shapes that span multiple layers. In those cases, it's useful to work on all those layers together as a single group. Photoshop has two features to help you do this: linking and grouping layers.