Foundation Game Design with ActionScript 3.0, Second Edition (47 page)
Read Foundation Game Design with ActionScript 3.0, Second Edition Online
Authors: Rex van der Spuy
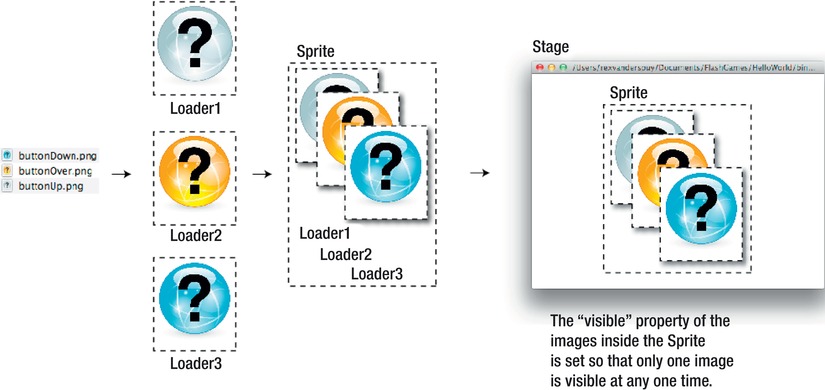
Let's review what you know about how images are loaded into a program. A PNG file is loaded from the images folder into a loader object. The loader object is then added to a Sprite. The Sprite containing the loaded image is then placed on the stage.
Figure 4-29
illustrates how this works for a single button image. But this is nothing new; it's what you did in the previous chapter to load all your images. Easy stuff!

Figure 4-29.
The processes of loading one image into the program
To make a button with three states, all three images are loaded into one Sprite. Yes, you heard right: three images in one Sprite! However, only one of those images is visible at any one time. The images of the button states will become visible or invisible depending on what the mouse is doing.
Figure 4-30
illustrates this concept.

Figure 4-30.
The processes of loading one image into the program
If you understand this concept, the code will be very easy to follow. Let's take a look at the code that does this in the Buttons.as file.
The Buttons.as file is surprisingly long, so you're first going to look at the specific code that loads the button images and adds the button Sprite to the stage. You'll see how all this code fits together in context with the rest of the program in the pages ahead. The highlighted comments explain what each section of code does.
This is the code in the class definition that creates the three image loaders and the single button Sprite:
//Create URLRequest objects to get the paths to the images
public var buttonUpURL:URLRequest
  = new URLRequest("../images/buttonUp.png");
public var buttonOverURL:URLRequest
  = new URLRequest("../images/buttonOver.png");
public var buttonDownURL:URLRequest
  = new URLRequest("../images/buttonDown.png");
//Create Loaders for the images
public var buttonUpImage:Loader = new Loader();
public var buttonOverImage:Loader = new Loader();
public var buttonDownImage:Loader = new Loader();
//Create a single Sprite to contain the images
public var button:Sprite = new Sprite();
There's nothing new here; you saw all this code in the previous chapter. The only slight difference is a shortcut that I took to create theURLRequestobjects. AS3.0 allows you to create theURLRequestobject and assign the path to the file at the same time, like this:
public var buttonUpURL:URLRequest
  = new URLRequest("../images/buttonUp.png");
You can see that the path to the image file is included in the parentheses. This saves you from having to write this line later in the program:
buttonUpURL.url = "../images/buttonUp.png";
The next step is to load the images, which happens when the program runs.
buttonUpImage.load(buttonUpURL);
buttonDownImage.load(buttonDownURL);
buttonOverImage.load(buttonOverURL);
But watch what happens next. The visiblepropertyof all the images is set to false, except for thebuttonUpImage.
buttonUpImage.visible = true;
buttonDownImage.visible = false;
buttonOverImage.visible = false;
All three images are then added to thebuttonSprite.
button.addChild(buttonUpImage);
button.addChild(buttonDownImage);
button.addChild(buttonOverImage);
They're all aligned on thebuttonSprite in exactly the same way—with their registration points at the top left corner. You can think of them as three playing cards that are perfectly stacked one of top each other. But only thebuttonUpImageis visible.
ThebuttonSprite then sets a few special properties that make it behave like a proper button.
button.buttonMode = true;
button.mouseEnabled = true;
button.useHandCursor = true;
button.mouseChildren = false;
Let's take a look at what each of these properties does.
- buttonMode
turns a Sprite object into a button. It allows a hand icon to be displayed when the mouse hovers over it. It also allows the button to accept click events using the Enter or Space key, if it's active. ThebuttonModecan be true or false. - mouseEnabled
determines whether or not the Sprite object can accept mouse events. Its default value is true, so you don't actually have to specifically write a line of code to set it to true. However, it's important to know that you can set it to false if you want to prevent the button from being clicked. - useHandCursor
determines whether or not the mouse arrow icon turns into a pointing hand when you move the mouse over the button. You can set this to either true or false. As soon as you set thebuttonModeproperty to true,useHandCursorbecomes truebydefault, so you don't specifically need to set it as such. But again, it's important to know that you can turn this off if you need to.
4.
mouseChildren
determines whether the mouse can interact with any other objects inside the Sprite. In this example, there are three objects inside the button Sprite: the three images that you've loaded into it. AS3.0 refers to these internal objects as
children
. When you create a button, you don't want the mouse to interact directly with any of these children. You just want to the mouse to interact with the parent button Sprite. This means you should always set the mouseChildren property to false. If you don't, your program will become confused about whether the mouse is intending to click the button or the images that it contains.
Lastly, thebuttonSprite is added to the stage and roughly centered.
stage.addChild(button);
button.x = 225;
button.y = 175;
Now that the images are loaded into the button and the button is on the stage, you can use mouse events to determine which image is displayed.
The code adds four listeners to the button Sprite, with matching event handlers.
button.addEventListener(MouseEvent.ROLL_OVER, overHandler);
button.addEventListener(MouseEvent.MOUSE_DOWN, downHandler);
button.addEventListener(MouseEvent.ROLL_OUT, resetHandler);
button.addEventListener(MouseEvent.CLICK, clickHandler);
Each controls the display of a different state. In the previous chapter you just used the CLICK event. These other listeners work in an identical way, except that they're triggered by different mouse actions. Let's see how they work in the context of the running program.
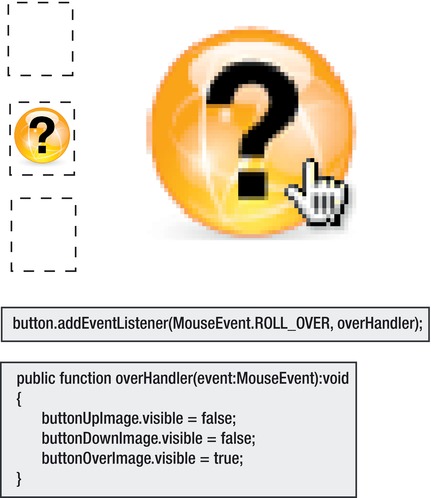
The ROLL_OVER event happens when the mouse rolls over the button. This creates a highlighting effect by displaying thebuttonOverImageand hiding the other states.
public function overHandler(event:MouseEvent):void
{
  buttonUpImage.visible = false;
  buttonDownImage.visible = false;
  buttonOverImage.visible = true;
}
Figure 4-31
illustrates this.

Figure 4-31.
The ROLL_OVER event
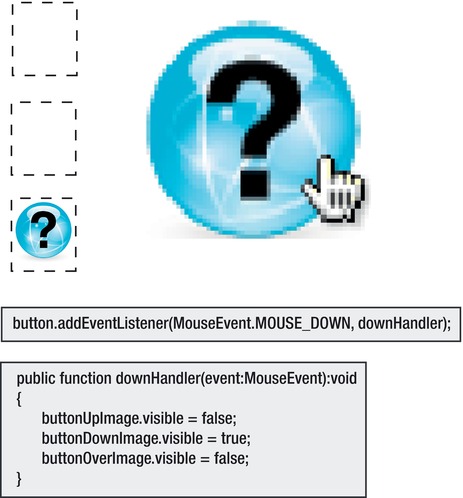
The MOUSE_DOWN event happens when the left mouse button is pressed down over the button. This is the effect of pressing the button (see
Figure 4-32
).
public function downHandler(event:MouseEvent):void
{
  buttonUpImage.visible = false;
  buttonDownImage.visible = true;
  buttonOverImage.visible = false;
}

Figure 4-32.
The MOUSE_DOWN event
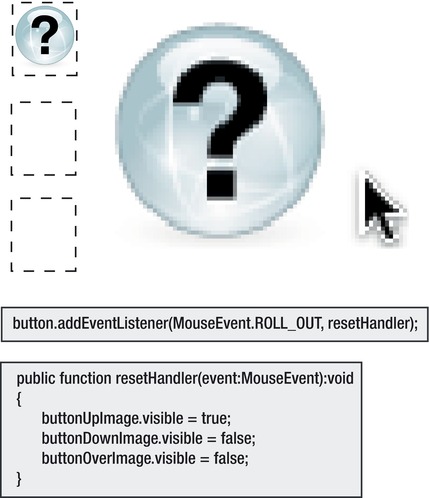
The ROLL_OUT event happens when the left mouse leaves the button. In this case, the button is reset to its up state (see
Figure 4-33
).

Figure 4-33.
The ROLL_OUT event
The CLICK event happens when the left mouse is clicked. In this example, it sets the button to its up state again. The effect is the same as the ROLL_OUT event.
public function clickHandler(event:MouseEvent):void
{
  buttonUpImage.visible = true;
  buttonDownImage.visible = false;
  buttonOverImage.visible = false;
}
And there you have all four button events that control the display of the button. Here's the entire code for the Buttons.as file so you can see it all in its proper context:
package
{
  import flash.net.URLRequest;
  import flash.display.Loader;
  import flash.display.Sprite;
  import flash.events.MouseEvent;
  [SWF(width="550", height="400",
  backgroundColor="#FFFFFF", frameRate="60")]
  public class Buttons extends Sprite
  {
    //Create URLRequest objects to get the paths to the images
    public var buttonUpURL:URLRequest
      = new URLRequest("../images/buttonUp.png");
    public var buttonOverURL:URLRequest
      = new URLRequest("../images/buttonOver.png");
    public var buttonDownURL:URLRequest
      = new URLRequest("../images/buttonDown.png");
    //Create Loaders for the images
    public var buttonUpImage:Loader = new Loader();
    public var buttonOverImage:Loader = new Loader();
    public var buttonDownImage:Loader = new Loader();
    //Create a single Sprite to contain the images
    public var button:Sprite = new Sprite();
    public function Buttons()
    {
      makeButton();
    }
    public function makeButton():void
    {
      //Load the images
      buttonUpImage.load(buttonUpURL);
      buttonDownImage.load(buttonDownURL);
      buttonOverImage.load(buttonOverURL);
      //Make the images invisible, except
      //for the up image
      buttonUpImage.visible = true;
      buttonDownImage.visible = false;
      buttonOverImage.visible = false;
      //Add the images to the button Sprite
      button.addChild(buttonUpImage);
      button.addChild(buttonDownImage);
      button.addChild(buttonOverImage);
      //Set the Sprite's button properties
      button.buttonMode = true;
      button.mouseEnabled = true;
      button.useHandCursor = true;
      button.mouseChildren = false;
      //Add the button Sprite to the stage
      stage.addChild(button);
      button.x = 225;
      button.y = 175;
      //Add the button event listeners
      button.addEventListener(MouseEvent.ROLL_OVER, overHandler);
      button.addEventListener(MouseEvent.MOUSE_DOWN, downHandler);
      button.addEventListener(MouseEvent.ROLL_OUT, resetHandler);
      button.addEventListener(MouseEvent.CLICK, clickHandler);
    }
    public function overHandler(event:MouseEvent):void
    {
      buttonUpImage.visible = false;
      buttonDownImage.visible = false;
      buttonOverImage.visible = true;
      trace("over");
    }
    public function downHandler(event:MouseEvent):void
    {
      buttonUpImage.visible = false;
      buttonDownImage.visible = true;
      buttonOverImage.visible = false;
      trace("down");
    }
    public function clickHandler(event:MouseEvent):void
    {
      buttonUpImage.visible = true;
      buttonDownImage.visible = false;
      buttonOverImage.visible = false;
      trace("click");
    }
    public function resetHandler(event:MouseEvent):void
    {
      buttonUpImage.visible = true;
      buttonDownImage.visible = false;
      buttonOverImage.visible = false;
      trace("reset");
    }
  }
}