Foundation Game Design with ActionScript 3.0, Second Edition (51 page)
Read Foundation Game Design with ActionScript 3.0, Second Edition Online
Authors: Rex van der Spuy
To create a believable illusion of motion, these slightly different images need to be flashed in front of a viewer's eyes at least 12 times per second (also known as frames per second or fps.) Most cartoon animation is animated at 12 fps. For really fluid natural motion, you need to increase the frame rate to about 24 fps. The 24 fps rate is the frame rate used by films shown in a cinema and high-quality animated films. Video uses a frame rate of roughly 30 fps.
In this project, the fps is set to 60, which is a common frame rate for games. This means that all the objects on the stage are updated 60 times per second. Each time the stage does one of these updates, it “enters a frame.” So the program
enters a frame
60 times per second.
In a nutshell, that is what Event.ENTER_FRAME means. Every time the program enters a new frame, the ENTER_FRAME event is triggered. So whatever directives you put inside an event handler called by an ENTER_FRAME event runs 60 times per second. It runs for the entire duration of the program or until you remove the event listener.
In the current program, these two directives are being run 60 times per second:
player.x += vx;
player.y += vy;
It makes the object appear as though it's moving. Here's how:
Imagine that the character is at an x position of 100. If the player of the game presses the left arrow key, thevxvariable is assigned the value -5. The next time the SWF enters a new frame, -5 is added to the character's x current position. The object's new position is now 95. On the next frame, -5 is added to the character's x position again, so its new position becomes 90. If the left arrow key is released, thevxvariable is assigned a value of 0. Zero is then added to the character's x position (using the += operator), so its position remains 90 and it stops moving.
Clever, huh?
These may seem like a lot of hoops to jump through just to get the character to move on the screen. Hang on for a bit; the advantages of this approach will be very apparent a bit later in the book when you look at natural motion using physics simulations. If you can calculate the velocity first, there are all kinds of fun things you can do with it before you use it to update the position of the game character. Patience, my child; all shall be revealed!
The ENTER_FRAME event is one of the most important of AS3.0's events for game designers. It's the basis for moving objects with programming code in AS3.0 Most of the new techniques you'll be looking at will be triggered by the ENTER_FRAME event, so you'll find that theenterFrameHandlerwill become quite a busy, bustling little place from now on'soon to be full of new friends and cheerful chitchat.
Now that you can move the little player character around the stage, notice that you can drive it completely off the edge and keep going on forever and ever if you want to. There are three main strategies that game designers use to prevent this from happening.
- Blocking movement at the edge of the stage.
- Screen wrapping, which is what happens when the player leaves the left side of the stage and emerges from the right.
- Scrolling, which happens when the character is in a very big environment and the background moves to reveal unexplored areas.
You'll look at each of these techniques one at a time.
Like most programming problems, if you understand the logic behind what you're trying to accomplish, all you need to do is figure out a way of representing that logic with programming code. Here's the logic behind what is accomplished with this bit of code:
If the character reaches the edge of the screen, push it back.
Hmm. Easier said than done? Let's see.
AS3.0 doesn't have any way of representing “the edge of the screen” as a whole, but you can access the built-instageobject. It containsstageWidthandstageHeightproperties that tell you the size of the stage. Maybe you can use those properties to figure out the top, bottom, left, and right boundaries of the stage and then stop the character from moving if you discover that its x or y positions go beyond them.
Sound promising? Give it a whirl! Follow these steps:
- Add the following code to the
enterFrameHandler:public function enterFrameHandler(event:Event):void
{
//Move the character
character.x += vx;
character.y += vy;
//Stop the character at the stage edges
if (character.x < 0)
{
  character.x = 0;
}
if (character.y < 0)
{
  character.y = 0;
}
if (character.x + character.width > stage.stageWidth){
character.x = stage.stageWidth - character.width;
}
if (character.y + character.height > stage.stageHeight)
{
character.y = stage.stageHeight - character.height;
}
} - Compile the program and use the arrow keys to move the character to the edges of the stage. It will stop moving when any of its sides reach the edge, as shown in
Figure 5-4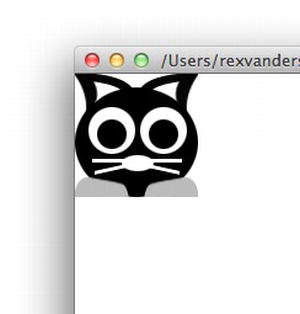
Figure 5-4.
The character stops moving when it reaches the edge of the stage.
Let's take a detailed look at how this code works to prevent the character from crossing the left, top, right, and bottom edges of the stage.
You know that the very left side of the stage has an x position value of 0. And remember that your character's registration point, the point at which its x and y position is measured, is its top left corner. That means you can use the following logic to prevent the character from crossing the left side of the stage:
If the character's x position is less than zero, then set it to exactly zero.
In code, this same logic looks like this:
if (character.x < 0)
{
character.x = 0;
}
If the character is moving from right to left, its x position value will gradually decrease. If it goes far enough, its x value will eventually reach zero, or even become negative. When this happens, the code pushes the character back so that it's at exactly position zero'the left edge of the stage.
Figure 5-5
illustrates how this works.
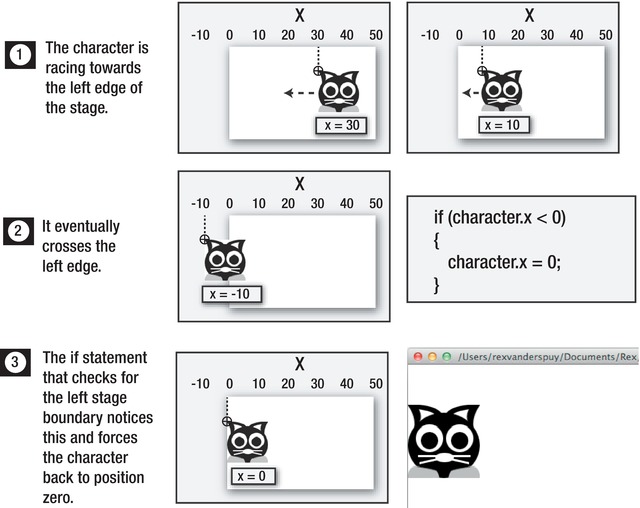
Figure 5-5.
The character stops moving when it reaches the edge of the stage.
Even though the character does actually move slightly beyond the stage boundaries that you set, you don't ever see it do that; you see it only at the point at which it's been forced back.
This logic works exactly the same for code that checks the top stage boundary.
If the character's y position is less than zero, then set it to exactly zero.
if (character.y < 0)
{
character.y = 0;
}
If the character crosses the top of the stage, it's forced back to a y position of zero.
Things get a little more complicated for checking the right and bottom stage boundaries. The reason for this is because the character's x and y position is measured from its top left corner. That means you need to stop the character
before
its top left corner reaches the right and bottom boundaries. If you stopped the character when its top left corner reached the right or bottom of the stage, the character's body would already have disappeared off the edge.
Figure 5-6
illustrates this problem.
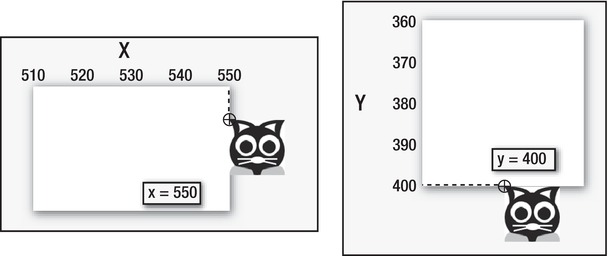
Figure 5-6.
You can't directly use the character's x and y position to stop it at the right and bottom stage edges.
By how much before do you need to stop it? By exactly the amount of its width or height.
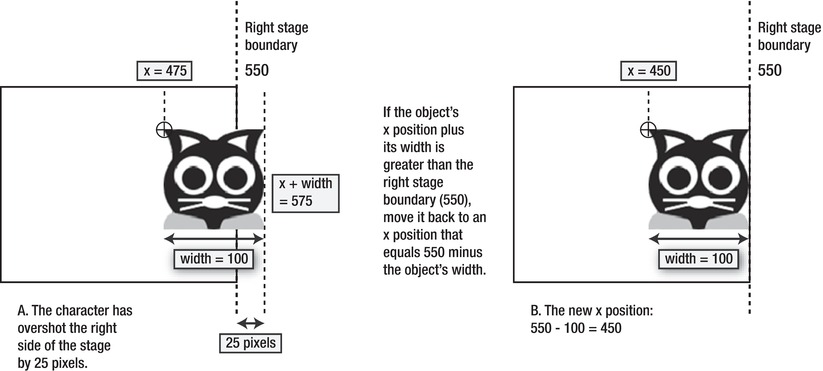
Figure 5-7
shows why this works.
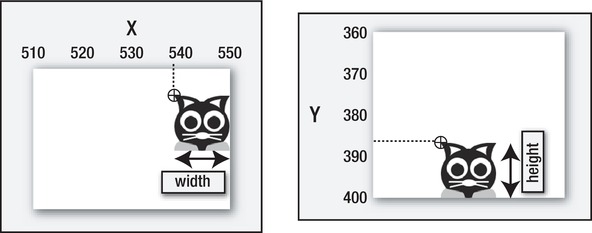
Figure 5-7.
Add the character's width and height to accurately stop it at the right and bottom edges.
You can find out what the character's height and width are by using the built-inheightandwidthproperties.
character.height
character.width
You created your character object in
Chapter 2
with a height and width of 100 pixels. So in this project,character.heightandcharacter.widthwill equal 100.
To find out the pixel values of the right edge and bottom of the stage, use the stage object's built-instageWidthandstageHeightproperties.
stage.stageWidth
stageHeight
The stage dimensions are 550 by 400 pixels. That means that thestage.stageWidthproperty has a value of 550, and thestage.stageHeightproperty has a value of 400.
Here's what you need to do to accurately stop the character at the right and bottom edge:
- First,
add the character's width or height to its x or y position.
This will give you the position of the character's leading edge. - If that leading edge has a value that is greater than the right or bottom edge of the stage, move the character back to an x or y position that equals the stage dimensions, minus the character's height or width.
So here's the code in the if statement that checks whether the character's x and y positions have crossed the right and bottom stage boundaries:
if (character.x + character.width > stage.stageWidth)
{
  character.x = stage.stageWidth - character.width;
}
if (character.y + character.height > stage.stageHeight)
{
  character.y = stage.stageHeight - character.height;
}
It compensates for the character's height and width, and stops it exactly at the stage boundaries.
Figure 5-8
illustrates this concept at work.
