Foundation Game Design with ActionScript 3.0, Second Edition (94 page)
Read Foundation Game Design with ActionScript 3.0, Second Edition Online
Authors: Rex van der Spuy
for(var i:int = 0; i < _boxPositions.length; i++)
{

//Create a box object
  var box:Box = new Box();

//Add the box to the stage
  addChild(box);
  box.x = _boxPositions[i][0];
  box.y = _boxPositions[i][1];

//Add it to the boxes array
  //for future use
  _boxes.push(box);
}
The for loop uses the_boxPositionarray's length property to repeat for however many box positions coordinates there are. The_boxPositions arrayhas 13 elements, so the loop repeats for 13 times.
for(var i:int = 0; i <
_boxPositions.length;
i++)
{...
Using the length property like this to determine the number of times to loop is really useful. It means that if you ever decide to add or remove boxes to the game, you just need to add or remove a pair of x and y coordinates in the_boxPositionsarray. The for loop will automatically adjust to the number of coordinates you have so you don't have to change the loop code at all.
The first thing that loop does is make a single box object.
var box:Box = new Box();
Next, the code adds this box to the stage.
addChild(box);
And then the cleverest trick of all: it gives the box x and y coordinates based on the coordinates you entered in the_boxPositionsarray.
box.x = _boxPositions[i][0];
box.y = _boxPositions[i][1];
How does this work? If you're new to loops and arrays, it's a bit of a mind-bender, so let's take a closer look. The first time the loop runs, the value ofiis zero. That means the previous code will actually look like this:
box.x = _boxPositions[0][0];
box.y = _boxPositions[0][1];
First of all, what is_boxPositions[0]? It refers to the first element in the_boxPositionsArray. It's the first x and y coordinate you noted down.
[0, 200]
In this little array, element 0 is the x position and element 1 is the y position.
_boxPositions[0][0] = 0
_boxPositions[0][1] = 200
Refer to the earlier section on 2D arrays if you're confused about this. It's exactly the same way you referenced the birds and insects in those examples. All this means is that the x and y positions of the first box are being copied from the_boxPositionsarray to the box object's x and y properties. You could interpret the code in the for loop to look like this:
box.x = 0;
box.y = 200;
The second time the loop runs,iwill have a value of 1. That means the code that positions the boxes will look like this:
box.x = _boxPositions[1][0];
box.y = _boxPositions[1][1];
_boxPositions[1]refers to _boxPositions' second element, which is the array that stores the coordinates of the second box.
[100, 100]
That means that you can find the second set of x and y coordinates by referring to them like this:
_boxPositions[1][0] = 100
_boxPositions[1][1] = 100
And finally, it means that the second time the loop runs, it interprets the two lines that position the box like this:
box.x = 100;
box.y = 100;
The loop runs for as many times as you have coordinates. That means it will create one box for one set of coordinates and assign one set of coordinates to each box.
Theboxobject created by theforloop is
local
. That means that it only exists for a single iteration of the loop. The loop is going to make 13 of these box objects in total but each of these box objects will be replaced by a new one each time the loop repeats. So, before you lose it, you need to push it into the_boxesarray so that you can store it for future use.
_boxes.push(box);
Now that the box object is safely stored in an array, you can access it at any time in the game to check for collisions—or even reposition or animate it! When the loop finishes running, all 13 box objects will be stored in the_boxesarray.
This is a wonderfully efficient little system, and once you have it set up and running, it pretty much takes care of itself. You don't even need to think about it too much; just copy and paste this basic code
whenever you need to make lots of objects and position them on the stage. You'll be able to use this basic format, unchanged except for the names of your objects, for countless game projects.
The next step in all of this is to add some collision detection so that your running, jumping game character can interact with the boxes. The hard part is now over, and you'll be surprised to see how easy it is to add collision detection.
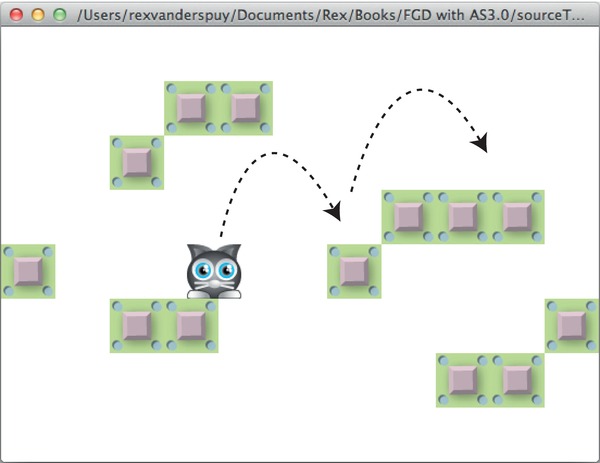
Open the LoopingThroughBoxes project folder and run the SWF file. You'll find a working system of exactly what I just discussed. The cat character can now explore the game world by running and jumping on the boxes on the stage, as illustrated in
Figure 9-16
. It's a lot of fun to play, and you now have all the skills you need to make something like this yourself and turn it into a game.

Figure 9-16.
Combine physics and collision detection to build the beginnings of a platform game.
Don't panic! There's nothing new to learn! This sophisticated effect is achieved with only a few additional short lines of code, all of which you've already seen before. Let's take a look at how it works.
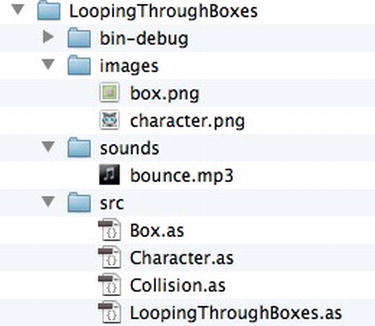
Take a look inside the LoopingThroughBoxes project folder, shown in
Figure 9-17
. In the images folder you'll find 50 by 50 pixel PNG images of the character and the box. The sound folder contains the bounce.mp3 sound file. In the src folder you'll find the application class, theCharacterclass, theBoxclass, and very importantly, theCollisionclass.

Figure 9-17.
The files used in the LoopingThroughBoxes project
Do you remember theCollisionclass from
Chapters 6
and
7
? You used it to block two objects, like this:
Collision.block(_character, _box);
It's this bit of code that you're going to use for the collision detection in this example.
TheLoopingThroughBoxesapplication class combines all the techniques you've used in this chapter so far: sound, jump physics, and adding objects to a game with arrays and loops. You should recognize all of it! The only new section is the for loop in theenterFrameHandlerthat handles the collision detection between the character and the boxes. Here's the entire application class, and I'll explain how the collision detection works in the pages ahead.
package
{
  import flash.display.Sprite;
  import flash.events.Event;
  import flash.events.KeyboardEvent;
  import flash.media.Sound;
  import flash.media.SoundChannel;
  import flash.ui.Keyboard;
  [SWF(width="550", height="400",
    backgroundColor="#FFFFFF", frameRate="60")]
  public class LoopingThroughBoxes extends Sprite
  {

//Embed the sound
    [Embed(source="../sounds/bounce.mp3")]
    private var Bounce:Class;

//Create the Sound and Sound channel

//objects for the sound
    private var _bounce:Sound = new Bounce();
    private var _bounceChannel:SoundChannel = new SoundChannel();
    private var _character:Character = new Character();
    private var _boxes:Array = new Array();
    private var _boxPositions:Array = new Array();
    public function LoopingThroughBoxes()
    {

//Set the box x and y positions
      _boxPositions
        = [
            [0, 200],
            [100, 100],
            [100, 250],
            [150, 50],
            [150, 250],
            [200, 50],
            [300, 200],
            [350, 150],
            [400, 150],
            [400, 300],
            [450, 150],
            [450, 300],
            [500, 250]
          ];

//Make the boxes
      for(var i:int = 0; i < _boxPositions.length; i++)
      {

//Create a box object
        var box:Box = new Box();

//Add the box to the stage
        addChild(box);
        box.x = _boxPositions[i][0];
        box.y = _boxPositions[i][1];

//Add it to the boxes array

//for future use
        _boxes.push(box);
      }

//Add the character
      addChild(_character);
      _character.x = 150;
      _character.y = 300

//Add the event listeners
      stage.addEventListener
        (KeyboardEvent.KEY_DOWN, keyDownHandler);
      stage.addEventListener
        (KeyboardEvent.KEY_UP, keyUpHandler);
      stage.addEventListener
        (Event.ENTER_FRAME, enterFrameHandler);
    }
    public function enterFrameHandler(event:Event):void
    {

//Apply acceleration
      _character.vx += _character.accelerationX;

//Apply friction
      _character.vx *= _character.friction;

//Apply gravity
      _character.vy += _character.gravity;

//Limit the speed, except when the character

//is moving upwards
      if (_character.vx > _character.speedLimit)
      {
        _character.vx = _character.speedLimit;
      }
      if (_character.vx < -_character.speedLimit)
      {
        _character.vx = -_character.speedLimit;
      }
      if (_character.vy > _character.speedLimit * 2)
      {
        _character.vy = _character.speedLimit * 2;
      }

//Force the velocity to zero

//after it falls below 0.1
      if (Math.abs(_character.vx) < 0.1)
      {
        _character.vx = 0;
      }
      if (Math.abs(_character.vy) < 0.1)
      {
        _character.vy = 0;
      }

//Move the character
      _character.x += _character.vx;
      _character.y += _character.vy;

//Check stage boundaries
      if (_character.x < 0)
      {
        _character.vx = 0;
        _character.x = 0;
      }
      if (_character.y < 0)
      {
        _character.vy = 0;
        _character.y = 0;
      }
      if (_character.x + _character.width > stage.stageWidth)
      {
        _character.vx = 0;
        _character.x = stage.stageWidth - _character.width;
      }
      if (_character.y + _character.height > stage.stageHeight)
      {
        _character.vy = 0;
        _character.y = stage.stageHeight - _character.height;
        _character.isOnGround = true;
      }
      for(var i:int = 0; i < _boxes.length; i++)
      {
        Collision.block(_character, _boxes[i]);
        if(Collision.collisionSide == "Bottom")
        {

//Tell the character that it's on the

//ground if it's standing on top of

//a platform
          _character.isOnGround = true;

//Neutralize gravity by applying its

//exact opposite force to the character's vy
          _character.vy = -_character.gravity;
        }
        else if(Collision.collisionSide == "Top")
        {
          _character.vy = 0;
        }
        else if(Collision.collisionSide == "Right"
          || Collision.collisionSide == "Left")
        {
          _character.vx = 0;
        }
      }
    }
    public function keyDownHandler(event:KeyboardEvent):void
    {
      if (event.keyCode == Keyboard.LEFT)
      {
        _character.accelerationX = -0.2;
      }
      else if (event.keyCode == Keyboard.RIGHT)
      {
        _character.accelerationX = 0.2;
      }
         else if (event.keyCode == Keyboard.UP
           || event.keyCode == Keyboard.SPACE)
         {
           if(_character.isOnGround)
           {
             _bounceChannel = _bounce.play();
             _character.vy += _character.jumpForce;
             _character.gravity = 0.3;
             _character.isOnGround = false;
           }
        }
          }
          public function keyUpHandler(event:KeyboardEvent):void
          {
            if (event.keyCode == Keyboard.LEFT
              || event.keyCode == Keyboard.RIGHT)
       {
          _character.accelerationX = 0;
       }
    }
  }
}