I'm Just Here for the Food (15 page)
Read I'm Just Here for the Food Online
Authors: Alton Brown
Tags: #General, #Courses & Dishes, #Cooking, #Cookery
But think about the heat for a minute. Cooking anything is a matter of bringing two environments into equilibrium with each other, right? And those outer layers of the meat are going to reach this equilibrium quicker than the inner portions, right? So if we want the majority of the inner mass to reach a certain temperature (medium-rare), we need to work with a lower temperature to begin with. If the oven temp is 200° F the roast will take longer to cook, but a higher percentage of the meat will be done to our liking. But if, like me, you’re in it for the caramelized crust, this method will leave you cold. Oh sure, there will be some crustiness, but nothing to set you raging. To heck with this roasting business.
But wait: you can have your crust and pink meat too. Simply expose the roast to different temperatures at different stages of the cooking process. Here are two potential strategies for roasting beef and lamb.
Start the roast in a 500° F oven
, and once a crust has formed, drop the temperature to 200° F and cook until done. This is a variation on the method most often seen in cookbooks. The instructions usually begin with “sear meat on all sides over high heat.” As far as I’m concerned that’s an added step that neither the cook nor the to-be-cooked needs. If the oven’s hot enough, the sear will happen on its own. The only problem here is that meats that meet high heat right from the get-go tend to lose more moisture than those that heated up slowly, which leads us to:

300° F is the minimum temp recommended by the USDA. I still stand by 200° for culinary reasons, but read cleanliness is Next to...before you do.
Start the roast in a 200° F oven
, and once the interior hits 10° below your target temperature, remove and cover lightly with foil. Crank the heat up, and when the oven reaches 500° F place the roast back in the oven and cook until a golden brown, delicious crust has formed.
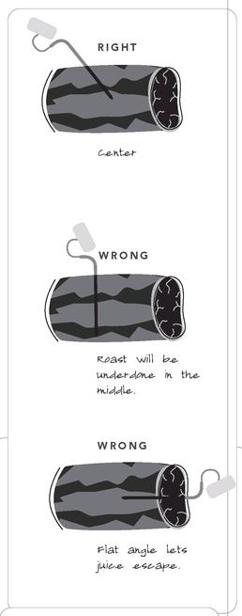
Roasts don’t care about time. They’re not trying to catch a train. So forget the clock and use your thermometer. Traditional meat thermometers are hard to read, and their spikelike probes are better suited to pitching tents. Get yourself a digital thermometer with a probe that attaches with a length of wire. Stick this into the roast (see illustration, opposite) and set the thermometer’s alarm to go off at the target temperature. No mysteries, no weight/time calculations.
MY SEARCH FOR A PERFECT PLACE TO ROAST
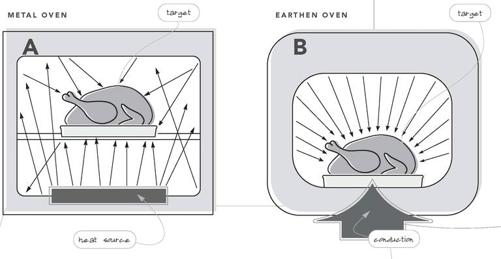
Let me get something off my chest: you can’t roast in a grill. You can cook a roast (noun) in a grill via indirect heat, but I still don’t consider it roasting because roasting requires even heat from all directions, which no grill can do. The real problem is that most home ovens can’t do it either.
Figure
A
is your average home oven. The heat is generated from a gas burner array safely hidden under a metal plate in the floor of the oven. You turn the oven on and set the thermostat and this burner fires. The metal in the floor heats, creating convection currents in the air that rise and fall through the cavity. Then there’s radiant energy, which rises up from the floor and bounces around like zillions of ricocheting bullets. (In electric ovens, a coil inside the cavity heats air and walls via radiant—both visible and infrared—energy.) If we place a piece of food in the oven, some of the careening waves will indeed strike and penetrate that food. These random hits, along with the convection air currents, are what roast it.

ROASTING: THE SHORT FORM
1.
Bring target food (meat or otherwise) to room temperature before cooking.
2.
If the target is a beef roast, consider dry-aging it for a couple of days in the bottom of your refrigerator.
3.
Lightly oil the meat. How light is light? Enough to make the entire surface of the meat glisten but not enough to leave a puddle on the plate.
4.
Season the meat. Kosher salt and freshly ground pepper are all the seasoning you need. Most folks go too easy on them. Don’t be shy.
5.
Choose the right meat: broiler/fryer chickens and smaller, tender cuts of beef, pork, and lamb.
6.
Roast at different temperatures. Either start low and finish high or, in the case of pork and chicken, vice versa.
7.
If possible, build an oven (with firebricks or flower pots). The even heat will reward you.
8.
Buy big: small roast—no leftovers; big roast—lots of leftovers (see
Sandwich Making Tips
).
9.
When purchasing beef look for “choice” grades. The marbling in these cuts will help to keep them lubricated throughout cooking.
10.
If you plan to make a
jus
, sauce, or gravy, consider doing your roasting on a bed of vegetables (carrots, onions, herbs, potatoes, and so on).
When a thermostat in the oven senses that the air in the cavity has reached the desired temperature, the burner turns off. When the thermostat senses a drop in temperature, it re-ignites the burner. How much of a drop is necessary to prompt the firing depends on the manufacturer.
All of this is fine and good, except for the fact that it’s almost impossible to get all this heat into the food evenly. Some ovens are better at it than others, but I’ve never seen a metal oven that roasts as well as a pile of dirt (be it in the form of clay, ceramic tile, or what-have-you).
Earthen ovens have made a big comeback in the last twenty years. Restaurants are building them into their kitchens and home enthusiasts are erecting them in their back-yards. I, for one, am happy about this de-evolution of culinary technology because several of the best meals I’ve ever eaten (or cooked, for that matter) have come out of such ovens. Why?
Consider figure
A
in comparison to figure
B
.
A
is your oven (and mine).
B
is an earthen oven. Oven
A
may be easy to use, easy to heat, clean, and so forth, but under normal usage it cannot generate heat beyond 500° F, nor can its walls
conduct
and store heat; rather, they reflect it, which is not the same thing. The earthen oven can be cranked well beyond the 500s, and once heated it will radiate that heat evenly, which is why foods roasted in such ovens look and taste so darned good.
Let’s say that you have no intention whatsoever of building a clay or adobe oven in your backyard. You can get the same effect by building another oven either inside your existing oven or inside your grill.
Few residential ovens heat beyond 500° F unless they’re in self-clean mode, in which case temperatures of up to 800° F are not uncommon. Take firebricks and build a box in the oven just big enough to hold the smallest metal roasting or baking pan that can possibly hold the target food. Turn the oven to its self-clean mode. Wait one hour, then turn the oven off. Although I haven’t been able to find a single manufacturer to condone the practice, it’s my oven so I do it anyway.
16
Place the thermometer probe into the room-temperature roast, then load the roast into the brick box. Close up with bricks and let the roasting begin. Do not turn the oven back on. What we’re counting on here is thermal decay: the roast is going to sear quickly but as the bricks cool down the heat pushing into the meat will slow so that you get the benefits of bilevel cooking without having to pay any attention to oven temperature whatsoever.
The cool thing about using the grill instead of the oven is that once the bricks are hot you can take them out and quickly assemble yourself an oven right there in the carport. Then you can use the grill for other things.
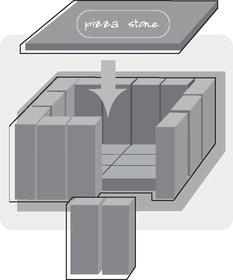
Arrange a stack of fireplace bricks (available from your local home supply store) on the floor of your oven in such a way that it forms a box just big enough to hold a 9-inch square baking pan (see illustration, upper right). Like a cast-iron skillet, these bricks are dense and can absorb a great deal of heat, then dole it out. In fact, if properly charged, the bricks will function like thermal capacitors. Light a chimney starter’s worth of charcoal and when the coals are good and hot (gray ash over all and lots of little dancing flames) dump them into the box and lid with bricks. The bricks will take an hour to charge, during which time you can prep the target food.
Sometimes in summer I heat my bricks in my large grill to 700° F or so, then, using fireproof gloves, assemble them in an oven shape right in my carport and bake bread in it. I’ve generally found that on a hot summer’s day the bricks will remain hot enough to cook as many as three pizzas.

CONVECTION OVENS
Some oven manufacturers would have us believe that the word convection indicates the presence of a fan in the cavity that speeds the movement of air, and in doing so speeds the cooking process while enhancing browning. The thing is, a real convection oven is more than a hot box and a fan. A real convection oven actually has heating elements outside the main cavity, which heat air that is then pushed into the cavity by a powerful fan. Such ovens cook by convection alone, as very little radiant energy is generated. Such ovens can do wonderful things when it comes to browning and baking—especially things like cookies. Top models can be stacked with upward of 100 cookies, and because of the precise airflow they all come out perfect. As one might expect, such miracles come with a price, but kitchen tools are like automobiles: you get what you pay for.
A WORD ABOUT MOMENTUM
Find yourself a Lincoln Continental from the mid-1960s. Get on an empty stretch of road and get that bad boy up to say 70 or 80 miles per hour. Now stop as fast as you can without losing control. Takes time, doesn’t it? That’s because that big hunk of auto has a lot of mass, and mass + motion = inertia. Well, a roast in the oven has inertia too. Pull an 8-pound rump roast out of a 500° F oven at the moment it hits your final desired temperature, and it’s all over. That Lincoln is going to cruise right past 135° to 140°, 150°, maybe 155° before stopping. If you go with a method in which you cook at a lower temperature, then boost the heat for a quick sear, you won’t have as much momentum so you’ll be able to pull the roast out of the oven maybe 10° from your final destination. If you choose to cook at a low temperature, then leave the roast out and let it rest while the oven’s reaching searing temperature, this way you’ll have even less momentum to deal with. No matter what you do, though, there’s always going to be what I call “thermal coasting” and the more mass you’re dealing with, the more coasting there’s going to be. Then, of course, there’s the resting.