Windows Server 2008 R2 Unleashed (117 page)
Read Windows Server 2008 R2 Unleashed Online
Authors: Noel Morimoto
tion of the policies at that level can cause 15–30 seconds of additional logon or startup
delay. This is because the Group Policy Objects at a particular OU level are evaluated at
one time, which takes a few seconds. The process is repeated for each OU level where
there are GPOs, and that processing time can really stack up, leading to longer logon
delays for the users and complaints to the help desk. Interestingly, the same applies for
the computer startup as the policies are applied, but users don’t notice that as much.
ptg
NOTE
The logon delay is something that can develop over time as the Active Directory infra-
structure matures. When initially deployed, the Active Directory will have relatively few
GPOs and, consequently, logon delays will be short. As time progresses, more GPOs
are added and more OU levels with GPOs are added, with an increase in the logon
times that users experience. This creeping logon time can be directly traced to the pro-
liferation of GPOs.
The general guidelines to reduce the logon performance impact are as follows:
.
Reduce the number of OU levels—
By reducing the number of OU levels, there
will be fewer levels to link GPOs to and, thus, better performance. The best practice
is to have a maximum of three levels, if possible. If more are needed, prohibit the
linking of GPOs to some of the levels.
.
Reduce the number of GPOs—
By consolidating settings into fewer GPOs, less
processing time is needed to read the GPOs. A single GPO at the same OU level will
perform faster than 10 GPOs at the same level.
.
Use security filtering—
If a GPO is security filtered to not apply to a user or
computer, the settings do not need to be read or processed. This speeds up logon
and startup performance.
Managing Users with Local Security and Group Policies
573
.
Disable user or computer settings in GPOs—
Each GPO consists of a user and a
computer section. If there are no settings in either of those sections, that section can
be disabled and will be ignored. For example, if a GPO only has computer settings
and the user settings are disabled, that GPO will be skipped at logon (which only
deals with user settings).
These guidelines can dramatically improve logon and startup performance.
The last guideline suggested disabling the user setting or computer settings, as processing
a GPO takes a certain amount of time for a computer at startup and for a user at logon. To
enable or disable the entire GPO or the user/computer portion of the GPO, run the
following steps:
1. Open the Group Policy Management console.
2. Expand the Forest folder, expand the Domains folder, select the specific domain, and
select the Group Policy Objects.
3. Select the GPO to enable or disable it.
4. Right-click the GPO and select GPO Status.
5. Select the appropriate option: Enable, User Configuration Settings Disabled,
Computer Configuration Settings Disabled, or All Settings Disabled.
ptg
This will take effect immediately. The All Setting Disabled option is useful for trou-
bleshooting when you want to completely disable a GPO without changing the ACLs or
the settings.
Block Policy Inheritance
The Block Policy Inheritance option enables an administrator to prevent higher-level poli-
cies from applying to users and computers within a certain domain or OU. This capability
can be useful to optimize Group Policy applications and protect sensitive user and/or
18
computer accounts from organization-wide policy settings.
To block policy inheritance, follow these steps:
1. Launch Server Manager on a domain controller.
2. Expand the Features folder.
3. Expand the Group Policy Management Console.
4. Expand the Forest folder.
5. Expand the Domains folder.
6. Select the specific domain, such as companyabc.com.
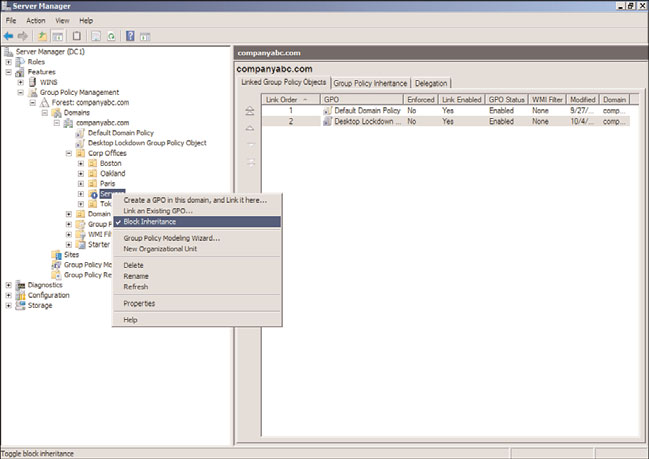
7. Locate and right-click the OU for which you want to block inheritance, and select
Block Inheritance, as shown in Figure 18.7.

574
CHAPTER 18
Windows Server 2008 R2 Administration
FIGURE 18.7
Blocking policy inheritance for an OU.
ptg
In this example, policy inheritance was blocked on the Servers OU. Group policies created
above the OU will not affect objects within the OU (unless the group policy is enforced;
see the next section). Note the blue exclamation mark icon on the OU to alert the admin-
istrator that policy inheritance is blocked.
The Enforce Option
Configuring the Enforce option prevents lower-level policies from blocking policy inheri-
tance and from changing the parameters or configured settings in a policy. This option
should be used only if a policy needs to be enforced on AD objects in every container and
subcontainer with a link or inheritance to this policy object.
To configure the Enforce option for a policy, follow these steps:
1. Launch Server Manager on a domain controller.
2. Expand the Features folder.
3. Expand the Group Policy Management Console.
4. Expand the Forest folder.
5. Expand the Domains folder.
6. Select the specific domain, such as companyabc.com.
7. Right-click the group policy to enforce, and select Enforce.
Managing Users with Local Security and Group Policies
575
Now the group policy will be enforced even if the Block Policy Inheritance option is set
on down-level OUs. Note that the group policy will now have a small lock icon associated
with it to show that it is enforced.
Troubleshooting Group Policy Applications
When policies are used throughout an organization, sometimes the policy settings do not
apply to a user or computer as originally intended. To begin basic troubleshooting of
Group Policy application issues, you need to understand the policy application hierarchy.
First, any local server or workstation policies are applied to the user or computer, followed
by site group policies, domain group policies, and, finally, the organizational unit group
policies. If nested OUs have group policies, the parent OU policies are processed first,
followed by the child OUs, and, finally, the OU containing the Active Directory object
(user or computer). You might find it easier to remember “LSD-OU”—the acronym for
local, site, domain, and then OU.
Now that you know the order in which policies are applied, you can proceed to use the
Group Policy testing and troubleshooting tools provided with Windows Server 2008
R2—namely the Group Policy Modeling tool in the Group Policy Management Console
and the command-line utility GPResult.exe, which is the command-line version of the
RSoP snap-in.
ptg
The Group Policy Modeling Tool
The Group Policy Modeling snap-in can be used to show the effective policy settings for a
user who logs on to a server or workstation after all the respective policies have been
applied. This tool is good for identifying which policies are being applied and what the
effective setting is.
To simulate the policies for a user, use the Group Policy Modeling snap-in as follows:
1. Launch Server Manager on a domain controller.
18
2. Expand the Features folder.
3. Expand the Group Policy Management Console.
4. Expand the Forest folder.
5. Select the Group Policy Modeling snap-in.
6. Select Action, Group Policy Modeling Wizard to launch the wizard.
7. Click Next.
8. Leave the default domain controller selection, which chooses any available domain
controller. The domain controller must be running Windows Server 2003, Windows
Server 2008, or Windows Server 2008 R2. Click Next.
9. Select the User option button in the User Information box, and click Browse.
10. Enter the name of a user to check, and click OK. Click Next to accept the user and
computer selection.
576
CHAPTER 18
Windows Server 2008 R2 Administration
NOTE
In the Group Policy Modeling Wizard, the net effect of the group policies can be mod-
eled for specific users, computers, or entire containers for either object. This enables
an administrator to see the effects for individual objects or for objects placed within
the containers, making the tool very flexible.
11. Click Next on the Advanced Simulation Options page. The advanced simulation
options enable you to model slow network connections or specific sites.
12. Click Next to skip the Alternate AD Paths.
13. The User Security Groups page shows the groups that the user is a member of. You
can add additional groups to see the effects of changes. Leave as is and click Next.
14. Click Next to skip the WMI Filters for Users page.
15. Click Next to run the simulation.
16. Click Finish to view the results.
17. Click the Show link next to Group Policy Objects.
18. Click the Show link next to Denied GPOs.
ptg
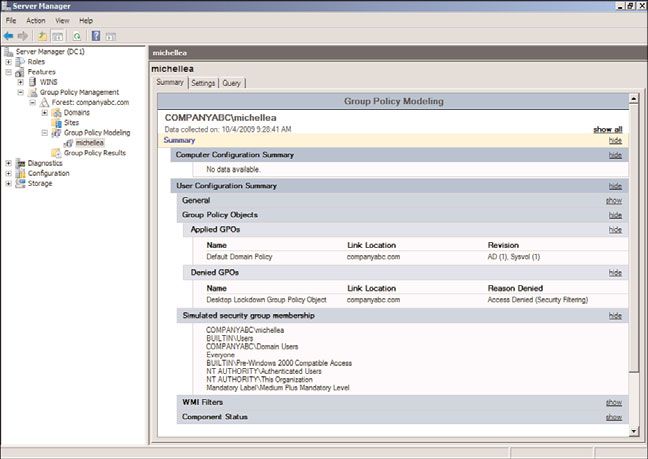
Within the console, you can review each particular setting to see whether a setting was
applied or the desired setting was overwritten by a higher-level policy. The report shows
why specific GPOs were denied. Figure 18.8 shows that one GPO was denied to the user
object “michellea.” The Desktop Lockdown Group Policy Object was denied due to secu-
rity filtering. This is the GPO created earlier in the chapter, which was applied only to
members of the Oakland Help Desk group. The user michellea is not a member of this
group and, hence, does not have the GPO applied.
Managing Printers with the Print Management
The Print Management console in Windows Server 2008 R2 helps organizations better
manage and administer printers on an enterprise basis. Prior to the Print Management
console, a network administrator would have to point to each network printer or printer
server individually to manage and administer the device. For a large enterprise with
hundreds of printers and dozens of printer servers, this was a very tedious task to select
print servers each and every time a printer needed to be managed. Furthermore, if the
administrator didn’t remember which printer was attached to which print server, it could
take a while to eventually find the printer and print server that needed management.
The Print Management console provides a single interface where an administrator can
open the Print Management console, and view all printers and print servers in the enter-
prise. Furthermore, it could be configured to group printers together so that certain
administrators could manage and administer only certain printers. As an example, if an
organization has an administrator for a particular building, the Print Management inter-

Managing Printers with the Print Management Console
577
FIGURE 18.8
The Group Policy Modeling report.
ptg
face could be filtered to only list printers within the building. This would allow the
administrator to only see certain printers they are responsible for, as well as consolidate
multiple print server groups of printers into a single interface for management and
administration.
The Print Management component only needs to be installed on the system that the
administrator is managing from—it does not need to be installed on all print servers or
systems in the enterprise. Functionally, Print Management could be installed on just one