Windows Server 2008 R2 Unleashed (187 page)
Read Windows Server 2008 R2 Unleashed Online
Authors: Noel Morimoto
planned server outages for maintenance or to install new applications. Called User Logon
mode in Windows Server 2008 R2, the following modes can be used:
.
Allow All Connections—
This is the default setting that is selected and allows users
to connect remotely to the RD Session Host server.
.
Allow Reconnections, but Prevent New Logons—
When selected, users are
prevented from creating new sessions on an RD Session Host server. However, users
960
CHAPTER 25
Remote Desktop Services
that already have a Remote Desktop session running can still use and even reconnect
to their session. Once the RD Session Host server is rebooted, no users will be able to
connect to that server.
.
Allow Reconnections but Prevent New Logons Until the Server Is Restarted—
When selected, users who already have a remote session can connect to the RD
Session Host server. However, new users without a session will not be able to create
new sessions. Then once the RD Session Host server is restarted, the User Logon
mode is reset to Allow All Connections.
Use the following steps to configure the User Logon mode on an RD Session Host server:
1. Open the Remote Desktop Session Host Configuration tool by clicking Start,
Administrative Tools, Remote Desktop Services and then select Remote Desktop
Session Host Configuration.
2. In the Edit Settings area, double-click the User Logon Mode setting.
3. On the General tab of the Properties dialog box, select the desired User Logon mode.
Additionally, the User Logon mode can be configured using the command line:
. change logon /drain—No additional users will be able to log on to this system.
ptg
. change logon /drainuntilrestart—After the server is restarted, user logons will
automatically be reenabled.
. change logon /enable—User logons are enabled.
Setting Up Printer Support
By default, when printer redirection is enabled, an RD Session Host server will first
attempt to use the Remote Desktop Easy Print driver. If the client cannot use this driver,
the server will then attempt to match the printer driver on the client. To support the
usage of other printer drivers, administrators mush either preinstall the matching printer
driver on an RD Session Host server or create a custom printer mapping file.
To change the default printer driver behavior, an administrator can use GPOs to modify
the Use Remote Desktop Services Easy Print Printer Driver First policy setting. This setting
is located under the following node: Computer Configuration\Policies\Administrative
Templates\Windows Components\Remote Desktop Services\Remote Desktop Session
Host\Printer Redirection. When enabled or set to Do Not Configure, this policy setting
forces the RD Session Host server to use the Remote Desktop Easy Print driver first. If that
fails, the server then looks for a matching printer driver. Conversely, when disabled, the
policy setting forces the RD Session Host server to look for a matching printer driver first.
If that fails, the server attempts to use the Remote Desktop Easy Print driver.
Other printer redirection policy settings available under the noted node include the
following:
Deploying Remote Desktop Services
961
. Do Not Allow Client Printer Redirection
. Do Not Set Default Client Printer to Be Default Printer in a Session
. Redirect Only the Default Client Printer
Defining Remote Desktop IP Virtualization
To configure Remote Desktop IP Virtualization, use the Remote Desktop Session Host
Configuration tool. On the RD IP Virtualization tab, administrators can define the follow-
ing settings:
. Enable or disable RD IP Virtualization.
. Select the network adapter to be used for RD IP Virtualization.
. Define if RD IP Virtualization is per session or per program.
. For per-program virtualization, a list of programs can be defined that can use RD IP
Virtualization.
25
Deploying RD Web Access
ptg
Before installing RD Web Access, you need to take a few considerations into account:
. The RD Web Access is a role service of the Remote Desktop Services role.
. The RD Web Access needs to be a Windows Server 2008 R2 machine, but does not
need to have the RD Sessions Host role service installed.
. To run the RD Web Access role service, Microsoft Internet Information Services (IIS)
7.5 must/will be installed.
. Clients must meet the previously noted requirements that were discussed earlier in
this chapter.
Installing the RD Web Access Role Service
Use the following steps to install the RD Web Access role service:
1. Log on to the desired server with local administrator privileges.
2. Click Start, and then click Run.
3. In the Run dialog box, type in ServerManager.msc and click OK.
4. In the Roles Summary section, click the Add Roles task.
5. After the Add Roles Wizard loads, click Next.
6. On the Select Server Roles page, select the Remote Desktop Services role, and click
Next.
7. On the Remote Desktop Services page, click Next.
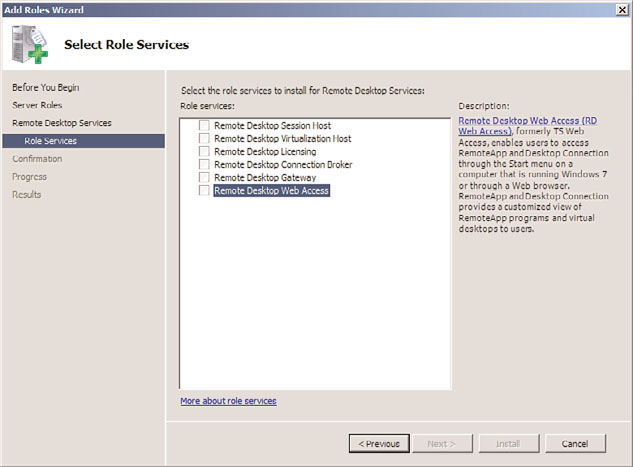
8. Now, on the Select Role Services page, only select the Remote Desktop Web Access
role service. This is the only role service that is being installed at this time, as shown
in Figure 25.6.


962
CHAPTER 25
Remote Desktop Services
FIGURE 25.6
Selecting the RD Web Access role service.
ptg
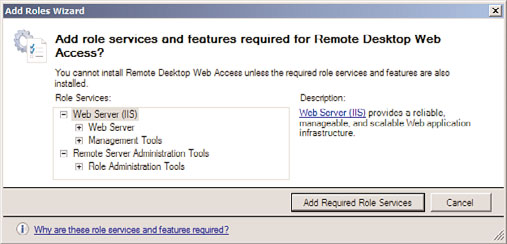
9. When prompted with the Add Roles Wizard dialog box, click the Add Required Role
Services button (any missing required role services or features for RD Web Access role
service will now be added), as shown in Figure 25.7.
FIGURE 25.7
Adding prerequisite role services and features.
10. On the Select Role Services page, click Next.
11. On the Web Server (IIS) page, click Next.
12. On the Select Role Services page, click Next (do not change the defaults).
13. On the Confirm Installation Selections page, review the selections made, and then
click Install.
14. On the Installation Results page, review the results, and click Close.

Deploying Remote Desktop Services
963
Defining the RemoteApps Programs Source
Before users can use RemoteApp and Desktop Connection, the source for RemoteApps
programs must be defined for an RD Web Access server. A RemoteApp source can be either
of the following:
. RD Connection Broker server
. RD Session Host server or farm (with identically configured RD Session Host servers)
Use the following steps to define the RemoteApp source:
1. Connect to the RD Web Access Web site using either of the following methods:
. On the RD Web Access server, click Start, Administrative Tools, Remote
Desktop Services, Remote Desktop Web Access Configuration.
. Using Internet Explorer, connect to the RD Web Access website using the
following URL: https://
2. When prompted with the RD Web Access forms-based authentication logon page,
log on to the site using a domain account that is a member of the local RD Web
Access server’s TS Web Access Administrators group.
25
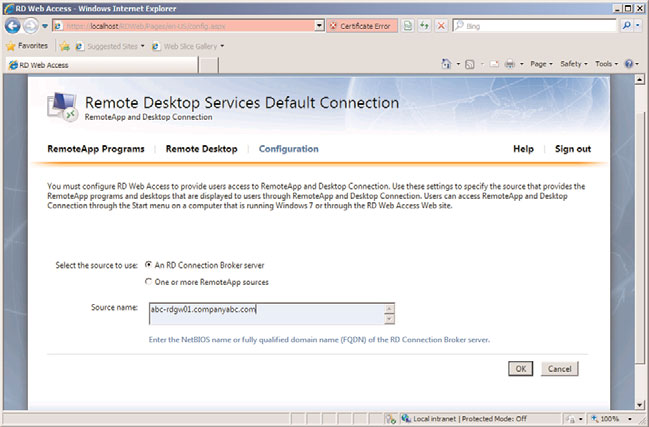
3. Ensure that the Configuration page is selected, and choose either the “An RD
Connection Broker Server” option or the “One or More RemoteApp Sources” option,
ptg
as shown in Figure 25.8.
FIGURE 25.8
Selecting the RemoteApp source.
. If the “An RD Connection Broker Server” option is selected, the NetBIOS name
or FQDN of the RD Connection Broker must be defined in the Source Name box.
964
CHAPTER 25
Remote Desktop Services
. If the “One or More RemoteApp Sources” option is selected, the NetBIOS name
or FQDN of an RD Session Host server or DNS name of the RD Session Host
server farm must be entered. If multiple RemoteApp sources are being used,
each name must be separated using a semicolon.
4. Click OK to save the changes.
When defining a RemoteApp source, certain requirements must be met depending on the
option used. For example, if an RD Session Host is used as the source, the RD Web Access
server must be added to the TS Web Access Computers security group on the RD Session
Host server. Or, when using an RD Connection Broker server as the source, the RD
Connection Broker server must be installed, configured, and online.
Additionally, if the “One or More RemoteApp Sources” option is used, a connection name
and connection ID must be defined on the RD Web Access server, and the
RDWebAccess.config file needs to be modified. This file is found under the:
%windir%\Web\RDWeb\App_Data\ directory. The contents of this file include instruc-
tions as to how to define the connection name and connection ID. Once a connection
name has been defined, it is used to identify the RemoteApp and Desktop Connection
that comes from that RD Web Access server. Conversely, if the “An RD Connection Broker
Server” option is used, the connection name and connection ID are defined using the
Remote Desktop Connection Manager tool on the RD Connection Broker server.
ptg
Securing RD Web Access
After RD Web Access has been installed, it is recommended that you secure the RD Web
Access traffic by installing and using a Server Authentication (SSL) certificate. To complete
this task, refer to the IIS 7.5 online help section titled “Request an Internet Server
Certificate.” After a certificate has been requested, installed, and bound to the website
hosting the RD Web Access role service, that website should then be configured to only
accept SSL connections.
Deploying RD Connection Broker
Use the following steps to install the RD Connection Broker role service on a machine
that already has the RD Web Access role service installed:
1. Log on to the desired server with local administrator privileges.
2. Click Start, and then click Run.
3. In the Run dialog box, type in ServerManager.msc and click OK.
4. Under Roles Summary, select the Remote Desktop Services option.
5. Under Role Services, select the Add Role Services task.
6. On the Select Role Services page, select the Remote Desktop Connection Broker role
service, and then click Next.
7. On the Confirm Installation Selections page, review the selections made, and then
click Install.
8. On the Installation Results page, review the results, and click Close.
Deploying Remote Desktop Services