Windows Server 2008 R2 Unleashed (300 page)
Read Windows Server 2008 R2 Unleashed Online
Authors: Noel Morimoto
37
NOTE
It is recommended that you reserve one network adapter for remote access to the host
server. To reserve a network, do not select it to be used as a virtual network.
8. On the Confirm Installation Selections page, review the selections made, and then
click Install.
9. On the Installation Results page, review the results, and click Close.
10. When prompted to restart the server, click Yes.
11. After the server restarts, log on to the server with local Administrator or Domain
Admin privileges.
12. After logging on, the installation and configuration will continue for a few more
moments. When complete, the Installation Results page will be displayed. Review
the results on the page and confirm that the Windows Hyper-V role has been
installed successfully. Click Close.
1524
CHAPTER 37
Deploying and Using Windows Virtualization
NOTE
The server’s network configuration will change when virtual networking is installed.
When network adapters are used in virtual networks, the physical network adapter
becomes a Microsoft virtual switch and a new virtual network adapter will be created.
By default, this virtual network adapter is shared between the host and the guest VMs.
It is important to note that the new virtual adapter will not inherit the old physical
adapter’s IP settings. It will become a DHCP client, which can be reconfigured to use
the old physical adapter’s configuration.
Becoming Familiar with the Hyper-V Administrative
After Hyper-V has been installed, the next step is to install guest images that will run on
the virtual server. However, before jumping into the installation of guest images, here is a
quick guide on navigating the Hyper-V Administrative console and the virtual server
settings available to be configured that apply to all guest sessions on the server.
Launching the Hyper-V Administrative Console
ptg
There are two ways to open the Hyper-V Administrative console and access the server’s
configuration options. One way is to use the Server Manager tool and administer the host
server through Server Manager, and the other option is to launch the freestanding Hyper-
V Manager Microsoft Management Console (MMC) to perform administrative tasks for the
host system.
NOTE
The functions and settings between the Server Manager console and the stand-alone
MMC application are the same. Administrators who manage several server roles tend
to use the Server Manager console because they have easy access to more than just
the virtualization role; they can also manage DNS, Remote Desktop Services, Network
Policy and Access Services, or other roles that might be applicable to their job. For
those whose sole job is to administer Windows virtualization systems, they might
choose the freestanding MMC application for administering and managing the Windows
virtual server systems.
Using the Server Manager Tool to Manage Hyper-V Systems
For administrators who want to manage their Hyper-V systems from a centralized console,
the Server Manager tool provides a common administrative interface for all the server
roles installed on a particular system. To start the Server Manager tool to view and edit
Hyper-V Settings, do the following:
1. Click the Server Manager icon in the Windows Server 2008 R2 taskbar. This will start
the Server Manager application if it is not already running on the system.

Becoming Familiar with the Hyper-V Administrative Console
1525
2. Expand the Roles section of the tree by clicking on the +.
3. Expand the Hyper-V branch of the tree, and expand the Hyper-V Manager branch
of the tree.
Using the Hyper-V MMC Tool to Manage Hyper-V Systems
For administrators who want to manage their Hyper-V systems from a dedicated console
just for Hyper-V administration, the Hyper-V tool should be used. To start the Hyper-V
administration tool, do the following:
1. Click Start, All Programs, Administrative Tools, and then choose Hyper-V Manager
for the tool to launch.
2. Click on Hyper-V Manager to see the virtual servers to which you are connected.
3. Click on the name of one of the virtual hosts and then select one of the virtual
machines listed to see snapshots, details, and actions available for the guest system.
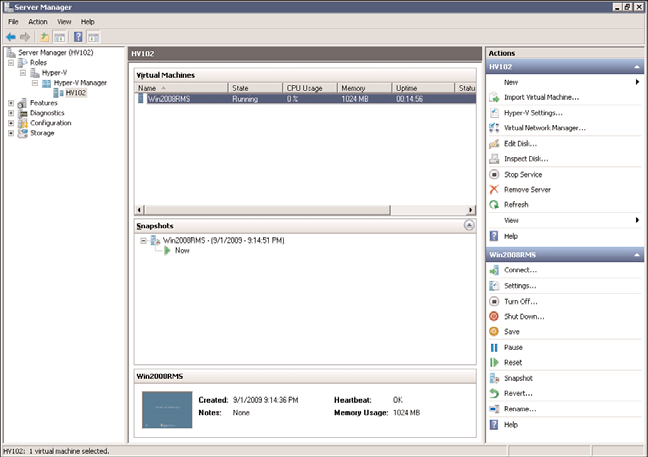
By default, the Hyper-V MMC will have the local virtual server system listed, as
shown in Figure 37.2.
ptg
37
FIGURE 37.2
Virtualization Management Console.
Connecting to a Remote Hyper-V Host
If you want to administer or manage a remote Hyper-V host system, you can connect to that
server using the Hyper-V Manager. To connect to a remote virtual server, do the following:
1. From within the Hyper-V Manager Console, click on the Hyper-V Manager object in
the left pane.
2. In the Actions pane, click Connect to Server.
1526
CHAPTER 37
Deploying and Using Windows Virtualization
3. Select Another Computer and either enter in the name of the server and click OK, or
click on Browse to search Active Directory for the name of the Hyper-V server you
want to remotely monitor and administer.
4. When the server appears in the Hyper-V Manager Console, click to select the server
to see the actions available for administering and managing that server.
Navigating and Configuring Host Server Settings
Regardless of whether you have chosen to use Server Manager or the MMC tool, the config-
uration options and settings are the same. When you click on the virtual server system you
want to administer, action settings become available. These action settings allow you to
configure the host server settings for the system you have chosen to administer.
Hyper-V Settings
When you select the Hyper-V Settings action item in the Actions pane, you have access to
configure default paths and remote control keyboard settings. Specifics on these settings
are as follows:
.
Default Paths—
This option enables you to set the drive path for the location where
virtual hard disk files and virtual machine configuration files are stored. This might
be on the local C: volume of the server system or could be stored on an external
ptg
SAN or storage system.
.
Keyboard Behavior—
This option specifies where special Windows key combina-
tions (for example, Alt+Tab and the Windows key) are sent. These keys can always be
sent to the virtual machine, the host machine, or the virtual machine only when it
is running in full screen.
.
Mouse Release Key—
By default, the key combination that releases the guest session
so the administrator can gain keyboard control back to the host console is
Ctrl+Alt+Left Arrow. The Remote Control/Release Key option allows for the selection
of other key options.
.
User Credentials—
Hyper-V uses default credentials, by default. This means it will
use the logged-on credentials to connect to any virtual machine. The administrator
might choose to require credentials when connecting to a virtual machine. This is
necessary when using smart card authentication to connect to a virtual machine.
Virtual Network Manager
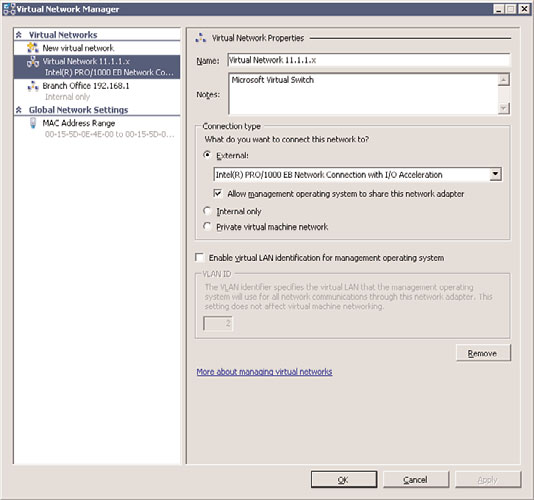
By selecting the Virtual Network Manager action item, you have access to configure the
virtual network switches, as shown in Figure 37.3. Here is where you configure the local
area network (LAN) and WAN connections available for the guest sessions of the virtual
server host.
Specific to these settings are as follows:
.
Add New Virtual Network—
This configuration option allows for the addition of a
new external, internal, or private network segment available to the guest sessions.
An external network binds to the physical network so the virtual machines can

Becoming Familiar with the Hyper-V Administrative Console
1527
ptg
FIGURE 37.3
Virtual network switch management.
access the physical network, just like any other host on the network. An internal
network segment would be a connection that is solely within the virtual server
system, where you might want to set up a virtual LAN so that the virtual server
37
guests within a system can talk to each other and the host, but not with the physical
network. A private network segment can only be used by the virtual machines that
run on that host. They are completely isolated and cannot even communicate
directly with the host server.
NOTE
A new feature in Windows Server 2008 R2 is the option to “Allow Management
Operating System to Share This Network Adapter” in external networks. By deselecting
this option, you isolate the management operating system from communications
between virtual machines and other computers on a physical network.
Here, the administrator can also choose to configure virtual LAN identification
(VLAN ID) for the management operating system. This enables the administrator to
tag the virtual network for a specified VLAN.
.
Existing virtual networks—
If the system you are managing already has virtual
networks configured, they will be listed individually in the left pane of the Virtual
Network Manager dialog box. By selecting an existing virtual network switch, you

1528
CHAPTER 37
Deploying and Using Windows Virtualization
can change the name of the virtual network; change the internal, private, or exter-
nal connection that the network has access to; or remove the network altogether.
.
MAC Address Range—
Every virtual network adapter must have a unique Media
Access Control (MAC) address to communicate on an Ethernet network. The admin-
istrator can define the range of MAC addresses that can be assigned dynamically to
these adapters.
Edit Disk
The Edit Disk option in the Virtual Network Manager action item menu enables you to
modify an existing virtual hard disk (VHD) image. Specifically, the options are as follows:
.
Compact—
This option enables you to shrink a virtual hard disk to remove portions
of the disk image file that are unused. This is commonly used when a disk image will
be archived and stored, and having the smallest disk image file possible is preferred.
.
Convert—
This option enables you to convert a dynamic virtual hard disk file to a
fixed-size virtual hard disk by copying the contents to a new file.