Everyday Paleo (46 page)
Authors: Sarah Fragoso
Tags: #Diets, #Healthy Living, #Health & Fitness, #General
2)
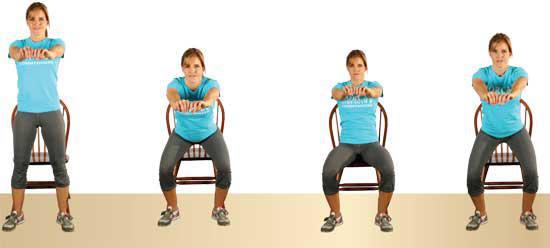
Keeping your tummy tight and your back straight, reach your fanny back and down. Make sure to keep your knees behind your toes and your weight distributed on your heels.
3)
Continue to sink your hips lower, while still reaching your fanny back. If necessary, your chest can come slightly forward, but keep your spine straight and do not round or arch your back! Once you feel your fanny reach the seat of the chair, continue to keep your back and tummy tight and sit all the way down.
4)
Rock forward slightly from the seated position. Make sure to keep your arms out in front for balance and your tummy and back tight. At this point, push up through your heels and return to the standing position.

Lunge
The walking lunge is another excellent exercise for strengthening the legs, glutes, and core. However, it is important to note that if you are unable to squat to full depth, you may not be ready to safely try this movement. Instead of performing the full lunge, you can modify this movement by simply taking larger than normal steps while walking.
MUSCLES USED: Gluteals, Hamstrings, Quadriceps, and Adductors

1)
Start in the same position as the squat, with your feet directly under your shoulders.
2)
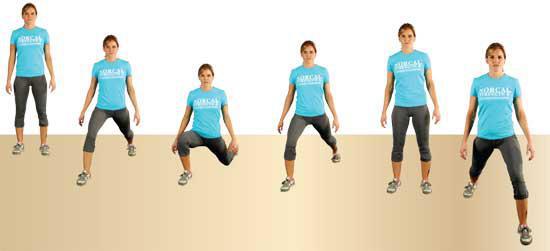
Looking straight ahead, take a giant step forward. If you start with your left foot, step a little toward eleven o’clock. If you start with your right foot, step a little toward one o’clock. This will help you to maintain balance. As your back knee begins to drop straight down, make sure to keep your chest upright and your tummy tight.
3)
Sink your back knee straight down until it is just above the ground. To achieve proper form, make sure the shin of your front leg is vertical and your lead knee is tracking over your heel and not your toes.
4)
Pushing up through the heel of your front leg, begin your return to a vertical position. When done properly, you should feel this movement in your fanny as you rise.
5)
Return to the start position by stepping your left foot up to your right foot. Keep your feet under your shoulders and your tummy tight.
6)
Repeat the movement exactly as described, but this time step forward with the opposite leg. Continue to lunge, alternating legs as you go.

Push-Up
Push-ups can sound very intimidating, I know. I remember the day when doing a push-up seemed impossible. However, there is a starting point for everything in life, and the push-up can be accomplished by anyone with some modifications. In this sequence I demonstrate a classic push-up, but if you aren’t ready for this exercise just yet, in the following sequences I offer some options that are a little less advanced. With each variation, it is very important to focus on form. When done correctly, the push-up is not just a chest or arm exercise, but rather a movement that strengthens the entire body.
MUSCLES USED: Pectoralis, Deltoids, and Triceps


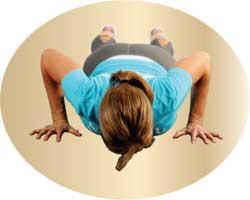
To achieve the start position, place your tummy, thighs, and chest on the ground, position your hands slightly wider than shoulder width, and keep your neck in a neutral position. Make sure that your tummy, glutes, back, and legs are as tight as possible. The goal is to turn your body into a rock-solid plank!

While keeping your body as rigid as possible, begin to push yourself up. Your gaze should be directed down, just a few inches above your hands. Do not let your fanny rise up in the air like a mountain or let your tummy sag down, turning your spine into a valley. Stay tight!

Continue to push yourself up until your arms are fully extended.

Begin to lower yourself slowly back to the start position by bending at the elbows. Once your chest and thighs are again touching the floor, you may begin the pushup again. Stay tight!
Knee Push-Up
In this sequence I demonstrate the knee push-up, which is easier to perform than the classic push-up because you only have to lift a portion of your body weight. However, the knee push-up can still be too much to tackle for beginners. If you have trouble with this movement, do not give up. Instead, begin the push-up movement by standing a few feet away from a wall, placing your hands on the wall at shoulder height with your elbows bent, and then pushing your body away from the wall until your arms are fully extended. Just like with the classic push-up, tighten everything. This means your tummy, glutes, and legs. Next, bend your elbows and perform another repetition. If this proves too easy, gradually position your feet farther away from the wall each time you perform the movement. Once your strength increases, move on to the chair push-up. The chair push-up can be achieved by placing your hands on the edge of the chair, walking your feet out until your body is straight, and then performing a push-up. However, with chair push-ups it is extremely important to make sure the chair is stabilized against a wall. As you gain more strength, eventually chair push-ups will become too easy, and you will be ready to move on to the knee push-up shown below.
MUSCLES USED: Pectoralis, Deltoids, and Triceps
