Everyday Paleo (49 page)
Authors: Sarah Fragoso
Tags: #Diets, #Healthy Living, #Health & Fitness, #General
Workouts
for Beginners
Week One
Day 1:
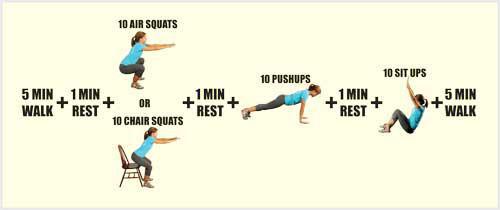
Warm up with a 5-minute walk (around the block will work just fine). Rest for a minute and then perform 10 air squats or chair squats. Rest for a minute and then perform 10 push-ups. Rest for another minute and then perform 10 sit-ups. Finish with another 5-minute walk. Assess how you feel? If at any time during your workout you begin to feel light-headed or dizzy, slow down, rest longer, or cut the reps in half.
Day 2:
Do something active that you enjoy. Take a brisk walk. Walk fast for a minute or two and then slow down and saunter along at a slower pace for a minute or two. Plan to be active for at least 30 minutes. Play a game of soccer, catch, or tag with your kids, and make sure you alternate between moving quickly and moving slowly. If you start to feel light-headed or dizzy, stop and rest for a few minutes.
Day 3:
Repeat day 1 but instead of sit-ups, do body rows.
Day 4:
Rest today but stay active. Do some stretching, yoga, or simply take a slow leisurely walk with the family.
Day 5:
This should be another active day. Swim, ride bikes with the kids, or take another brisk walk. Discover a new hobby that you might enjoy. Take a tennis class with your spouse or your children, try shooting the basketball, or take a trip to the batting cages. When you are exercising again, try to work hard for a few minutes, and then go at a slower pace. Alternate back and forth and make sure you get in at least 30 minutes of activity.
Day 6 & 7:
Maintain an active lifestyle but focus more on relaxation, meal planning and preparation, and spending time with family.
Week Two
Day 1:
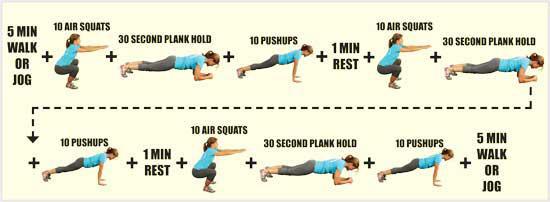
Walk or jog slowly for 5 minutes to warm up. Perform 10 squats, hold for an accumulative total of 30 seconds in a plank hold, and execute 10 push-ups. Rest for 1 minute and then repeat the squats, plank hold, and push-ups. Rest for another minute and then again repeat the squats, plank hold, and push-ups. Walk or jog slowly for 5 minutes. Again, if you are feeling light-headed or dizzy, slow down or cut the down the number of reps. If you are feeling great and up for more of a challenge, try to move a bit quicker through the workout in order to raise the level of intensity. Listen to your body!
Day 2:
Be active for at least 30 minutes today. Try alternating between walking and jogging. Play with the kids— this is always a sure way to get in at least 30 minutes of activity! Go to the park and run around with your children. Do everything that they do and you’ll be amazed by the energy that is required to simply act like a kid!
Day 3:
Repeat day 1 except do 15 reps of the super woman movement instead of the plank hold.
Day 4:
Rest today but stay active with stretching, yoga, walking, and playing with the kids.
Day 5:
This should be another day of fun activity! Play tag with the kids, a great way to have a burst of activity followed by a period of rest.
Day 6 & 7:
Rest, recuperate, meal plan, and play!
Increasing Workout Intensity
As you begin to feel better and get healthier and your workouts become easier, start thinking about increasing the reps for these workouts and adding in some of the other movements that I have demonstrated in the above section. Try completing more rounds of each suggested workout and try adding in a sprint at the end, middle, and beginning of the workout rather than just a jog or a walk.
Following are a few more workouts for you to include in your weekly routine once you are able to squat to full depth and feel healthy and strong enough to increase the intensity of your workouts. You should continue to follow the same model as described in the two-week workout plan. On days 1 and 3, do one of my suggested workouts below. With the other days, either do activities such as sprinting, walking, swimming, biking, or playing, or spend your time resting, relaxing, stretching, and playing with the kiddos.
Workout 1:
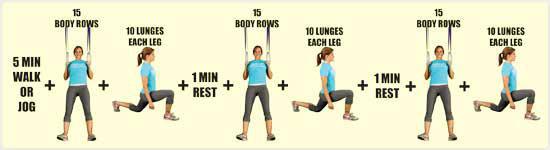
Run or walk for 5 minutes. Perform 15 body rows followed by 10 lunges on each leg (20 total). Rest for 1 minute and then repeat the 15 body rows followed by the 10 lunges on each leg. Rest again for 1 minute and then repeat the 15 body rows and 10 lunges each leg.
Workout 2:
Repeat as many times as possible within a 7–10 minute time period: 20 squats, 20 hollow rocks, 10 sit-ups, and 10 push-ups.

Workout 3:
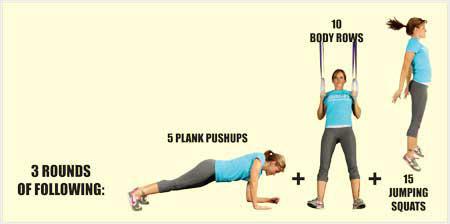
Perform 3 rounds of: 5 plank push-ups, 10 body rows, and 15 jumping squats
Workout 4:
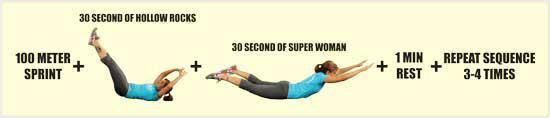
Sprint 100 meters, or about 6 car lengths, walk back, and then perform 30 seconds of hollow rocks followed by 30 seconds of the super woman movement. Rest for 1 minute and then repeat the entire sequence 3–4 times.
Workout 5:
Warm up with a 5-minute jog. Perform 30 squats and 15 push-ups followed by 20 squats and 10 push-ups, followed by 10 squats and 5 push-ups.

Dumbbells!
T
ime to move on to the weights. Please ladies, understand that lifting weights does not give you humongous or unsightly muscles. By incorporating weight training into your fitness plan, you will gain the strength and ability to make it through your day, add bone density, and decrease the signs and symptoms of aging. Another bonus of weight lifting, just like with the introductory movements, is that it transfers over to what we do every day in real life. You will learn how to safely lift, push, and carry heavy objects without injuring yourself, all the while working toward a healthier, more fit you. Most importantly, I want you to have fun! Exercising should make us feel better and should not be a dreaded experience. It should give you confidence and add joy to your day. Finding a friend to join you, getting the kids involved, and having your spouse be your workout partner are all ways to make exercise more fun and rewarding.
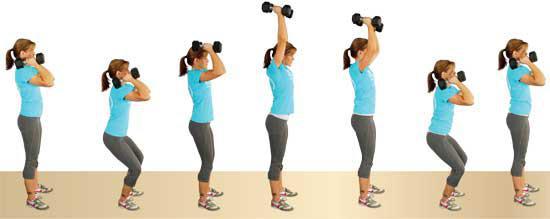
Dumbbell Press
Although the dumbbell press is a very straightforward movement, when you first begin using this technique, I suggest starting with a lighter weight. Only after you are extremely comfortable with the movement should you start lifting more. This is true for all movements that involve weights. Start out light, get used to moving with proper , and then think about gradually increasing the load.
MUSCLES USED: Deltoids, Triceps
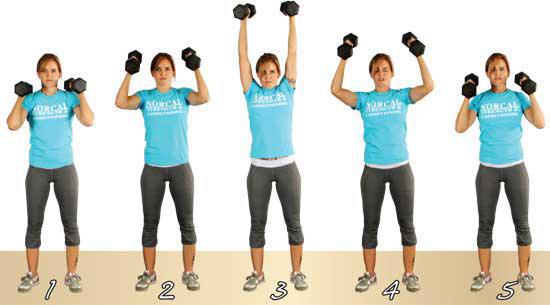
1)
Bring the dumbbells up to your shoulders and position your elbows under the weights. It is important to notice how the weight plates are facing forward rather than to the sides. Your feet should be placed between hip and shoulder width, with your toes turned out just a bit for support.
2)
Tighten your tummy, fanny, and leg muscles. Take a small breath and hold it as you begin to press the dumbbells straight overhead, engaging the muscles in your shoulders and arms.
3)
At the top of this movement, your arms should be fully extended to the point that you feel as if your shoulders are up around your ears. Pretend you are holding up the sky—if your shoulders are relaxed, you will not be strong enough to do so! The dumbbells should be directly over your shoulders and lined up directly over your hips and heels.
4)
Begin to return the dumbbells back to your shoulders. You can let gravity help, but you must also control the weights on the way down. Dumbbells crashing onto your shoulders does not feel good; trust me, I know from experience.
5)
Finish with the dumbbells resting back on your shoulders, with your elbows under the weights and facing forward. Take a few breaths of air, get tight, hold that little breath again with a tight tummy, glutes, and legs, and repeat.
Push Press
Although the push press looks similar to the press, there are some key differences, the most prominent one being that the push press is a dynamic movement. The push press incorporates power generated from the legs in order to move the dumbbells overhead, adding a metabolic component to this movement that is sure to get your heart racing a bit faster than the standard dumbbell press does.
MUSCLES USED: Deltoids, Triceps, Gluteals, and Quadriceps
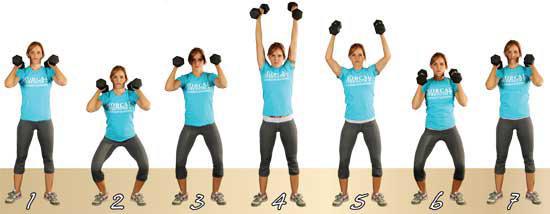
1)
Start in the same position as the press—holding the weights up on your shoulders, with your feet placed between hip and shoulder width and your toes turned out just a bit for support.
2)
Take in a small breath and hold it, making sure your tummy is super tight. Next, keeping your gaze forward and your torso straight up and down, bend your knees slightly.
3)
As if you were jumping, use a quick upward movement, letting the power generated from your legs help press the dumbbells overhead. This should be a fast and explosive movement. However, you must make sure to keep your torso upright!
4)
As with the press, finish this movement with your arms fully extended and let your breath out.
5)
Begin to return the dumbbells back to your shoulders as your knees bend again slightly.
6)
Once the dumbbells reach your shoulders, your knees should again be bent so that you are ready to repeat the movement and explode the dumbbells back up and overhead. Find a rhythmic
breathing pattern during this exercise so that you are not holding your breath through the entire movement.
7)
Finish in an upright position.
Dumbbell Dead Lift
Unlike the squat, the dumbbell dead lift predominately works the glutes and the hamstrings rather than the quadriceps. We all pick stuff up, but most of us tend to do this everyday movement incorrectly. Some health professionals have warned that the dead lift can cause back injury. Can you hurt your back dead lifting? Of course, but you can also hurt your back just as badly or worse by incorrectly lifting a kitten; therefore, learning how to dead lift with proper technique transfers over to real life quite nicely, and you will actually be strengthening and training your body in order to prevent injury. Again, working with a trained fitness professional is always the best option!
MUSCLES USED: Erector Spinae, Gluteals, and Hamstrings
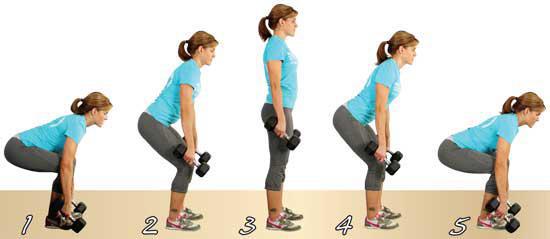
1)
Your feet should be positioned directly under your hips with your toes angled out slightly. The dumbbells should be on the floor, just outside of your feet and directly under your arms. Before you reach down to grab the dumbbells, take in a little breath of air and hold it, bend forward at the waist, reach your fanny back, and bend your knees. It is important to note that you want your knees tracking over your heels, not your toes. Next, grip the dumbbells tight. Your back should be flat, straight, and flexed, and your shoulders should be just in front of the dumbbells.
2)
Pushing through your heels and holding the dumbbells close to your legs, begin to stand upright while looking slightly down and straight in front of you. Make sure that your hips and knees rise in unison.
3)
Continue to rise until you are standing upright, keeping the weights in close to your body and not letting them drift out in front of you.
4)
To return the dumbbells back to the floor, take in another few breaths and hold a little bit of it to help your body stay tight. Again, reach your fanny back as your chest comes forward. Your knees should bend, but do not allow them to track forward over your toes.
5)
Keep reaching your fanny back. As your chest comes forward, maintain a tight back and tummy until the heads of the dumbbells touch the floor. From there, take a few breaths, hold in a little bit of air, and repeat the movement.
Special note:
if you still are unable to perform a full-depth squat, you may not yet be ready to dead lift. Furthermore, if you have extremely tight hamstrings or hips, this movement might prove to be too challenging.
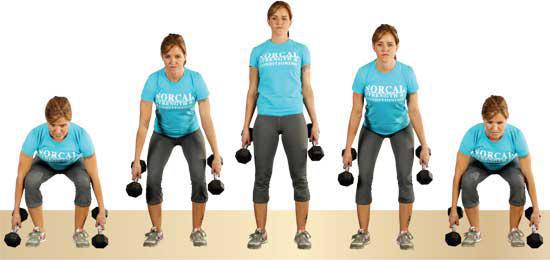
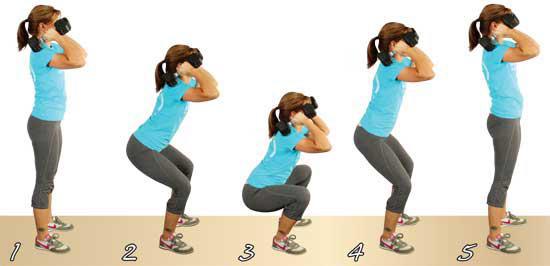
Dumbbell Squat
The dumbbell squat adds more resistance to the already beneficial movement of the squat. This movement should only be performed if you can properly execute a full-depth squat. Again, I’ll remind you to use a lighter weight when you are first learning these dumbbell techniques.
MUSCLES USED: Quadriceps, Gluteals, and Hamstrings