Mac Hacks (17 page)
Name the app something descriptive (Cleaner Upper, say) and save
it wherever you wish—except on the desktop, since that’s what you’re
trying to keep tidy! All the necessary files will be generated and
packaged with your script, and you’ll be able to clean your desktop any
time you wish with just a double-click.
If you would like to modify the script to move another file type,
such as applications, this is how to change it. In the--Where to put stuffsection, add this line of
code:
set theapplications to alias ":Users:username:Applications:"
And in the--filetype bysection, add:
extension
set applicationsExt to {".app"}
And finally, before the final instance ofend repeat, add this:
repeat with ext in applicationsExt
if FileName ends with ext then
move theFile to theApplications
end if
end repeat
As you’ve deduced by now, you can extend this script to any folder
and any app type. Think of it as the moving company of
apps.
. Create a Service with Automator
You
can manipulate text, pictures, etc., more easily from the
Services menu. This hack shows you how to add useful features to this menu
using Automator.
Automator is Apple’s way of making programming easy for anyone who
wants to take a few minutes to learn how to do it. There are thousands of
pre-compiled scripts on the Web, and Automator is bursting with
examples.
One of the underused and underappreciated aspects of Automator is
its ability to create services that will show up in the universally
accessible Services menu. So let’s create a service that does something
useful—one that sorts selected text alphanumerically.
To get started, launch Automator (Applications→Automator). When the
program starts, it will ask you what type of document you’d like to
create. Select Service and then click the Choose button.
On the lefthand side of the new document window, you’ll see a list
of available actions. You can filter the list by typing in the search
field at the top of it. You’re after the Run Shell Script action, so type
shell
in the search field, and Automator will filter
the list down to just the action you’re looking for. Then simply drag the
action over to the big empty pane on the right (
Figure 5-4
).
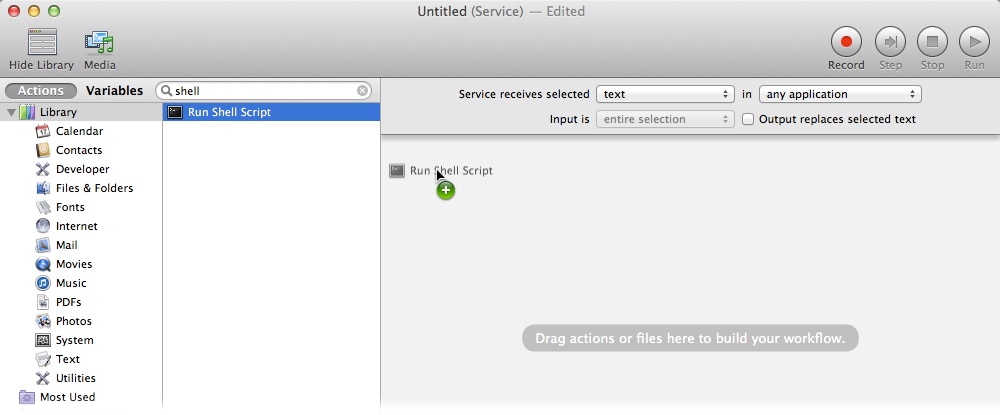
them all but it’s much easier to use the search box. Then simply drag
the Run Shell Script action into the pane on the right.
A
Run Shell Script box appears in the formerly empty pane.
Above that are a few settings (
Figure 5-5
). Make sure the
“Service receives selected” box is set to “text,” and that the “in” box is
set to “any application.” Then turn on the “Output replaces selected text”
checkbox. What you’re doing here is telling Automator that the text you
select in an application (like Word or TextEdit—wherever the service
applies) will be replaced by the text generated by the script you’re about
to write.

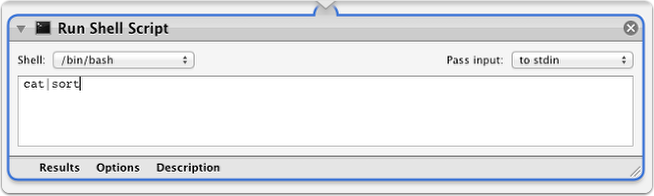
Now
that you’ve adjusted the settings, it’s time to write the
script. We’ll just use the default UNIXsortcommand. To do that, leave the Shell box
set to “/bin/bash,” and the “Pass input” box set to “to stdin.” Then edit
the text in the Run Shell Script box (where it initially says “cat”), and
change it tocat|sort(
Figure 5-6
).
ever visiting the command line.
What does all that mean?
/bin/bash is the default shell for OS X.
stdin (which is short for “standard input”) is one of the
standard
streams
(the way the computer passes
information from the program to the outside world) between the
program’s environment (where the program runs) and your screen. In
other words, the service will take the content you selected and send
it to the shell script using stdin. The program then performs its
actions on the passed text and sends it back.catis a small program that
con
cat
enates (get it?) and outputs files.The
|character connectscattosort.sortis a program that (not
surprisingly) sorts lines of text.
Basically,catwill take the text
you select (more on that in a moment) and “pipe” it to thesortcommand. The service will then replace the
selected text with the result.
All that’s left to do now is save your new service. Press Command-S
and name the service Sort Lines. From
now on, in any application where you can edit text, you’ll
be able to choose [Application name]→Services→Sort Lines to run this
script.
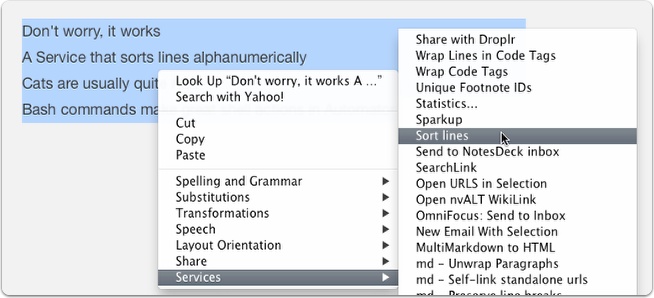
An even faster way to use your new service is to select some text
and then right-click your selection. At the bottom of the contextual menu,
you should see a Services submenu, which is where you’ll find your new
service. (Note that OS X sorts items in this submenu in strange ways, so
if you have multiple services, you might have to look carefully to spot
Sort Lines [
Figure 5-7
].) Select it
and OS X will sort the selected text.
When you run Sort Lines on lines that start with letters, it will
sort them alphabetically. When you run it on lines that start with
numbers, it will sort them numerically. And lines that contain both
letters and numbers get sorted first by number, then by letter. Give it a
whirl to see it in
action!
—
Brett Terpstra
. Customize the Services Menu
You
know that Services menu that you rarely use? You can make it
more useful and have it display things you want to use with this helpful
hack.
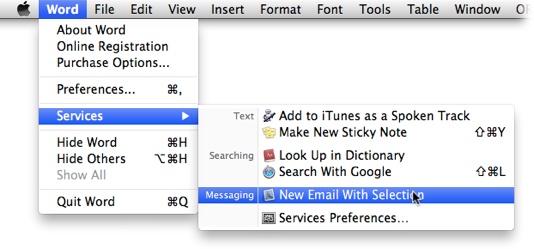
The Services menu is an underused productivity tool. In fact, you
may not even know it’s there. It lives in the application menu of each
program on your Mac. So in Safari, you find it by going to
Safari→Services, in Calendar it’s under Calendar→Services, and so on. The
Services menu is also a bit of a chameleon: what you see in the menu
depends on what you have selected when you open it.
The idea behind the Services menu is solid—quick access to tools you
use a lot, specifically tailored to what’s currently selected—but the
implementation is bland. Apple supplies some services, but they’re ones
that most folks rarely use.
Figure 5-8
shows what the
Services menu looks like when text is selected.
world. If only there were some way to make it more useful...
What most people don’t realize is that the Services menu is
customizable. That means you can add the service you want to use so it
will be available to you whenever you need it!
Just
knowing something is customizable isn’t any good if you
don’t know how to customize it. You can create your own services (see
[Hack #23]
) but, chances are,
someone has already created the service you need. (A
service
is a small program that does something
useful: transforms text, speaks text, creates an email, etc.) So where
can you look to find a useful service? Try an online search for “OS X
workflowcapitalization” where the last word
(or phrase) is what you want your Mac to do, such as capitalize every
first word of a sentence. You’ll likely find several results. (If you’re
wondering why you’d include the word “workflow” in your search instead
of “service,” it’s because the service file will have a
.workflow
extension.)
When
you download the service file, it may be compressed,
probably as a
.zip
file (if your browser is set to
automatically open files or you see a
.workflow
file but no
.zip
file, skip ahead to the next
section). You can probably locate the file in your Downloads folder and
double-click it to unzip/extract the contents. But, occasionally, you
might unwittingly change the download destination or the folder might be
jumbled and the file hard to find. If that’s the case, you can use
Safari or Spotlight to find the file (
Figure 5-9
). For most
third-party services you’ll find on the Web, the extracted file will
have a
.workflow
extension.
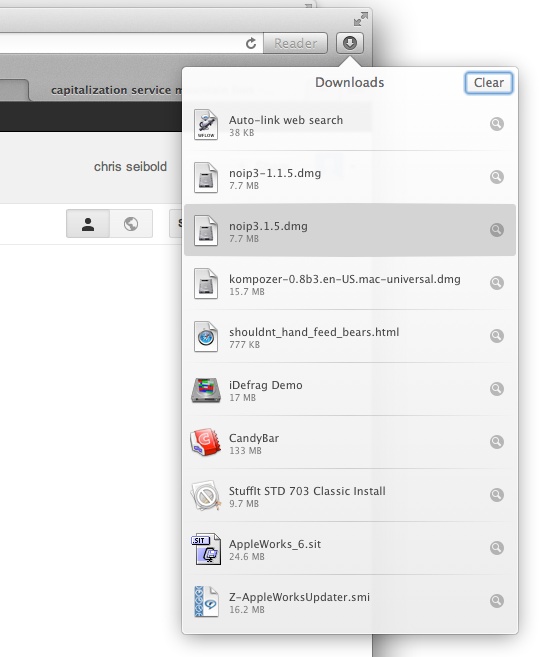
magnifying glass icon next to the file’s name and Safari will take you
right to the file. (Note that this only works on files you’ve
downloaded using Safari.)
Tip: Want a real-life workflow to play along while you’re doing
this hack? Head to my website and grab
the
Markdown Service Tools
. They’re designed for Markdown text,
but there are a lot of tools that you’ll find yourself using all the
time.
You’ve
found the service you need, you’ve downloaded it, and
you’re ready to start using it. You’re just a few steps away:
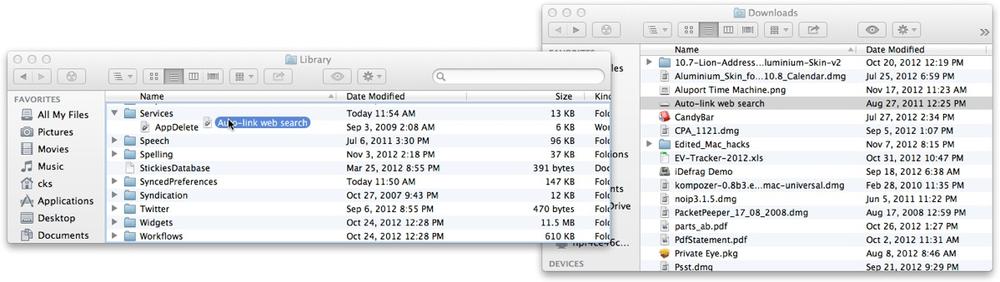
Open a new Finder window (press Command-N).
Locate your user’s Services folder. In Lion and Mountain Lion,
do this by pressing and holding the Option key, and then choosing
Go→Library. Within that Library folder, you’ll see the Services
folder.Drag the
.workflow
file from wherever it
currently lives into your Services folder (
Figure 5-10
).
The service is now installed. That was easy!
folder. That’s where your Mac looks for services, so that’s where they
have to live!
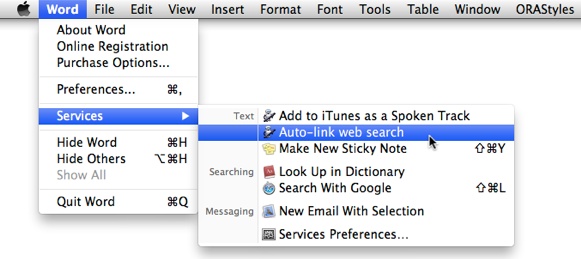
When
it’s available, your new service will show up in two
places: the Services menu you get by going toApplication→Services (
Name
Figure 5-11
), and the Services
submenu of the contextual menu that pops up when you right-click (or
Control-click) a file or selected text. (The first time you use the
Services menu after installing a new service, you might see a
“Building...” message.)
Remember, not all services are available all the time—they only
appear when your selected object is something on which they can act. For
example, if you’ve installed a text-modifying service and you
right-click a file, that service will not show up in the services menu
because it doesn’t work on files.
when they’re applicable, so if you don’t see the service you added,
chances are there’s nothing for it to do.
Using the service is as easy as selecting the type of object it
acts on (files, text, etc.), and then selecting it either from theApplication Name→Services menu, or by
right-clicking (Control-clicking) your selection and then choosing it
from the Services submenu. There’s one more way to activate the service,
though, and it makes accessing your tools very convenient. Keep reading
for details.
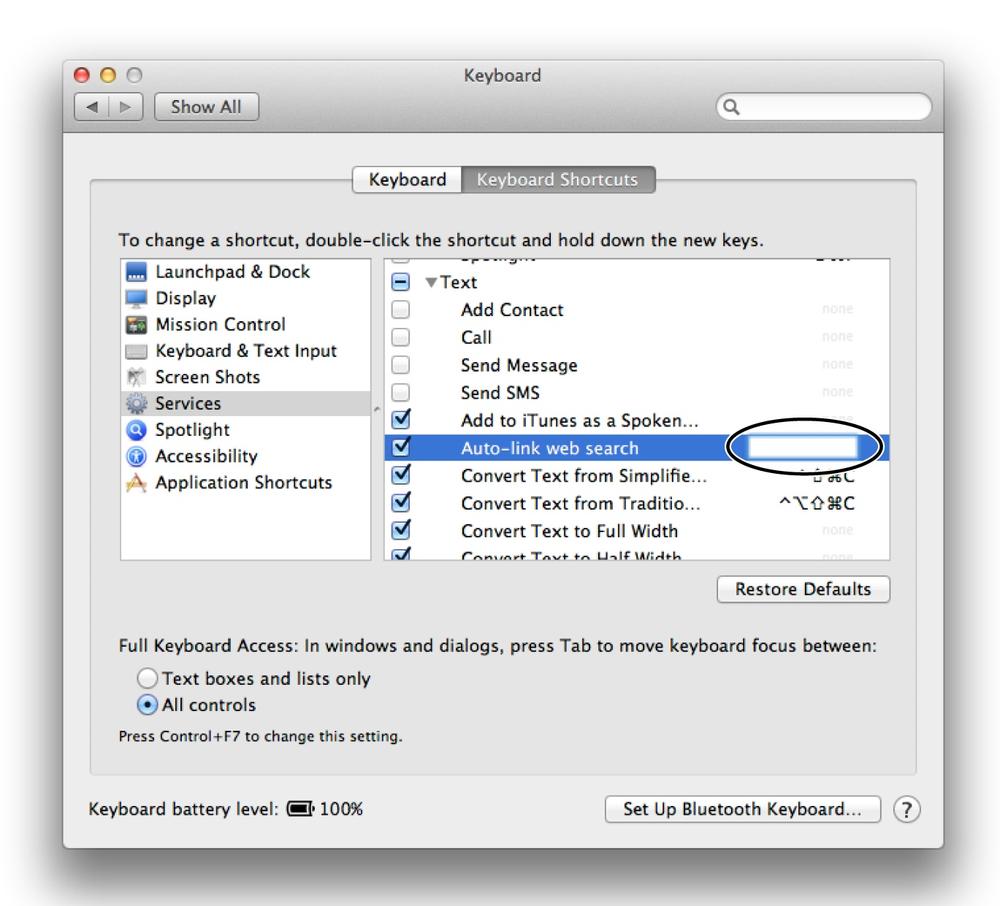
Turns
out you can add keyboard shortcuts for Services menu
items. To add one for your service, head to System Preferences→Keyboard,
and then make sure the Keyboard Shortcuts tab is selected at the top of
the preference pane. (Sometimes there’s a delay when loading this tab as
OS X indexes all of the available applications and services.) On the
left side of the pane, click Services, and then locate your new service
on the right.
Note: In the Keyboard Shortcuts preference pane, you can use the
checkboxes next to services’ names to enable and disable services
without having to remove them from the Services folder.
When you find your new service in the list, click its name; an
“add shortcut” button will appear to its right (in Lion and earlier, you
don’t actually see a button, just a blank area; double-click that blank
area). Click that button and, when that area turns into a text field
(
Figure 5-12
), press the
key combination you want to use to activate the service. Use a
combination of modifier keys (Command, Shift, Control, Option) and a
letter or number. If the combination is available (not used by another
service or existing system shortcut), your new shortcut appears in the
text field. If that doesn’t happen, try a different combination of
keys.
service. Keyboard shortcuts aren’t mandatory, but if you use this
service a lot, setting up a key combo can be a real timesaver.
If you see a yellow warning triangle next to your Service, it
means that there’s another service or application using that key
combination, but it let you add it anyway. This can cause odd results,
but mostly just results in neither shortcut doing anything if both
associated actions are available at any given time. It’s safest just to
change your shortcut and avoid the warning.
That’s all there is to it. You now have a shiny new service that
probably does something really cool. Select some text or a file and use
the menus or your new key combination to test it
out!
—
Brett Terpstra