Mac Hacks (19 page)
. Fun with Unix
Unix is what hides behind the pretty face of OS X. All those nifty
graphics are powered by command-line programs that remain inscrutable to the
vast majority of Mac owners. But you’re not the vast majority, you’re a
Mac Hacks
reader, so don’t let the power of Unix go to waste. Once you take a few
steps into the Unix world, you’ll never look
back.
. Harmless Unix Tricks
Unix is the core of OS X, but to get at it you need the command-line
interface, which terrifies a lot of people. This hack demystifies the
command line by showing you the fun that’s baked in!
Unix was originally intended to be used from a text-only terminal
console, and many of its features are still accessed via typed commands.
These days, OS X users never have to use the command line to get everyday
work done. (In early versions of OS X, firing up the command line was
sometimes required to empty Trash!) So why would anyone want to bother
with something as arcane as the command line?
For hardcore hackers, the answer is obvious: to harness the power of
OS X’s underlying system. But the command line isn’t just for the geekiest
among us; it’s a useful tool for everyone. Not only can otherwise
unchangeable parts of OS X be modified via the command line, but in
certain situations, the command line actually works better than the
graphical user interface.
The
easiest way to get to the command line is via an
application called Terminal (you can find it in your Mac’s Utilities
folder). When
you launch Terminal, you’re presented with a
shell
, Unix-speak for a program that waits for your
commands and executes them, sort of like OS X’s Finder. In this shell, you
can navigate, copy files, create directories, and modify files in a
nongraphical, generally nonintuitive, completely un-Mac-like but powerful
way.
Almost all Unix features are configurable (which is how Apple
engineers managed to shoehorn it into OS X), so you actually have some
choices when it comes to the shell. The
default shell is called
bash
(short
for “Bourne Again Shell”), but there are plenty of other options. For most
people, it’s wise to stick with bash to ensure compatibility with the
scripts you’ll see throughout this book and with scripts you’ll find
online.
If
you’ve steadily upgraded from earlier versions of OS X,
you may find that the default shell Terminal uses is tcsh instead of
bash. That’s because tcsh was the default shell until Panther was
released, and that preference was saved as you upgraded. To change the
default shell in Mountain Lion to bash (or to switch from bash to
another shell), head to System Preferences→Users & Groups. After
clicking the lock icon to authenticate, right-click or Ctrl-click on the
account name in the left side of the pane where the accounts are listed.
A menu with a single option appears: Advanced Options. Click it, and the
Advanced Options window appears. You can change the shell by clicking
the down arrow next to
the “Login shell” field.
Time
to get up and running with Unix. Launch Terminal
(Applications→Utilities→Terminal). Once it’s running, you’ll see a
prompt
something along the lines of:
computer:~username$
Wherecomputeris the name of your Mac,
andusernameis your login name. (This prompt
is endlessly configurable. In this book, we’ll just use$to indicate the command prompt. So when you
see$in the following commands,
remember that you don’t need to type it in.) This prompt is a Unix
representation of the current
directory
(that’s the
Unix term for “folder”). The
tilde (~) tells you that you’re in your home directory, and
the$represents the command prompt.
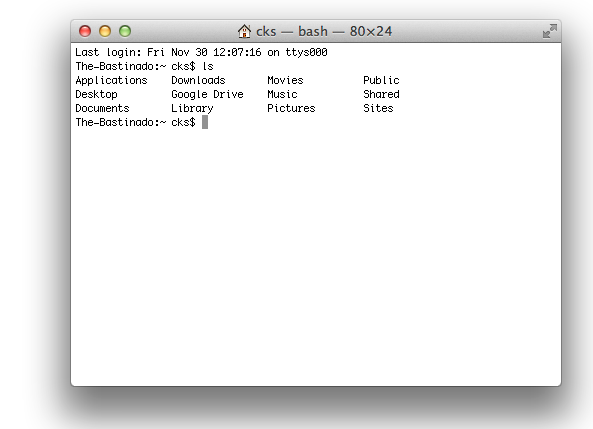
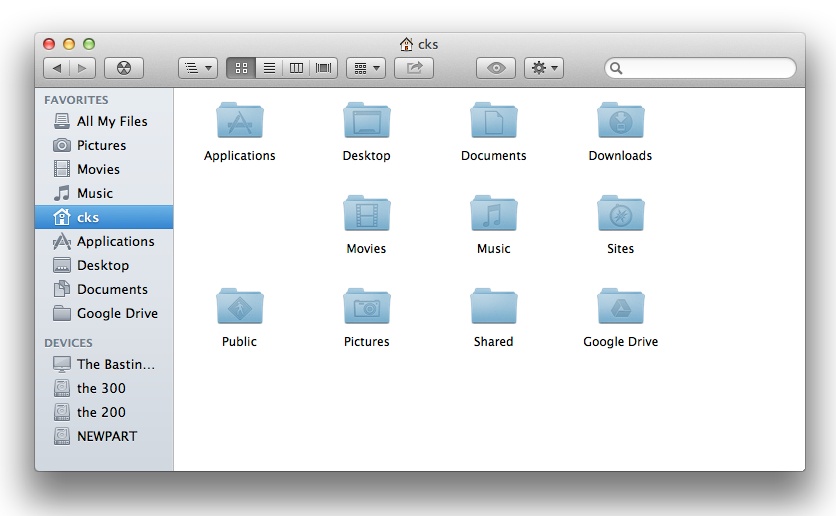
You can prove this by typing:
$ ls
and then hitting Return. Wow, that list exactly mirrors your Home
folder.
Figure 6-1
and
Figure 6-2
show the
differences (and the similarities) between the Unix way and the Mac
way.
Tip: The ~ can cause a lot of confusion to those new to the
Terminal. The standard way of explaining ~ is to say that it represents
your home directory. That’s accurate, but can still be confusing if
you’re not sure where (or what) your home directory is. An alternative
way of thinking about ~ is that it’s the same as typing/Users/username
Terminal. When you’re messing around your Mac using the Finder, you can
spot the home directory because its icon looks like a house!
Now that the Terminal is running, it’s time for the fun stuff. Sure,
you won’t accomplish anything important by trying out these tricks, but
they’ll help alleviate any fear you may have of the Terminal. Here’s a
quick list of (arguably) fun stuff you can do with the Terminal:
- Watch
Star Wars Episode IV
. In
Terminal, type:telnet towel.blinkenlights.nl
Press Enter and you’ll be treated to the movie shown in
Figure 6-3
.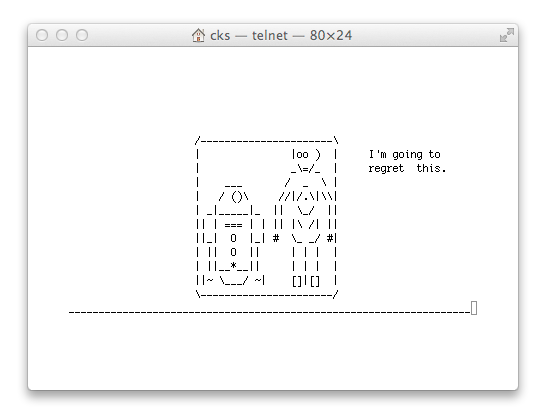 Figure 6-3. Star Wars on your Mac, in ASCII. (The downside of this is
that, if the ASCII version sucks you in, sooner or later you’ll
watch the movie versions and that will, inevitably, lead to Jar
Jar Binks. Apologies in advance.)- Get some mental help from Eliza the built-in
psychotherapist. Type:
emacs
This
launches a Unix program called—you guessed it—emacs.
Hit the Esc key, then typeX(capitalization matters), and then typedoctor. Now vent your frustrations to
Eliza (
Figure 6-4
).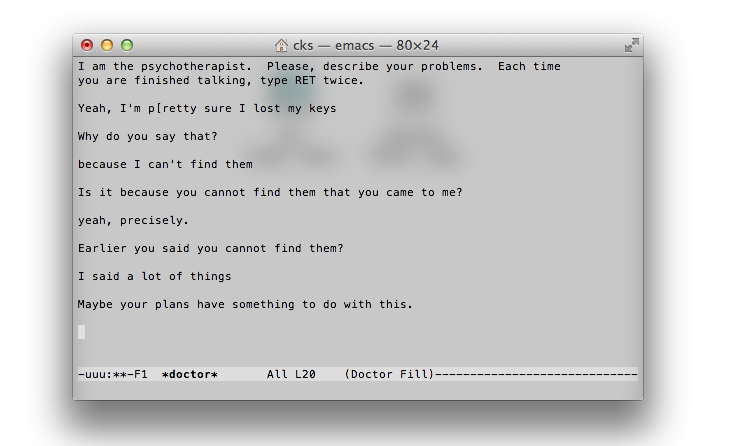 Figure 6-4. Eliza isn’t the most insightful psychotherapist around, but
her hourly rate is low and her patience knows no bounds.Note: Emacs can do more than help you through the rough
times in life. You can also use it to play games. Instead of
typingdoctor, typesnake, for a classic snake
game;dunnetfor a text
adventure game; ortetrisfor, well, a Tetris-type game.- Get the Terminal to talk to you.
Type:
say -v Fred Mac Hacks makes a great gift for any occasion
That’s
not just an interesting trick—that’s solid
gift-giving advice! But you’re not limited to that; your Mac can
actually say just about anything. Thesaypart tells your Mac to say something, the
-vFredpart tells it which voice to use, and
the rest is the text you want it to say. As long as the text is all
on one line, your Mac will speak it (that means you can’t hit the
Return key when typing the text). All this leads to tricks like the
following. Turn up your speakers and type:say -v Pipe Organ da da da dum dun da dum da da
If
you’re using Terminal, you might be wondering where its
Help option lives. For the Terminal
program
, it’s
where you expect: at the top of your screen. But that doesn’t do you
much good if you want to know about the application you’re using
within
Terminal.
For
example, if you want to know about grep, the seemingly
all powerful search utility, you won’t find helpful information in
Terminal’s Help menu. But all is not lost: programs you launch via the
Terminal (cp, grep, imagemagick,
etc.) all include
manual pages
, a.k.a.
manpages
. Manpages are instructions that tell you
how to use the program. To read the current application’s manpage, type$ manprogramname. For example,$ man rmwill bring up a page telling you all
about thermprogram, with
examples.
One
final, semi-useless trick: change the look of the shell. OS
X comes with a bunch of different Terminal emulators. You can find them in
Terminal by choosing Shell→New Window. These emulators don’t change how
Terminal works, just how it looks.
Okay, you’re not scared of the Terminal anymore and you want it to
do something useful. Tighten up those Terminal typing gloves because here
we go!
It’s
likely you’ve had a program hang before and used the Force
Quit option found in the Apple menu to kill off the misbehaving
application. The trouble is that there are a lot more processes running on
your Mac than are revealed in the Force Quit window. You
can see all the running processes using thetopcommand in Terminal. Simply typetopat the prompt, and then hit Return (
Figure 6-5
)
If
you open up the Force Quit window and compare it to the
output oftop, you’ll note thattopreveals
many
more processes than Force Quit. If something isn’t behaving properly, or
if you just want to kill off a process that Force Quit won’t let you get
at, it’s the Terminal to the rescue. Note the PID number of the process
you want to quit and then either hit Q (to quittop) or open a different tab in the Terminal by
choosing Shell→New Tab (a new tab is much more useful if you plan on
halting multiple processes), and then typekillfollowed by the PID number. For example,
if you wanted to kill offtop(which
doesn’t show up in the Force Quit menu), simply typekill 43171and then hit Return (note that this
number is likely to be different on your computer and will probably be
different each time you run whatever application you’re trying to shut
down). Voilà—topis no longer
running.