Mac Hacks (33 page)
From further use, it’s clear that the MacBook Pro is substantially
faster now, but the increase in speed was rapidly adapted to so we
didn’t really notice it anymore. While the machine is indeed much faster
than it was pre-upgrade, it still doesn’t match the zippiness of a new
MacBook Pro. While the yearnings for a new MacBook Pro remain, the
necessity of acquiring one has been staved off (at least until a new
O’Reilly sticker can be procured).
Bottom line: the upgrade will likely give us another one to one
and a half years out of the MacBook Pro. At a cost of $226, this hack
pays off if you get a new laptop every three or four years. But if you
wait five years (or longer) between purchases, you’d be better off
putting the money towards a new MacBook
Pro.
. Give Your Polycarbonate Mac a Dye Job
With
polycarbonate MacBooks, you get your choice of color—as
long as that color happens to be white. It doesn’t have to be that way.
This hack shows you how to make your MacBook any color of the
rainbow.
This project follows in the footsteps of the iBook Rit dye
procedure, but with a sandpaper-based twist that takes into account the
way MacBooks are constructed. The goal is to create a vibrantly colored
MacBook that will stand out in the sea of white and aluminum.
Note: Want color pictures? Want more pictures? Want to email the
author of this hack? Visit
the online
repository
for this hack.
The MacBook’s polycarbonate lid, bottom case, clutch cover, and
fan vent cover are all sealed with a strong gloss layer. That means that
unlike the iBook others used in earlier, similar hacks, the MacBook’s
plastic will absorb dye slowly. The display bezel (the plastic around
the edges of the screen) is made of a softer plastic, and will absorb
the dye very quickly, as will the keys. (The newer black Macbook
Pro/unibody line keys are sealed with a gloss layer.)
The only way to remove the gloss layer is with sandpaper. If done
improperly, this process can create a coarse surface. But, if properly
wet-sanded and grit-stepped (moving from coarser to ever finer-grained
sandpaper), it can almost mirror the original finish. Personally, I
chose to leave the surface coarse as I don’t like gloss. To each their
own.
Note: You don’t
need
to remove the gloss
layer to dye the plastic, but I’ve found that the color is absorbed
more evenly (and more quickly) when sanded. Also, the Apple logo on my
MacBook was painted white, so in order to change its color, I needed
to sand off that crappy paint. (Apple lid designers, if you’re reading
this: dude, come on. Changing the color of the logo was fun. Do you
people hate fun or something? C’mon!)
Not all the plastic on your MacBook is
the same
. The display bezel is made of softer plastic
than the other plastic parts, and it’s also more susceptible to
heat. Get its temperature up too high and it’ll become deformed,
like a Shrinky Dink—and there’s no fixing that.Parts are very easy to crack or
deform, so take your time disassembling the computer
. Let
me be absolutely clear: you can remove
every
part of a MacBook without major force. If you’re forcing something,
it’s likely you’ve forgotten a screw. Adhesive is used on some
parts, which require a
slight
bit of force to
remove. The Apple logo is one example. You should use a heatgun to
loosen the adhesive and then pop it out. Don’t try and force it
out—you
will
crack the lid. (I speak from
experience.)Just because computers have the same
model name does not mean they share parts
. For example,
Core Duo MacBooks have completely different motherboard mounts and
fan vent struts than Core
2
Duos, which use ZIF
low-rise sockets for half of the connectors on their boards. Then
2009 Core 2 Duos changed to a different optical drive connector, and
who knows what else. Point is, they’re all different, damn it. So
get parts specific to your MacBook.
Mactracker
is a wonderful
resource for this; I can’t recommend it enough.You will ruin pans, oven mitts, spoons
and anything plastic within a 1 mile radius
. (Okay, maybe
not that last one, but hey—shoot for the stars.) Try to keep the
destruction to a minimum so your mom/girlfriend/boyfriend/roommate
doesn’t want to kill you. Also, after you’re done with this project,
don’t reuse any of the supplies you used with food. Rit dye is
toxic
and is meant for clothes, fabrics, and
things that don’t normally touch your mouth. So keep that in
mind.You can’t remove the keyboard from the
inner top case without a lot of work
. You can take the
keys themselves off, but you need to split plastic mold (it doesn’t
just come apart) in order to remove the keyboard. It’s possible, but
I went with black accents (from a busted black MacBook) instead of
attempting that split. I’d recommend painting that part with the
keys and trackpad removed, if possible. If you’re more adventurous
than me, do it big and post it online so the world can see.The color shown on the dye’s label may
not match what you’ll get
. The first color picked was
supposedly a teal dye but was really what I’d call pine green; it
still looked awesome, but it wasn’t quite what was expected. Rit dye
is only a few bucks per package, so it’s better to spend a few more
dollars and get what you want than to put up with a color you
weren’t after.
Just throwing this out there, I accept zero responsibility for
your actions based on anything you read here. If you dye half your
stove, your cat, your hands, and permanently ruin your computer, it
rests on you. (“With great power, comes great responsibility.”) Also,
the water will be boiling hot, so
be careful and take
care
. (Do I need to show you my burn marks/scars? Do as I
say, and not as I do.)
Now that you’ve been sufficiently warned, it’s time to get to the
heart of the project. What’s the best place to start when you’re doing a
project? The supply list, of course!:
3 boxes of your favorite Rit Fabric Dye color (the powdered
kind; I haven’t tested the liquid dye)A deep pan
A cookie sheet roughly the size of that deep pan
Running water (I recommend a slop sink or shop sink; they’re
nice and roomy)A white MacBook
Rubber gloves
A wooden spoon
Salt
Sandpaper (120-, 200-, and 400-grit; if you want a smoother
finish, get finer grits, too)Denatured alcohol or cleaning solvent
Stove or sustained heat source
Lots of cookies (to eat in glorious celebration when you are
finished!)
The first step, obviously, is to unplug your computer and then
take it apart and separate the plastic parts from their metal
counterparts. Take care not to leave
any
electronic
parts in the dye pieces, or you’ll be replacing those parts. I’m not
going to detail taking apart the computer here because you might not
have the same model I do. Take a look at one of the
take-apart guides
from the
wizards at iFixit for instructions specific to your model. Their
take-aparts are the absolute best on the Web. Follow them to a T, and
you’ll be butter.
Now all the glossy plastic pieces need to be sanded down until the
gloss layer is completely gone. (The best way to tell when the gloss is
gone is when they will no longer glimmer in the light.) If you want a
nice smooth finish, start with 120-grit sandpaper, then switch to
200-grit, then 400-grit, and finally 1600-grit; by the end, you should
have a very smooth finish. (If you want a
really
smooth finish, you can get superfine sandpaper—up to 4000 grit—at auto
parts stores or in the automotive section of your local big-box store.)
But I’m not patient enough for that, so I stuck with 120-grit paper all
the way through and ended up with a somewhat rough finish but the
relative smoothness of the finish is up to you.
Warning: If you use a high speed device like a Dremel to do the
sanding you’ll likely melt the plastic. The process is best done by
hand.
Once the parts are sanded, clean them thoroughly. Denatured
alcohol and a paper towel work well, and the alcohol dries
quickly.
Next, go get a pair of rubber gloves and put them on
right now
. I don’t care if you aren’t even
contemplating this project—you should be wearing gloves. Trust
me.
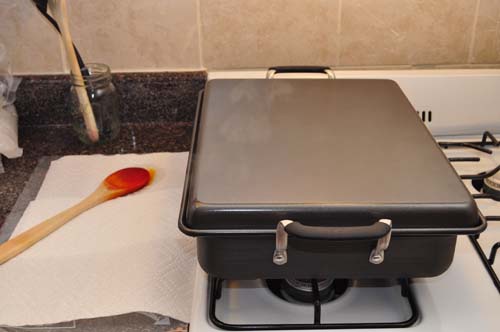
Then get a pan big enough to hold the largest plastic part (you
can’t dye the part in stages) that’s an inch or so deep. (Make sure the
pan is stove safe, like the one in
Figure 11-8
.) I used a
rectangular pan that covered two burners. Fill the pan with water 8 cups
of water, and then add two boxes of Rit dye the color of your choice
(that’s 4 cups of water per dye packet). Add 2 tablespoons of table salt
to the water and stir. Place the pan onto your stove, and let the salt
dissolve while the pan sits on the heat. As the water starts to boil,
place the part(s) you want to dye into the bath. (If you’re dyeing the
display bezel, keep the heat as low as possible to avoid warping the
bezel.) Gently stir the water as you dye the parts, and add water as
necessary—it will boil away quite quickly.
you’ll probably want to use a gas stove.
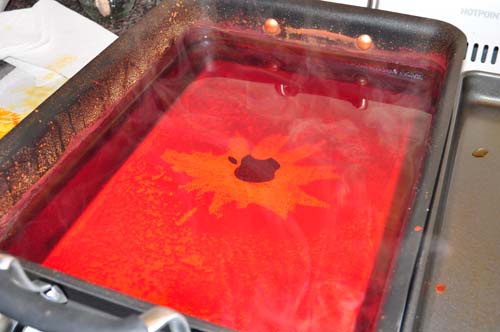
It took about 45 minutes for the lid and bottom case of my MacBook
to become saturated with the orange dye (
Figure 11-9
). Darker colors
(navy blue, scarlet, black, pine green) may require more time. The
display bezel took only 10 minutes to become saturated, as did the
clutch cover and display spacers. Check your parts as you go, and flip
as necessary. The larger parts require a hotter and longer bath.
Note: Adding too much dye to the bath will cause spotting and
inconsistent color distribution, so try to keep “free floating dye” to
a minimum. Don’t forget to keep stirring your bath throughout the
process.
and require less attention than the smaller parts.
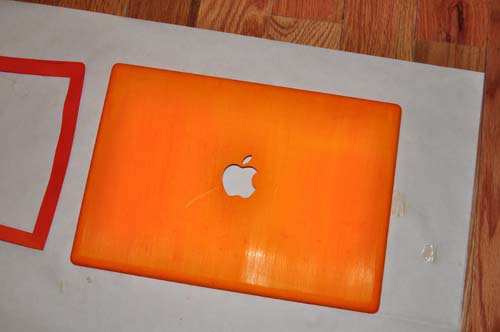
Remove the part from the bath, and clean off excess dye with a
paper towel and cold water. Check for even color distribution (
Figure 11-10
). If it looks good,
great! If not, go ahead and throw it back in the bath. The small parts
can warp, as I’ve said, so keep a close eye on them. But the large parts
can take a lot of heat/beating/abuse; they’re like the Hercules of
plastic or something.
Once all the parts are dyed to your satisfaction, you’re done!
Well, okay, you still have to put your computer back together, but
still—you’re done with the dying process. After your computer is
reassembled and looks awesome, it’s time for those cookies I mentioned
earlier!
So, originally I had a white MacBook. (I used the white pieces for
the lid and bottom case.) I decided that I like the way the black
accented the orange, instead of doing full orange. The inside top case
is also very difficult to dye, as the keyboard cannot be easily removed,
which explains why the entire thing isn’t orange: part of it came from a
black MacBook that had been killed by too much liquid. The dead machine
supplied all the black parts you see and helped the project look even
better. And yes, I rock at
Halloween.
—
Phil Herlihy
the only person rolling with an awesome orange MacBook.