Oracle RMAN 11g Backup and Recovery (117 page)
Read Oracle RMAN 11g Backup and Recovery Online
Authors: Robert Freeman
336
Part III: Using RMAN Effectively
Advisors and Checkers. Advisors is the default view; you will need to click the Checkers tab to see the health check utilities.
From the Checkers page, you can see the most recent runs of the checkers and the results.
By clicking on the Run Name, you can move to the Findings page to see if any alerts have been raised that require action. Each of the checkers may require unique inputs to run, but they all require at least two items in common: you must name the run you are asking to start (and it must be unique), and you must provide a time-out after which EM aborts the checker if it has not completed.
■
Data Block Integrity Check
Checks a single block for corruption. You need to know the suspected file and block number (such as reported by an ORA-1578 error) to run this checker.
■
CF Block Integrity Check
This is the Control File checker. Again, the expectation in the tool is that you know the suspected back block number that requires an integrity check.
■
Redo Integrity Check
This checks for online or archive redo corruption and accessibility.
You specify the SCN that you want to start moving forward from, and EM performs the check from there.
■
Transaction Integrity Check
This is the same as the Undo Segment Integrity Check, in that it checks for logical undo corruptions, except that it does so for a single transaction.
The required input is the transaction ID.
■
Undo Segment Integrity Check
This checks for logical undo corruptions for an entire Undo segment. The Undo segment number is the required input.


Chapter 13: Using Oracle Enterprise Manager for Backup and Recovery
337
■
DB Structure Integrity Check
This checker provides a proactive mechanism for checking all database files for accessibility, header corruption, and SCN synchronicity across the files and the control file. There is no input required.
■
Dictionary Integrity Check
This examines core data dictionary items to ensure consistency and integrity. You must provide the name of the data dictionary table you are checking, and the check mask.
Data Recovery Advisor
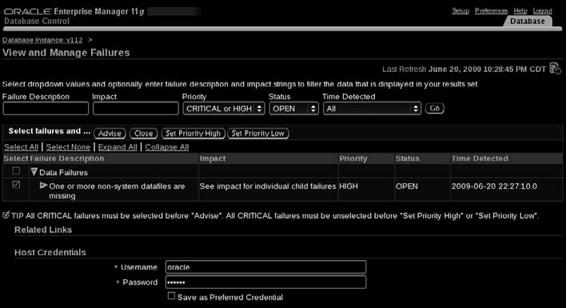
As with the health check utilities, you get to the Data Recovery Advisor through the Advisor Central link from Related Links on the database home page. If there are no current recovery-related findings in the database, the DRA will simply have a search field to search previous cataloged failures. If a new failure exists that hasn’t been rectified yet, you will see the option to
Select failures and…
take an action.
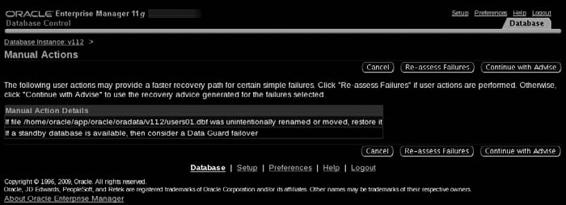
If you click the Advise button, EM will take a few moments to examine the information and then will provide advice on what to do about the particular failure at hand. If there is an action it can take automatically, it will ask permission and then do so. Otherwise, it will recommend a manual action to take, as shown next.


338
Part III: Using RMAN Effectively
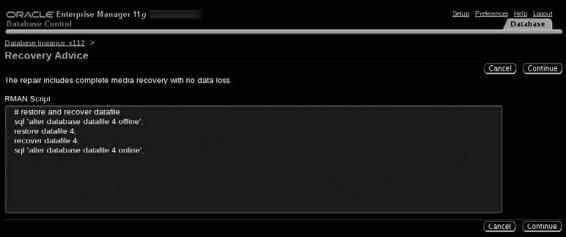
The recovery action that is advised will be technically accurate, but what you cannot ensure is that it will be the absolute best path. As we stated, you are not in 100 percent control, because Oracle cannot know all the details. For instance, in the example being worked in the illustrations, a file has been renamed. Before we fire up a restore operation for a file, it would probably behoove us to do some manual investigation on the server and see if we can rectify the problem in a more straightforward fashion. Otherwise, we are going to go with the recommended action, restore the file and then recover it, shown next.
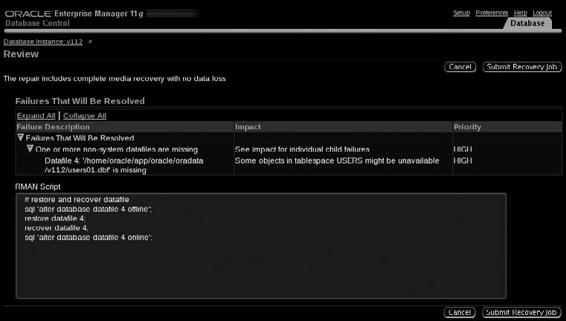
Finally, after showing the possible action, the Data Recovery Advisor is prepared to submit a recovery job to act on the recommendation it has made to you. You get a chance to see, shown next, the possible impacts (at least the ones programmatically feasible and safe to tell you), the RMAN script that will be run, and then to click the Submit Recovery Job button and let the actions go forward. After this, you will be tracking this like any other job in EM, and can go to the Jobs page to see how things are progressing.

Chapter 13: Using Oracle Enterprise Manager for Backup and Recovery
339
The Perform Recovery Page and Data Recovery Advisor
If the Data Recovery Advisor has detected a failure, when you click the Perform Recovery page, you will see a section entitled “Oracle Advised Recovery.” This will briefly describe the failures detected and will provide an Advise and Recover button. This will take you to the ADR page and guide you through the wizard outlined in the preceding DRA conversation. If DRA has not currently detected failures, the Advise and Recover button will be grayed out.
User Directed Recovery
If you are not taking the advice of the RDBMS on how exactly to perform database recovery, Enterprise Manager still provides the mechanisms by which you can select different types of recovery and perform them using a guided set of steps. From the Perform Recovery link on the Availability page, you first see the Oracle Advised Recovery (discussed earlier), then the section on User Directed Recovery.
Whole Database Recovery
The first type of recovery is Whole Database Recovery. When you select Whole Database Recovery, you have several options: Recover to the Current Time or Previous Point-in-Time; Restore All Datafiles; and Recover from Previously Restored Datafiles.
Recover to Current or Previous Point in Time
The first option is the one that will do what you would expect: restore datafiles and recover them using archive logs. The only variable that you decide is the time at which you want the database to be opened. In fact, if you walk through this wizard, you will find that the generated RMAN script is as follows (click the Edit RMAN Script button to see the output):
run {
restore database;
recover database;
}
Not exactly rocket science.
The other option is to perform point-in-time-recovery (PITR). You can specify the point in time that you want to recover to as a point in time, but also as a log sequence number, an SCN, or as a restore point. Note that when you do a PITR and you have Flashback Database turned on, you see a blue-font TIP telling you to consider Flashback Database (which you can choose from the next screen). When you specify your time (or SCN or log), OEM evaluates whether this point falls within the timeframe that is available for Flashback Database and offers you the choice: Flashback or Traditional PITR? Choosing Flashback takes you to the Flashback Wizard; choosing Traditional PITR carries you through the present wizard. For more on Flashback Database, see Chapter 15.
Whenever you do any kind of file restore in OEM, you are always allowed to change the location of the restored files to a new location. From the OEM wizard, for a full database recovery, the options are limited to a single new location for all datafiles. You cannot pick and choose different file locations for individual files. However, when you get to the end of the wizard, you can always choose to Edit RMAN Script and make filename changes there.
Restore All Datafiles
From the main Perform Recovery page, the second option is Restore All Datafiles. Choosing this option initiates a datafile restore that does not also perform a recovery. As

