Read The Art of Pregnancy Photography Online
Authors: Jennifer George
Tags: #Health & Fitness, #Pregnancy & Childbirth, #Photography, #Subjects & Themes, #Portraits, #Techniques, #General
The Art of Pregnancy Photography (12 page)
In this chapter and the next, we’ll look at a variety of strategies that will help you achieve your lighting goals. Some of the information presented in
chapter 7
will build on the information that follows, which is concerned mainly with using and modifying window light in the client’s home.
HARD VS. SOFT LIGHT
Finding or creating the right quality of light is critical to creating a great portrait. In portraiture, we strive to avoid hard light sources. Hard light is direct light created by a source that is relatively small in size. It produces hard-edged shadows, bright colors, and bright highlights. Hard light that comes from above the subject (e.g., midday sun) is the worst offender, as it creates unflattering dark shadows under the subject’s eyes and nose. (Though the sun itself is huge, its distance from the subject makes it small in relation to the subject.)
CLIENT TESTIMONIAL
“Being photographed while pregnant was a wonderful experience. It was my last child, and I wanted to be able to hold on to that experience just a little bit. It was a very warm and intimate experience.” —Shea O.
Keep in mind that you can modify or supplement hard light to produce more flattering effects. Of course, when working on location in the client’s home, you can simply scout out a room with more flattering light, saving yourself time and energy.
Soft light is ideal for portraiture. Such light comes from a larger light source (e.g., a large window or a softbox). When the sun’s position is just right (e.g., low in the sky, as it is from sunrise to an hour after sunrise and in the hour before the sun sets), it too can spill onto and caress your subject’s features, rather than casting the harsh shadows produced at midday. No matter its source, soft light produces paler, softer shadows, and more subdued colors in your images. It can also enhance the appearance of your subject’s skin and create a three-dimensional feel in an image. In the studio, photographers rely on softboxes, umbrellas, reflectors, and other devices to produce soft, directional light. When working in the client’s home, soft light generally comes from a large window. However, all window light is not created equal. We’ll look at the qualities of good window light later in this chapter.
FINDING THE BEST LIGHT
When you arrive at the subject’s house, look for great window light. In many homes, the master bedroom has a large window that can work well as your main light. The larger the light source, the more diffuse the light and the softer and more flattering the effect. A large window—10x5 feet in size and 3 feet from the ground—can be ideal. At this height, the natural falloff of the light can be used to your advantage, creating a darker area at the bottom of the image that will help to draw the viewer’s eye to the subject.
Though the best way to gauge the effects of a variety of window light scenarios would be to pose your subject near each window, this approach is not always practical. Using an assistant is your next best bet. Should you find yourself working solo, find a room where the sunlight softly illuminates the room. Open your hand and observe the way the light affects your palm. Move your hand around and observe the way the light changes. Where does the light most slowly transition from highlight to shadow? The best light will come from the side of the subject, wrap around, and fall off toward the bottom and far side of your subject. When the light has these qualities, it can be used to beautifully render your subject’s form.
Look for window light that softly illuminates the entire room. The light should come from the environment; in other words, be sure to avoid photographing a subject when the sun seems to be lined up with the window. Note, too, that the light should come from the side of the subject (not from a skylight or through a glass ceiling). This directional lighting will wrap around the subject, creating depth and form, allowing you to achieve the desired three-dimensional quality in your portrait.
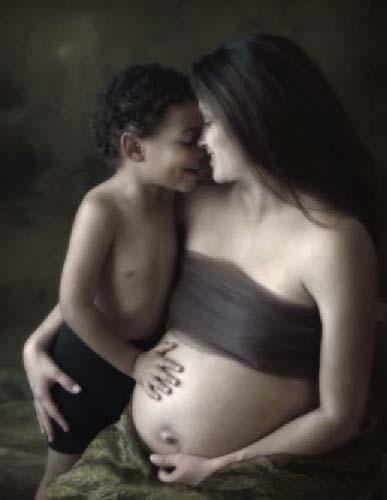
The beautiful light from a large living room window created a perfect place to work with this expecting mother and her toddler son. After moving through several poses and positions, this image was captured.
As evidenced in this image, the lighting setup for this image was simple.
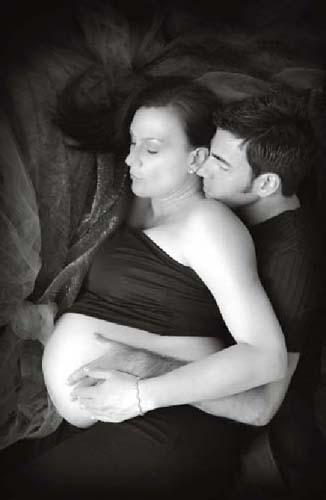
Sometimes, giving the couple some basic instructions of where to lie, and then stepping away and not interfering, can lead to capturing a tender moment between them. This image was captured with a Nikon D2x at an ISO of 400 and a setting of f/3.8 at
1
/60 second. The image was retouched in Photoshop using the Healing Brush. The Kubota Artistic Actions Vol. Two Smoothner action and Kodak Digital GEM Airbrush Professional c. 2.0 plug-in were used to smooth out the skin. Finally, the image was vignetted using Kubota Artistic Actions Vol. Two Edge Burner action, and Nik’s Midnight filter was applied.
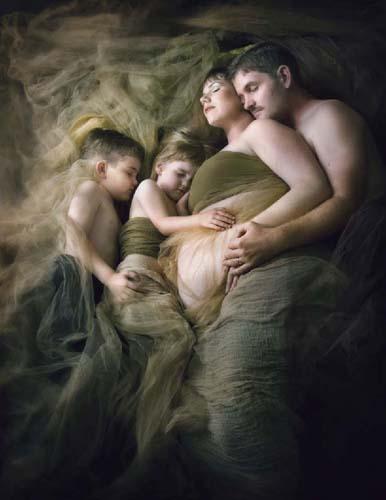
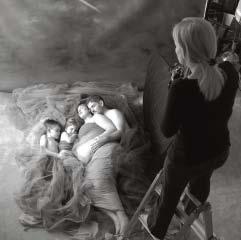
To create this particular image, a backdrop was hung, some fabrics were arranged on the floor, and the subjects were posed close to create a tender feeling in the image. A large window at camera left served as the main light, and a reflector placed to camera right helped to bounce light back onto the subjects, filling in the shadows.
Light reflected by a white or light-colored structure more than 15 feet from the window can be ideal. This structure acts as a large reflector, pouring soft, diffuse light into the room. When working in a low-light situation, the photographer can place a large white reflector outside the window to simulate the same effect and thus direct more light into the working area.
On a heavily overcast day, you may need to use a reflector outside the window to direct more light into the room and another on the opposite side of the subject to bounce light back onto her. On a bright and sunny day, you may need to use a diffusion panel in front of the window to soften the light falling on the subject for a more flattering effect.
Avoid sunlight that is reflected off of a parked car, the window of another building, or a metal structure. Colored objects outside the window (e.g., a house with blue vinyl siding) can affect the color of the light streaming into the room. Your best bet in such a case may be simply to find another room to shoot in. If this location is your best option, however, you can try to counteract the problem by using your camera’s custom white balance setting and/or correcting the color cast in postproduction. Note that shooting in a second-floor room often improves the odds that your light will be free from the color casts that light can pick up from parked cars, grass, and other outdoor objects.