The Art of Pregnancy Photography (16 page)
Read The Art of Pregnancy Photography Online
Authors: Jennifer George
Tags: #Health & Fitness, #Pregnancy & Childbirth, #Photography, #Subjects & Themes, #Portraits, #Techniques, #General
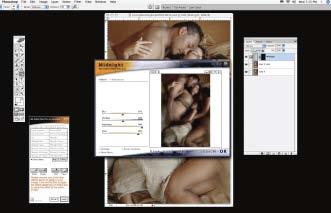
With the filter’s contrast-altering qualities in mind, the original image was created using a lighting ratio of 3:1, rather than the 5:1 ratio I typically favor for pregnancy portraits. The image was lighter than usual, with both the subject and surrounding area well illuminated.
This screen shot shows the original image and the effect of applying the Midnight filter.
Once installed, the Nik filters can be accessed via Photoshop’s Filter menu. To create the final image, the following steps were employed:
- In Photoshop, the background layer of the original image was duplicated (Layer>Duplicate Layer).
- With the duplicate layer active, the Midnight filter was selected (Filter>nik Color Efex Pro 2.0: Sylizing Filters>Midnight filter).
- In Nik’s Basic palette, the following slider amounts were set: Blur = 40%, Contrast = 15%, Brightness = 100%, and Color = 100%.
- The Protect Highlights slider and Protect Shadows slider were both set to 50%.
- With the settings in place, I clicked OK.
- When the effect was complete, the image layers were merged (Layer>Flatten Image) and the image was saved and closed.
The final image. Note the Midnight filter’s effect on the highlights and shadows in the image.
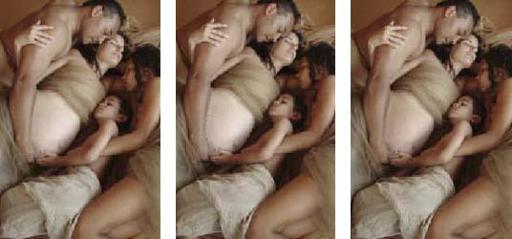
Though the entirety of the image shown here was treated with the Midnight filter, you can use the settings in the Nik Selective palette to selectively apply the effect. To do so, you can apply the effect to the overall image, as outlined above, then use the Erase tool in the Selective palette. To do so, choose the Erase mode, select a suitable brush size in Photoshop’s Options bar, reduce the tool’s opacity, paint over areas that should appear slightly lighter and sharper (e.g., the eyes and the highlights in the hair), and hit Apply. Alternatively, you can simply select the Midnight filter from the Selective palette, adjust all of the sliders in the Basic and Advanced palette as desired (see steps 3 and 4 above) and then click on the Paint button to selectively add the filter to specific image areas. When the image appears as you desire, hit Apply. For the majority of the images in this book, the entire image was covered except for the eyes, lips, and sometimes hair.
BASIC RETOUCHING AND ENHANCEMENT
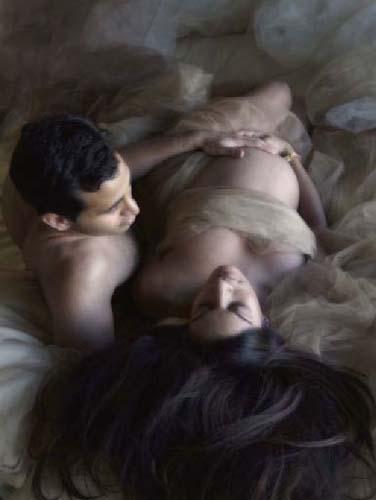
The steps below illustrate how making a few refinements to this touching family portrait made for a more attractive and salable image. You can employ these techniques to correct similar problems in your own images.
Note:
Be sure to save a backup copy of all of your images before retouching them so that you always have an original file to revert to should the need arise.
- To remove the visible veins and blemishes from the mother’s stomach, the background layer was duplicated (Layer>Duplicate Layer).
- Next, the Healing Brush was used to retouch the stomach area.
- The Clone tool, with an opacity setting of 100% was selected next, and skin was sampled and stamped over the visible portion of the girl’s shorts. Note that this tool can also be used to extend the background area if need be and to add more fabric to better cover the body (or stamp skin tones over some clothing that’s peeking out from under a tulle wrap).
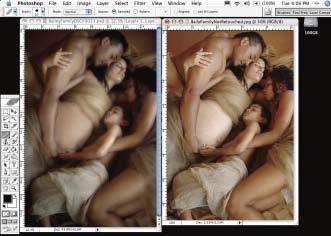
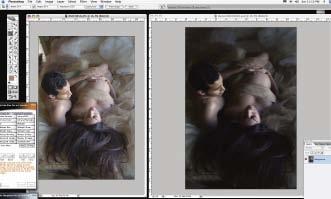
This screen shot shows two images—the final portrait (left) once the retouching was complete and the filter effect was applied, and the original (right).
(Left) The Healing Brush was used to retouch the subject’s stomach area. (Center) The mother’s stomach was selected with the Lasso tool. (Right) A layer mask was created to isolate the woman’s stomach.
This screen shot shows the Nik Midnight filter Basic palette and the settings chosen for this image.
4. The stretching of the skin across the pregnant mother’s midsection resulted in a slightly lighter skin tone in this area. To solve this problem, the stomach area was isolated with the Lasso tool. With the selection active, I clicked on the Layer Mask icon at the bottom of the Layers palette and changed the blending mode to Multiply. The layer opacity was reduced to 57% to ensure that the stomach area matched the rest of the woman’s skin.
5. The layers were merged (Layer>Flatten image), and a new duplicate layer (Layer>Duplicate Layer) was created.
6. The last step was to enhance the new duplicate layer with Nik Software’s Midnight filter. To create this image, settings of Blur = 51%, Contrast = 52%, Brightness = 98%, and Color = 89% were selected in the Basic filter palette. If you desire, you can use the Advanced palette (accessed by clicking Advanced at the top-left corner of the Basic palette) to specify the degree to which the image highlights and shadows will be protected when the filter is applied. For this image, those values were Protect Highlights = 50% and Protect Shadows = 20%. Next, I clicked OK to apply the filter.
7. With the desired effects in place, the image was flattened (Layer>Flatten Image) and saved.
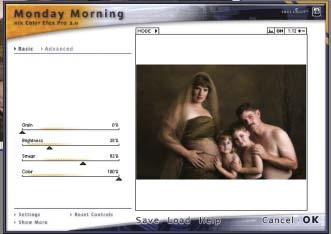
NIK’S MONDAY MORNING FILTER
Nik’s Monday Morning filter (also available in the Nik Color Efex Pro 2.0 filter set) is another great option for finishing an image. The following technique is courtesy of Patricia Mathis, who is also the model in the image!
- Patricia accessed Nik’s Monday Morning filter through Photoshop’s Filter menu. In the Basic palette, the sliders were adjusted as follows: Grain = 0%, Brightness = 28%, Smear = 63%, and Color = 100%.
- Next, she clicked on the Advanced setting in the upper-left corner of the palette. The Protect Highlights slider was set to 100%; the Protect Shadows slider was set to 47%. She hit OK to apply the filter effect.
This screen shot shows the Basic palette for the Monday Morning filter and the settings used to create the final effect. Note that the orange highlight above the sliders indicates the range of values that will work best with the particular image.
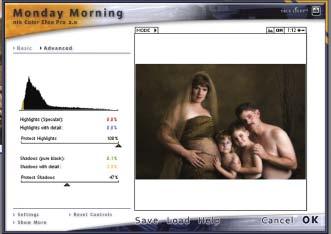
This screen shot shows the Advanced palette and the Protect Highlights and Protect Shadows values used to create this image.
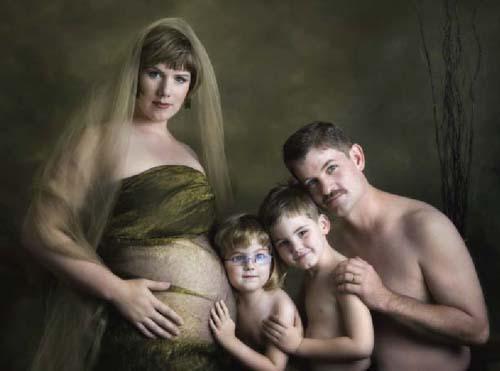
Here’s the final image, beautifully rendered by Nik’s Monday Morning filter.
3. Patricia then created a layer mask, exposing only the eyes. She chose the Erase mode, selected a suitable brush size in Photoshop’s Options bar, and set the tool’s opacity to 35% to bring back some of the sharpness in the eyes. Next, she used the same opacity setting but chose a larger brush size to bring back some sharpness in the face. Finally, she enlarged her brush and erased areas around the subjects’ heads to make those areas a little sharper.