The Art of Pregnancy Photography (14 page)
Read The Art of Pregnancy Photography Online
Authors: Jennifer George
Tags: #Health & Fitness, #Pregnancy & Childbirth, #Photography, #Subjects & Themes, #Portraits, #Techniques, #General
CLIENT TESTIMONIAL
“Jennifer was such a pleasure to work with. My husband and I have never taken professional studio photos before. Jennifer made our experience very relaxing and was very understanding of our inexperience as photography models. She was able to explain the different lighting situations that were involved with each shot. She also had an upbeat attitude that made us comfortable to be around her and her camera. The photos were wonderful! We couldn’t believe that it was us in the photographs. My husband and I loved every single photo she took and it was so hard to choose which was our favorite. We were very impressed by Jennifer’s professionalism and her talent. She has a great eye.” —Celin T.
In the studio, photographers use a flash meter to gauge the amount of light emitted by their strobes. In other settings, an incident light meter reading, with the dome of your meter pointed at the light source, can be used to determine the highlight to shadow ratio. (
Note:
In digital capture, care should be taken to not overexpose the highlights.)
BROAD AND SHORT LIGHTING
There are two basic types of portrait lighting: broad and short lighting. Broad lighting refers to a presentation in which the main light illuminates the side of the client’s face that is turned toward the camera. This type of lighting tends to flatten the contours of the features and make the face appear wider. For this reason, it is not a favorable approach in the majority of sessions.
Short lighting refers to a presentation in which the main light illuminates the side of the face that is turned away from the camera. It emphasizes the contours of the subject’s features and tends to present a more narrow view of the face. When a weak fill light is used in a short lighting setup, a dramatic lighting style with deep shadows and bright highlights results.
BASIC LIGHTING PATTERNS
Many photographers strive to achieve one of the following light patterns. These are tried-and-true “shortcuts” that can be used to flatter the face.
Butterfly Lighting
. Butterfly lighting, also known as Paramount lighting, is a feminine lighting style that produces a butterfly-like shadow beneath the subject’s nose. The lighting style emphasizes smooth skin and high cheekbones. To produce this lighting style, the main light is positioned high and in front of the client’s nose. The fill light is placed directly beneath the main light, at the client’s head height. Next, the hair light is placed opposite the main light. (Care should be taken to ensure that it lights only the hair and does not skim across the subject’s face.) Finally, the background light is placed low and behind the subject to form a semicircle of light behind the subject that fades out toward the edges.
Loop Lighting
. Loop lighting is a variation of butterfly lighting and is flattering for people with oval-shaped faces. To create this style of lighting, place the main light lower and more to the side of the subject so that the shadow under the nose becomes a small loop on the side of the face. The fill light should be placed on the opposite side of the camera, across from the main light, and close to the camera/subject axis. It’s important to ensure that the fill light does not cast a shadow on the subject. The hair light and background light should be placed as described for the butterfly lighting portrait style.
Rembrandt lighting is a dramatic lighting style named after the famous painter, Rembrandt Harmenszoon Van Rijn. When painting his portrait subjects, Rembrandt used very directional light that came from a small open window above the subject. He allowed the light to fall across the subject, creating a small triangle of light on the far cheek under the eye. The resultant dramatic highlight-to-shadow ratio produced a feeling of depth in the portrait.
Rembrandt Lighting
. Also called 45-degree lighting, this portrait lighting style is characterized by its small, triangular highlight on the shadowed cheek of the subject. This is a dramatic lighting style that is often used when photographing male subjects.
To create this lighting style, place the main light lower and farther to the right than is described in the styles outlined above. Position the hair light as described in the loop lighting description, but move it in a bit closer to produce stronger highlights in the hair. The background light should also be placed as described above. However, the kicker lights should be positioned to add brilliant highlights to the outline of the face and shoulders. (
Note:
It is important to ensure that these lights do not shine into the lens.)
Split Lighting
. The term split lighting is used to describe a lighting style in which the main light illuminates only half of the face. It’s a dramatic lighting style that can be used to narrow wide faces or wide features and can be softened slightly when a weak fill is introduced.
To create this style, move the main light lower and farther to the side of the subject than it is used in the other lighting style descriptions. Sometimes, the light may be placed behind the subject. This placement may be necessary when the subject is turned far from the camera.
Profile Lighting
. Also called rim lighting, this dramatic lighting style is used to emphasize a subject’s elegant features. In this portrait style, the subject is turned 90 degrees from the lens. The main light is placed behind the subject to illuminate best the center of the profile and highlight the edge of the face, as well as the hair and neck. The fill light is placed on the same side of the subject as the main light, and a reflector is added opposite the main light to fill in the shadows. The background light is placed low and behind the subject. Adding a hair light is optional, but it can be placed on the reflector side of the subject for enhanced separation from the background.
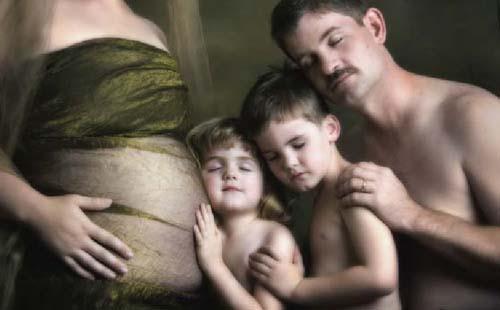
To create this family portrait, a 60-inch Norman octagonal softbox was placed at a 45 degree angle to the subjects and closer to the camera angle. A reflector was used opposite the main light. Shifting the light closer to the camera angle spread the light, illuminating all the subjects. With a larger group, be sure to move your main light to a position that covers everything. While this may flatten the light, all subjects will be lit and the light ratio will be sufficient to create form.
SIMULATING WINDOW LIGHT
With window light, we strive to create a feeling of depth and form. Having light from a large window to the side of the subject travel across the body and fall away on the far side creates the form needed. With studio lighting, the goal should be the same.
Using one light and a reflector or black panel produces a lighting effect that is similar to window light but with a more abrupt falloff. The beauty of this is that the background falls into shadow, and the light is focused on the subject, drawing the viewer’s gaze to the figure and emotion of the subject.
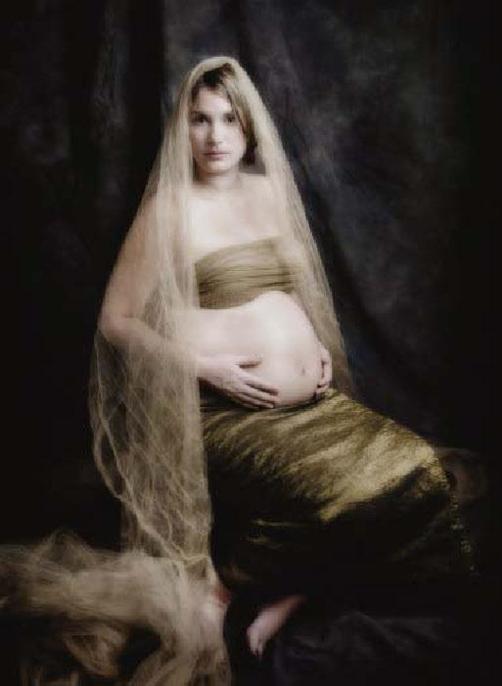
This shot was made following the creation of the couple shot shown on page 64. To set up the shot, the mom was moved into a seated pose, fabrics were added, and the softbox was lowered to center the mother in the light. This image was made with a Nikon D2x, Tamron 28–70mm lens, at f/5.6 and
1
/125 at an ISO of 100.
Another way to create light that mimics window light is to place the main light at a 45 degree angle to the camera, then add a small amount of fill light with either a reflector or strobe—or ambient light. This will give a lower ratio and less dramatic lighting, resulting in a softer, fuller look. This can be an especially good choice when photographing a family group.
To simulate window light, your light source will have to be up to four times wider than your subject (e.g., one that is at least 4 feet in width, but ideally, 5–6 feet wide). Position the light to the side of the subject with a reflector or black panel on the opposite side. The camera angle will be from the front of the subject, placing it at 90 degrees from the light and subject. This lighting setup will give you the most dramatic lighting, with high lighting ratios, creating form and depth.
8. RETOUCHING AND CREATIVE EFFECTS
T
he digital age has changed photography forever. It is now easier than ever to smooth out problems that might cause some pregnant women to shy away from the camera. We can use Photoshop’s Healing Brush to refine the client’s skin, removing blemishes that result from hormonal changes and removing veins and other perceived flaws. We can use the Liquify filter to slightly reshape areas that need a little finessing. By combining the power of Photoshop with the wide range of dazzling effects available through the use of Photoshop plug-ins, we can use our artistic talents and imagination to create unexpected fantasy images.