Windows Server 2008 R2 Unleashed (71 page)
Read Windows Server 2008 R2 Unleashed Online
Authors: Noel Morimoto
that include network routers, if network clients on each network require the automatic IP
address assignment functionality of a DHCP service, there will either need to be a DHCP
server on each network or a service known as a DHCP Relay Agent must be deployed.
DHCP Relay Agents can be servers, a service hosted by a network router, or, in some cases,
a network switch. DHCP agents will listen for DHCP broadcast requests and forward them
to previously designated DHCP servers on another network. As an example of this, Cisco
routers provide a service called ip-helper, which is defined with the DHCP server to
forward broadcast requests to. If this type of router configuration is not utilized, a
ptg
Windows server running the Routing and Remote Access Service must be configured as a
DHCP Relay Agent, as illustrated in Figure 11.2.
Any clients in Subnet2 have
their broadcasts answered
directly by the DHCP server.
Client3
Client4
Client5
Client7
Client8
Client9
Router1
Router2
Subnet1
Subnet3
Subnet2
Client1
Client2
DHCP Relay
Client6
Agent Server
Because of restrictions
Clients in Subnet1 have their
DHCP
Client10
Client11
on relaying broadcasts across
DHCP broadcast requests
Server
Router2, a DHCP Relay Agent
forwarded directly to
was set up in Subnet3 to
the DHCP server
forward clients' broadcasts to
via a setting in Router1.
the DHCP server.
FIGURE 11.2
DHCP broadcast packet routing.
Exploring the Dynamic Host Configuration Protocol (DHCP)
333
NOTE
11
In most real-world implementations of DHCP, the routers between network segments are
configured to forward client DHCP broadcast packets directly to the DHCP server.
Therefore, in large organizations, it is important to include the network architecture
team in any discussions on DHCP design.
Examining DHCP and Dynamic DNS
Using the DNS service in Windows Server 2008 R2, clients can automatically register
themselves in the DNS database through a mechanism called Dynamic DNS (DDNS). For
more information on this concept, refer to Chapter 10.
DHCP in Windows Server 2008 R2 integrates directly with DDNS to provide for automatic
registration of clients into DNS. By default, all Windows 2000 or higher clients will
perform this function by themselves, but DHCP servers can perform Dynamic DNS regis-
tration for DHCP clients that are not able to register themselves. Also, DHCP servers can
be configured to always register the Dynamic DNS entry on behalf of the client. In many
cases, this is ideal because the DHCP service will own the record and can remove it from
the DNS zone when the lease expires. These settings can be configured at the DHCP server
ptg
level and within each DHCP scope properties, through the DHCP administrative console.
A DHCP scope is a set of included and excluded IP addresses and networking options that
define the configuration that DHCP clients will be sent. How to plan and configure DHCP
scopes is detailed in the next section.
Installing DHCP and Creating New Scopes
DHCP installation historically has been two parts: Install the service and then later config-
ure the service. In Windows Server 2008 R2, DHCP Server role installation has been
streamlined through the use of the Add Roles Wizard. This wizard installs the DHCP
Server service and automatically invokes the New Scope Wizard, which can be used to
establish and configure DHCP scopes. To install and configure a Windows Server 2008 R2
system as a DHCP server, follow these steps:
1. Click Start, click All Programs, click Administrative Tools, and select Server
Manager. If prompted for User Account Control verification, click Continue to
confirm the action.
2. In Server Manager, click the Roles node in the left pane to display the Roles
Summary information in the right pane. Then click the Add Roles link in the right
pane to initiate the Add Roles Wizard.
3. After reading the Before You Begin information, click Next to continue.
4. On the Select Server Roles page, select the check box next to DHCP Server, and then
click Next to continue.

334
CHAPTER 11
DHCP/WINS/Domain Controllers
5. On the Introduction to DHCP Server page, helpful information is displayed to learn
more about the DHCP server. Click on any of the informative links as desired and
after reading the information, click Next to continue the installation.
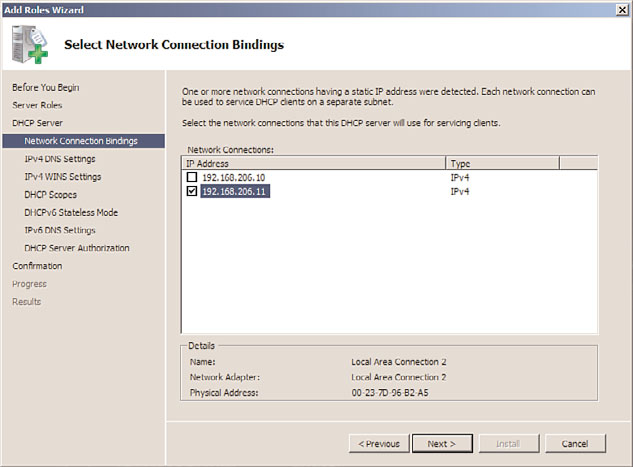
6. On the Select Network Connection Bindings page, check the box next to the desired
network connections that will host the DHCP Server service, as illustrated in Figure
11.3, and click Next to continue.
ptg
FIGURE 11.3
Verifying Binding options for the DHCP install.
7. At this point, the Add Roles Wizard displays the Specify IPv4 DNS Server Settings
page. Enter the name of the parent domain that clients will use for name resolution.
Enter the name of the preferred DNS server IPv4 IP address and the alternate DNS
server IPv4 IP address. Click the Validate button to check the IP addresses of the
preferred and alternate DNS servers. Once the DNS server IP addresses are validated,
click Next to continue.
8. On the Specify IPv4 WINS Server Settings page, click the option button to indicate
whether WINS is required on the network. If required, specify the IP addresses for
the primary and, if needed, alternate server. Click Next to continue.
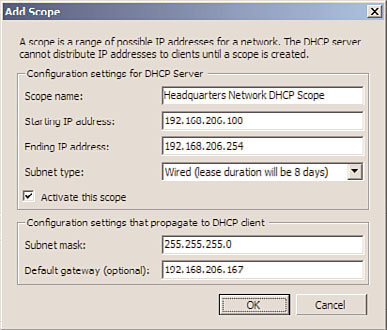
9. On the Add or Edit DHCP Scopes page, click Add and then type a descriptive name
for the scope such as Headquarters Network DHCP Scope. Type in the starting IP
address and ending IP address. Select whether the subnet is a wired or wireless
network, which will set the DHCP address lease duration to either eight days or
eight hours. In addition, type in a subnet mask for the subnet in question, and a
default gateway if the DHCP client needs to communicate with separate networks, as

Exploring the Dynamic Host Configuration Protocol (DHCP)
335
illustrated in Figure 11.4. Also if the DHCP server will be used immediately, check
the Activate this Scope check box and click OK to complete the creation of the
11
scope. If no additional scopes will be created, click Next to continue.
FIGURE 11.4
Defining the address in the Add or Edit DHCP Scopes page of the Add Roles
ptg
Wizard.
10. If DHCPv6 is required, select Enable DHCPv6 Stateless Mode for This Server to
configure the server for DHCPv6 stateless operation; otherwise, select Disable
DHCPv6 Stateless Mode for This Server. If Disable is selected, DHCPv6 can manually
be configured later from the DHCP server MMC snap-in. Click Next to continue.
11. If you enabled DHCPv6 Stateless mode in the preceding step, you must configure
the IPV6 DNS Server settings. On the Specify IPv6 DNS Server Settings page, enter
the parent domain and the necessary IPv6 addresses into the Preferred DNS and
Alternate DNS server information fields and click Next when finished.
12. On the Authorize DHCP Server page, select whether to use the current or alternate
credentials used to authorize the DHCP server in the domain. DHCP servers must be
authorized by Active Directory before they can be used to manage and distribute IP
addresses. If the account used to install the DHCP Server service has the necessary
group membership, select the Use Current Credentials option button and click Next
to continue. If you are not sure, click the Skip Authorization of this DHCP Server in
AD DS option and click Next to continue. Ask the Active Directory domain adminis-
trator to authorize the DHCP server later.
13. On the Confirm Installation Selections page, review the information for accuracy
and click Install to continue the DHCP server installation and configuration process.
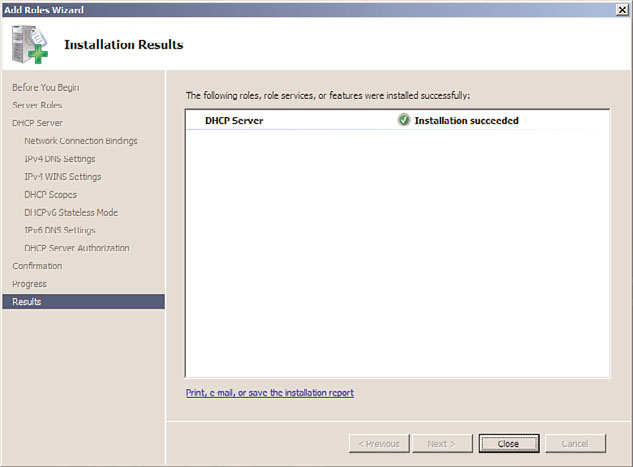
14. The Add Roles Wizard then indicates that the server has successfully become a DHCP
server, as indicated in Figure 11.5. Click Close to close the wizard.

336
CHAPTER 11
DHCP/WINS/Domain Controllers
FIGURE 11.5
Completion of the Add Roles Wizard for the DHCP server.
ptg
Administrators will now be able to see the newly created DHCP server reflected in Server
Manager. It will be located beneath the Roles node in the Server Manager tree in the left
pane. The Roles Summary section will also reflect the newly created DHCP server in the
right pane.
NOTE
It is recommended that all tests utilizing DHCP be conducted in a lab environment. In
addition, testing in production will be difficult because the Authorization Component
of DHCP will also make it impossible to enable scopes on a Windows Server 2008
R2 DHCP server, as described in the “Examining DHCP Authorization” section later in
this chapter.
Exploring DHCP Changes in Windows Server 2008 R2
As previously discussed, two improvements have been made to the functionality of DHCP
in Windows Server 2008 R2. These improvements allow for an increased level of function-
ality beyond the major improvements made in Windows 2000, Windows Server 2003, and
Windows Server 2008. Even though there are new improvements, the architecture and
design decisions that might have been made in previous Windows Server versions will still
remain valid, but the new functionality will enhance these best-practice designs.
