Daily Life in Elizabethan England (30 page)
Read Daily Life in Elizabethan England Online
Authors: Jeffrey L. Forgeng
146
Daily Life in Elizabethan England
Pattern for a bodice sleeve.
[Hadfield/Forgeng]
You can now assemble the pieces. Pin the interlining pieces to their corresponding lining pieces, wrong sides together. Sew the lining/interlining fore pieces to the back pieces along the line
a
/
c-b
/
d
, right sides together.
Sew the outer fore pieces to the outer back pieces in the same manner. Sew the top and CF line of the outer layer to the top and CF line of the lining layers, right side of the outer layer to the right side of the lining (leave the armholes unsewn if you plan to add sleeves),
taking in a seam allowance of
1” at the CF line
—you will want to have the lacing holes pass through the seam allowance, and this will also create a 1” gap at the front, giving you some play when lacing up.
Of your outer fabric, cut two front pickadills and as many ordinary pickadills as will be needed to reach around the bottom edge of the bodice (the two front pickadills are mirror images of each other). Do the same with the lining fabric. Pin each outer piece to its lining piece, right sides together, and sew along the bottom and sides. Turn each pickadill right side out. Pin the pickadills to the bottom edge of the outer layer of the bodice, right sides together (the two front skirts flank the CF opening, with the slanted side forward). Stitch. Turn in the bottom seam allowance of the lining-interlining and finish.
Clothing and Accoutrements
147
For the shoulder straps, pin the lining pieces to the interlining pieces, wrong sides together. Then pin the lining/interlining pieces to the outer pieces, right side of the outer layer to the right side of the lining, and stitch along the ends and one long side. Turn right side out. Pin the straps to the place where they meet the back piece, with the raw edge facing outward.
Put the bodice on, and pin the straps to the place where they meet the fore pieces. Remove the bodice, and sew the straps in place. If the bodice is sleeveless, press under the remaining seam allowance and sew shut.
Stitch lacing holes or apply grommets, at a spacing of about 1”, at CF; lacing holes will work best if you stitch small rings onto the fabric around the holes. You might choose to insert rigilene boning on either side of the lacing holes, even if the rest of the bodice is not boned. (Rigilene boning is available from many sewing-supply stores.) If the bodice will be worn as an outer layer, you may want a placket to cover the gap at CF. Cut a strip of the outer fabric 5” wide and as long as the front opening, plus 1” for seam allowances; cut a lining piece and an interlining piece of the same size. Sew these to each other along the long sides and one short side, right side of the outer fabric to the right side of the lining. Turn right side out, press, finish the open end, and sew it into the inside of the bodice to one side of the CF opening (behind the lacing holes, so that it doesn’t get in the way of the lacing).
To make a sleeve, cut two pieces as shown (the two pieces are depicted one on top of the other: they share the same left edge). You can also cut lining pieces if you choose to have a lining. The actual length of the top curve on the larger piece will depend on how much gathering you choose to have; the total length of the top curve on the larger piece plus the top curve on the smaller piece must be at least 1” greater than the armhole it will be gathered into. Stitch the sleeve right sides together along both side edges. Gather the sleeve to the armhole, right sides together, lining up the front seam (the left one on the illustration) with the foremost point of the armhole. Stitch the sleeve to the armhole, finish the shoulder seams, and hem the cuff. The other sleeve is a mirror image of the first.
Roll
This pattern for a roll is based on visual evidence, as no originals are known to survive. Cut a piece of sturdy linen or light canvas
a-b-c-d
as shown above. Sides
a-b
and
c-d
will be equal to your hip measurement,
a-d
and
b-c
will be 12”. Solidly hem sides
a-d
and
b-c.
Sew line
a-b
to line
d-c,
right sides together, creating a tube of fabric. Turn right side out. Pass a lace through the hems at the two ends. Tighten the lace and one end, gathering it shut, and stuff the roll with fabric scraps. Gather the other end shut, and use the laces to tie it on. It is worn slightly below the waist to accentuate the hips.


148
Daily Life in Elizabethan England
Pattern for a roll. [Hadfield/Forgeng]
Petticoat
This design for a woman’s petticoat derives from an example of the early 17th century.3 It should be ankle-length or toe-length, requiring about 8’ of fabric: medium to heavy wool for an outer petticoat, linen or lighter wool for an underpetticoat. If you plan to wear a roll, make it first, as it will affect the design.
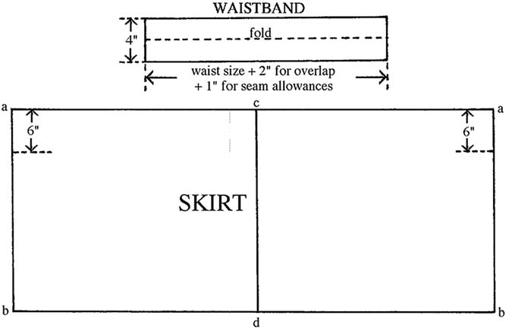
The easiest style to make is a drawstring petticoat. Cut the fabric crosswise into two panels as shown and sew them selvage to selvage (
c-d
). Sew the other selvages together (
a-b
), leaving the top 6” open. You now have a loop of fabric.
Pattern for a petticoat. [Hadfield/Forgeng]
Clothing and Accoutrements
149
If the overall circumference of this loop is greater than three times your waist measurement, you will need to trim the panels into trapezoids, until the measurement
a-c-a
is no greater than three times your waist (otherwise it will be too difficult to gather). This does not need to be done if the fabric will be pleated into a waistband, but it does need to be done if it is gathered to a waistband or drawstring.
Fold over 2” at the top of the loop and sew it down, creating a channel.
Open a hole in the channel at the seam at point a, and thread a drawstring through. Put the roll on, put the skirt on, and draw the string tight, then have someone pin the bottom edge so that it reaches your ankle or toes.
Remove and hem.
A more comfortable design in the long run (to which the drawstring petticoat can be converted) involves a waistband. Cut a strip of wool 4”
wide and as long as your own waist size plus 2” for an overlap plus 1” for seam allowances. Fold the waistband as shown, right sides together, stitch up the ends, and turn right side out. Insert a strip of buckram or some other reinforcement. Gather or pleat the top edge of the petticoat to the seam allowance on the outside of the waistband, right sides together, leaving an extra 2” at one end of the waistband for the overlap. Stitch. Fold the waistband over, folding in the inside seam allowance, and stitch it closed.
Use hooks to close the waistband—the petticoat can also be hooked or tied to the bodice to prevent gaping at the waist. You may add a placket to cover the opening in the petticoat.
Alternatively, you can use cartridge pleating, finishing the waistband first and sewing the pleats to it afterward.
Breeches
This design for a man’s breeches is based on the photograph of a surviving Italian example of the late 16th century.4 It will require 1 yd. of white linen.
Cutting:
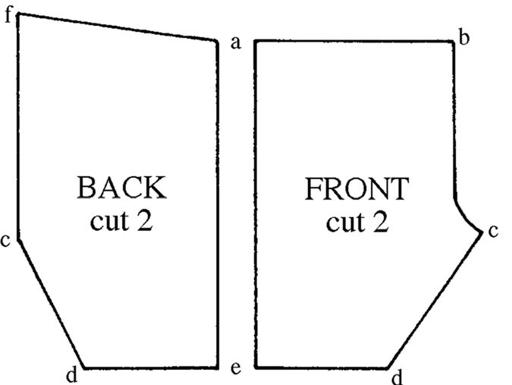
Cut two of each piece as shown.
—
a-b
=
a-f
= half waist measurement
—
b-c
= small of the back to midcrotch
—
d-e
= a bit more than half the circumference of the thigh
—
a-e
= hip to thigh (anywhere from midthigh to just above the knee)
—
f-c
= small of back to midcrotch
Sewing:
Sew outseam of each leg (
a-e
), right side together. Sew inseam of each leg (
c-d
), right side together. Sew front and back seam (
f-c
and
b-c
), right sides together. Hem the cuffs. Fold over the top to make a channel for the drawstring: sew it down, open a hole at the front seam (at point
b
), and thread the drawstring through.

150
Daily Life in Elizabethan England
Pattern for a man’s breeches. [Hadfield/Forgeng]
Shirt
This pattern is based on a man’s shirt of the late 16th century.5 It is shown without seam allowances. The shirt should require 3½ yds. of white linen.
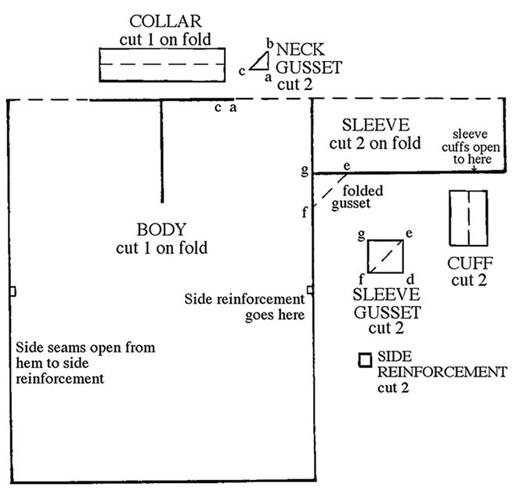
Adjust the measurements as necessary. The collar should be 1” longer than your neck size (including seam allowance). The distance from the ends of the neck opening (
a
) to the sleeve should be a bit longer than your shoulders—narrow the neck opening if necessary. The length of the sleeve should equal the distance from your shoulder to your first knuckles, measured around your bent elbow.
Stitch the sleeve gusset to one side of the sleeve along
d-e.
Stitch the sleeve-gusset piece to the body. Do the same with the other sleeve. Fold the body-sleeve piece over crosswise and stitch up the sides (leaving open at the bottom as shown), stitching
f-g
on the gusset to
f-g
on the body.
Stitch
g-e
on the gusset to
g-e
on the sleeve, and stitch up the rest of the sleeve from the gusset to the arrows. Do likewise with the other sleeve.
Fold over ⅛” of the side reinforcements all around, and stitch to the point where the side seams end, as shown.
Hem back the open section of the sleeve seam. Fold the cuff along the dotted line, stitch up the ends, and turn right side out. Gather the cuff

Clothing and Accoutrements
151
Pattern for a man’s shirt. [Forgeng]
edge of the sleeve to the seam allowance on the outside of the cuff, right sides together. Stitch. Fold the cuff over, folding in the inside seam allowance, and stitch it closed.
Stitch the neck gussets into the ends of the neck openings, right sides together, matching points
a-b-c.
Hem back the front slit, and take in a small dart at the bottom. Fold over the collar and stitch as you did with the cuffs, and gather the neck opening into it as with the sleeves and the cuffs. Hem the bottom and the open edges of the sides, and add ties to the bottom edge of the collar and the sleeve edge of the cuffs. The original is heavily embroidered on the upper torso, collar, sleeves, and cuffs.