Daily Life in Elizabethan England (31 page)
Read Daily Life in Elizabethan England Online
Authors: Jeffrey L. Forgeng
Venetian Breeches (Venetians)
This pattern for a man’s Venetians is based on a pair from the early 17th century, probably of German origin.6 The Venetians should require about 2–3 yds. of wool (and as much again for lining, if used) and a small amount of linen for the pockets (although these can be made of wool).
152
Daily Life in Elizabethan England
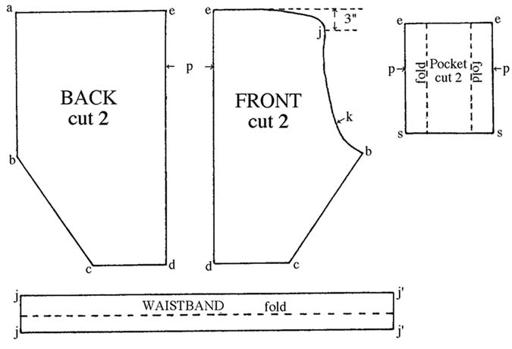
Pattern for Venetian breeches. [Hadfield/Forgeng]
Pattern:
The easiest way to proceed is to don a pair of trousers and take a few measurements to draft a pattern based on the one shown here.
—
a-e
=
e-j
= ⅓ to ½ hip measurement, depending on how full you want them
—
a-b
= top rear of trousers to crotch
—
b-c
= crotch to 3” below the knee along inseam
—
c-d
= ½ bottom cuff opening
—
e-d
= top of trousers to 3” below the knee along outseam
—
j-i
= top front to crotch
—
j-k
= 7”
—
e-p
= 7”
—
j-j
' = waist size (remember to add seam allowances)
—
j-j
=
j
'-
j
' = 3” (remember to add seam allowances)
—
e-s
= 16”
—
e-e
=
s-s
= 13”
Cutting:
You will need two of each piece except the waistband.
Sewing:
On the back and front pieces, sew point e to point e, and sew the outseam of each leg (
p-d
), leaving pocket slit open (
e-p
). On the pocket, sew point
e
to point
e
and
p-s
to p-s, leaving a slit from
e
to
p.
Fold the
Clothing and Accoutrements
153
pocket along the dotted lines and sew across the bottom. Turn the pocket so the seam allowances are inside. Pin the slit of the pocket to the pocket slit in the outseam of the Venetians (
p-e
), right sides together and from the outside of the Venetians. Sew around the pocket slit, and turn the pocket in (you will have to sew the ends of the slit by hand).
Sew the inseam of each leg (
b-c
). Sew center back seam (
a-b
). Sew center front seam from
b
to
k
.
Fold the waistband on the dotted line, sew up the ends, and turn right side out. Gather the top of the breeches to the seam allowance on the outside of the waistband, right sides together, with the top end of the pockets caught into the waistband (the pockets are not gathered), and matching the ends of the waistband to points
j
and
j
' on the Venetians. Stitch. Fold the waistband over, folding in the inside seam allowance, and stitch it closed.
Finish the fly (
j-k
) and cuffs, add three buttons and buttonholes to the fly opening, and attach hooks and eyes to fasten the waistband. You may also use hooks and eyes to attach the waistband to the bottom of the doublet, and at the cuffs to make them fit your leg more tightly (this works best if you leave open a few inches of the inseam or outseam at the bottom). A placket can also be added at the fly.
Doublet
The design given here is based primarily on an Italian doublet of the 1570s.7 You should need about 3 yds. of wool for a man, 2 to 2½ for a woman (and as much linen for lining, if used). It may be advisable to use a fairly stiff fabric or to reinforce it with a stiff lining, perhaps including an interlining. Use a medium weight wool and a sturdy lining fabric for best results. The same basic design can be used for a sleeveless jerkin.
Pattern:
The surest means of making a doublet fit properly is to make the pattern from an old fitted shirt.
—Cut off the collar of the shirt.
—Cut off the bottom of the shirt to shape of the doublet as shown. Point
c
is 4” below the waist;
b
is at the waist.
—Cut the shirt in two down the middle of the back.
—Cut off the sleeves at the armhole seams.
—Cut the sleeve down the seam to give the sleeve pattern.
—Cut the shoulder seam of the shirt body (this is normally at the front of the shoulder panel on the shirt).
—Cut the underarm side seam of the shirt to give the fore and back pieces.
—The length of the collar will be equal to the distance around the neckline, plus 1” for seam allowances.
—The wings and pickadills are optional.

154
Daily Life in Elizabethan England
Pattern for a doublet. [Forgeng]
Cutting:
Cut two each of the fore, back, and sleeve pieces (omit the sleeve pieces for a sleeveless jerkin). If you want a lining, cut two each of the fore, back, and sleeve pieces. If you use an interlining, cut two each of the fore and back pieces. If there is no lining, allow a 1” seam allowance at the front opening to support the buttons and buttonholes.
For wings, cut four of the outer fabric. Cut two of the interlining (without seam allowances) if you have it.
For pickadills, you will need two end pickadills to go on each side of the front opening, and as many mid pickadills as are needed (measure the total bottom edge of the body, subtract 4” for the two end pickadills, and divide by 3). For each pickadill, cut one of the outer fabric and one of the lining fabric. The end pickadills are mirror images of each other.
For the collar, cut one of the outer fabric and one of the lining. Cut one of the interlining (without seam allowances) if you have it.
Sewing:
Sew the front pieces to the back piece at the shoulder seam, right sides together. Sew the sleeves to the armholes of the body, matching point
a.
If you want wings, you will need to insert them
before
sewing the sleeves to the armholes. To make a wing, sew two outer pieces along the curved side, right sides together, and turn right side out. Insert the interlining if
Clothing and Accoutrements
155
you have it. When you pin the sleeves to the body, insert the wing between the right side of the body and the right side of the sleeve, lining up the raw edges of all three pieces together and making sure the midpoint of the wing lies at the shoulder seam. When you sew the sleeve to the armhole, you will also be sewing the wing in place.
Sew up the sleeve and side seams.
If you have a lining, assemble it as you did the outer layer (it will not have wings). Sew it to the outer piece along the CF, right sides together. Turn right side out, and push the lining sleeves through the outer sleeves.
For the collar, sew the outer fabric piece to the lining piece, right sides together, leaving the bottom edge open. Turn right side out. Insert the interlining, if you have it. Sew the neckline of the body to the outer seam allowance of the collar, right sides together, matching the raw edges. Fold the collar over, folding the inner seam allowance in, and stitch it shut. If you have a lining, you will stitch the lining of the collar to the lining of the body.
If you want pickadills, see the instructions for them under the bodice pattern. Otherwise fold over the bottom seam allowance and finish. Fold over the cuff seam allowance and finish.
The doublet normally buttons up the CF; buttonholes would be 1” to 1¾” apart (depending on button size). You may also add hooks around the waist to support eyes to hold up the breeches; if you are ambitious, you could consider matching rows of paired eyelets in the doublet and in the waistband of the Venetians for points. The sleeves could also be attached with hooks and eyes or laces to make them removable.
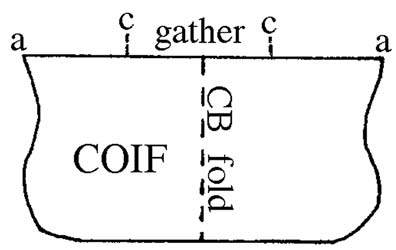
Coif
The original on which this coif is based is said to have belonged to Queen Elizabeth; it is made of white linen and is heavily adorned with embroidery.8 The piece measures 17” by 8¾”. After cutting, hem the entire coif.
Fold on the dotted line, and sew
a-c
to
a-c.
Thread a small string through the top from
c
to
c,
gather, and secure the ends of the string. Gather the Pattern for a coif. [Hadfield/
Forgeng]

156
Daily Life in Elizabethan England
bottom edge in the same manner, or use a lace, the ends of which can be used to hold the coif on your head.
Flat Cap
The flat cap is the easiest type of male Elizabethan headgear to reproduce. It might also be worn by women over a coif. Use wool for the outer layer, with linen for a lining if you want one, and sturdy canvas or buckram to stiffen the brim. The design is based on an Italian man’s flat cap of the 1560s.9
The diameter of the hole in the brim piece is such that it will fit snugly over the head—probably around 6”. The brim should be about 1½”. The diameter of the crown piece will be the diameter of the brim piece plus twice the width of the brim. Cut two brim pieces and one crown piece; cut another crown piece of lining fabric if you want lining. Sew the outside edges of the brim pieces together, right sides together, and turn right side out to make the brim. You may wish to insert a third brim piece of stiffer fabric to make the cap less floppy—canvas or buckram are two possibilities. Then gather the outside edge of the crown piece into the inside edge of the upper brim piece to make the crown. Finish the edges, and the cap will be complete.
Netherstocks and Garters
Woolen socks that reach the knee are available for cross-country skiing and mountain climbing. For knitters, patterns are also available.10 If you Pattern for a flat cap. [Hadfield/Forgeng]
