Daily Life in Elizabethan England (32 page)
Read Daily Life in Elizabethan England Online
Authors: Jeffrey L. Forgeng
Clothing and Accoutrements
157
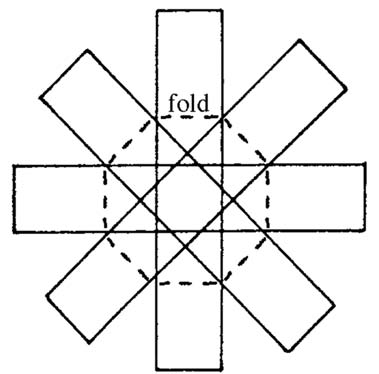
Pattern for cloth hose.
[Hadfield/Forgeng]
choose to make hose of a woven fabric, the weave should be loose and cut on the bias to allow for a snug fit. The following design is based on a number of surviving examples.11 They can be made with 2 yds. of fabric (1½ yds. for a woman). Wool will give the best fit; linen is also possible, although it will not have the same stretch.
Draft your hose as follows:
—
a-a
= the measurement around heel and instep
—
c-c
=
d-d
= half the measurement around the broad part of your foot
—line
a-b
is drawn at a slight angle
—
b-c
=
c-d
= half the distance from anklebone to anklebone measured under the sole
—lines
b-e
and
d-d
on the sole intersect at the broadest point of the foot (measure its distance from the toe)
—
b-e
= the distance from heel to toe less
a-b
—
d-e-d
on the body is the same as
d-e-d
on the sole
—the measurements on the gussets are the same as the measurements on the body and sole
Extend the body upward as follows:

158
Daily Life in Elizabethan England
The distance from the calf line to the top is the distance from the thick of the calf to the knee + 6”.
When cutting, do not worry about the lack of a seam allowance in the slashes on the body: just stitch them close to the edge.
Using zigzag stitch to prevent breakage of the thread, sew up the stocking, right sides together:
—Sew around the slashes, close to the edges, to prevent raveling.
—Sew the gussets to the sole.
—Sew the gussets to the slashes on the body.
—Sew the foot of the body to the sole.
—Sew up the heel and body, curving the seam around the heel.
Try the stockings on the opposite feet, still inside out. Repin seams (primarily the long heel-leg seam) to fit them as closely to your leg as you can without making it impossible to pull the stockings on and off. Remove, and restitch, using the new seam lines. Cut away the excess seam allowance, and finish seams and top. Don’t worry about the tendency for these stockings to bag at the ankle and twist around the leg: cloth stockings by nature did not fit as snugly as knitted ones.
Garters are strongly recommended, as they can save the aggravation of having your stockings slide down your legs. They can be made of strips of fabric at least 39” long and 1–4” broad. If the fabric is springy, so much the better, as it will allow a better fit. This can be achieved by cutting a woven fabric on the bias; a quick and easy route is to use bias tape. Alternatively, you could knit a strip of wool about 1–2” wide and at least 2’ long, alternating knit and purl stitches in both directions. Cross-garters, which wrap Pattern for a shoe rosette.
[Hadfield/Forgeng]

Clothing and Accoutrements
159
around the legs twice, once above the knee and once below, will have to be considerably longer.
Shoes
Shoes are much harder to make, but certain styles of bedroom slipper strongly resemble the plainer style of Elizabethan shoe. Tai-chi shoes are an alternative, with or without the strap: the design is again similar to that of Elizabethan shoes, although they would normally have been of leather instead of cloth.
Your shoes can be given a more distinctively Elizabethan look by adding rosettes, which can be made with four ribbons (preferably two each of two contrasting colors) roughly 7”x ¾”. Sew them together in the middle as illustrated. Fold the ends over so that they overlap each other in the center back, and sew them in place. Then attach them to the shoe.
Falling Band
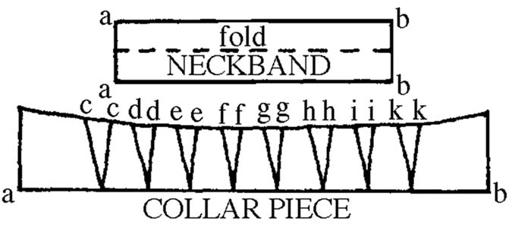
This design for a man’s falling band derives from visual evidence and surviving examples from the early 17th century.12 The band should be of linen. The collar piece is 25” long, 4¾” deep at the ends, and 3¾” deep in the middle. The neckband is 4” deep before folding, and as long as your neck measurement (remember to add ½” at each end for the seam allowance).
The eight pleats on the collar piece are evenly spaced and deep enough to make the curved edge equal to your neck measurement. The first pleat on each end is ¼ of your neck measurement away from the edge, so that it lies over the midpoint of your shoulder. Pin the pleats up and press: each Pattern for a falling band. [Hadfield/Forgeng]

160
Daily Life in Elizabethan England
Pattern for a cassock. [Hadfield/Forgeng]
pleat folds forward, so that the opening faces the back of the neck (the pleats lie on the underside of the collar). Hem the bottom and sides of the collar piece by ⅛”. Sew the pleats shut on top with a hemming stitch.
Fold the neckband along the dotted line, and sew up the sides. Turn right side out. Sew the collar piece to the outside seam allowance of the neckband, right sides together. Fold the neckband over, fold back the inside seam allowance, and stitch shut. Attach flexible ties, about 5” long, to the top of the fore-edge of the neck piece.
The collar should be pinned to the doublet and folded down over the doublet collar. Cuffs can be constructed in the same manner as the falling band.
Cassock
The cassock is a good warm garment for both men and women. The
design given here is based on a mid-17th-century Swedish example,
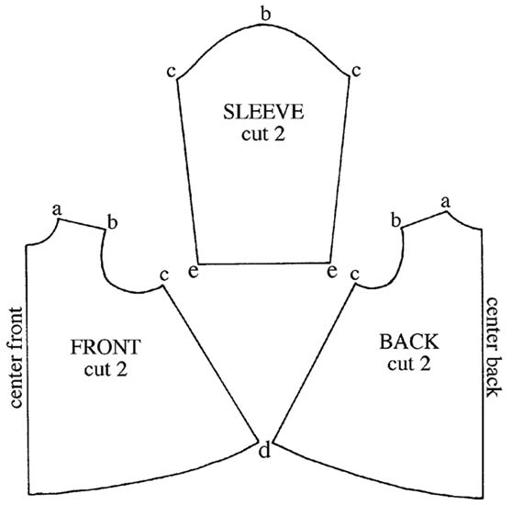
adjusted to make it closer to 16th-century illustrations.13 The cassock should require 2 yds. of wool. Two of each piece will be needed. Sew the
Clothing and Accoutrements
161
back pieces together at the CB seam. Sew the fore pieces to the back at the shoulder seams. Sew the sleeve to the armhole, and stitch up the sides and sleeve seam. Hem the neckline and cuffs; if the wool is sufficiently felted, you will not need to hem the bottom edge.
The cassock can fasten with buttons all the way down the front, or just a few at the top, with the remainder of the front sewn up. The side seams can be sewn shut, left open, or fastened with buttons or ties. The sleeves could be omitted. If you decide to add a lining, remember not to sew the lower edge of the garment to the lining: this will attract rainwater.
Buttons
Button-making kits are an easy means of reproducing the look of Elizabethan cloth-covered buttons, although the originals would have been more round. Try to get small ones—Elizabethan buttons tended to be under ¾”
in diameter. When choosing a button kit, try to be sure that the shank comes attached to the face rather than to the back plate; buttons of the latter type are less sturdy. You can also make an Elizabethan button entirely of cloth: cut a 1½” diameter circle, then sew a 1” diameter gathering stitch around it. Gather the stitch, stuffing the edge of the circle into the center as you do, and sew it up. Buttons were generally sewn to the edge of the garment, rather than slightly in from the edge as is usual today.14
NOTES
1. A. M. Nylen, “Stureskjortorna,”
Livrustkammaren
4 (1948): 8–9, 217–76.
2. Janet Arnold,
Patterns of Fashion: The Cut and Construction of Clothes for Men
and Women c.1560–1620
(New York: Drama Books, 1985), 112–13 [#46].
3. Arnold,
Patterns,
116–17 [#51].
4. Millia Davenport,
The Book of Costume
(New York: Crown, 1948), 633.
5. Janet Arnold, “Elizabethan and Jacobean Smocks and Shirts,”
Waffen-und
Kostümkunde
19 (1977): 102.
6. Arnold,
Patterns,
86–87 [#21].
7. Arnold,
Patterns,
55–56 [#3]. For the wings and pickadills and an example of a jerkin, compare 70–71 [#9].
8. Davenport,
Costume,
445.
9. Arnold,
Patterns,
55–56 [#22].
10. For a pattern, see Weaver’s Guild of Boston,
17th Century Knitting Patterns as
Adapted for Plimoth Plantation
(Boston: n. p., 1990), 18–24
.
11. This design is based on one given by Richard Rutt,
A History of Hand Knitting
(Loveland, CO: Interweave Press, 1987), 74.
12. M. Channing Linthicum,
Costume in the Drama of Shakespeare and His Contemporaries
(Oxford: Clarendon Press, 1936), 160; Davenport,
Costume,
636; Norah Waugh,
The Cut of Men’s Clothes 1600–1900
(London: Faber and Faber, 1964), 25.
13. Waugh,
Men’s Clothes,
31, pl. 5.
14. For examples of various types of buttons, see the various garments analyzed in Arnold,
Patterns.
7
Food and Drink
Food ranks among the most important of human needs, a fact of which the Elizabethans were more acutely aware than is sometimes true today.
By Renaissance standards, the Elizabethans were well fed. Travelers from the Continent were often impressed by the Englishman’s hearty diet: even the husbandman ate reasonably well compared to the Continental peasant. Yet in England as elsewhere during the 16th century, food production was a laborious and precarious endeavor. Agriculture was back-breaking work, which by modern standards yielded only low returns in produce.
Worse, it was extremely susceptible to natural misfortunes: mysterious illnesses could devastate livestock, and a summer that was too dry or too wet would lead to poor harvests, skyrocketing food prices, and famine.
The harvests of Elizabeth’s reign were relatively good, but severe shortages in 1586–88 and 1594–98 led to widespread hunger and mortality.
Even in a good year, poverty and malnutrition were never wholly out of sight of those who had steady sources of income: the poor were always highly visible in Elizabethan England. Not surprisingly, there seems to have been less waste of food: when an aristocratic family finished eating, the leftovers were given to the servants; when the servants were done, the remains were brought to the door for distribution to the poor.
MEALS
The first meal of the day was breakfast, which was generally an informal bite on the run rather than a sit-down meal. Many people did not take
