Happy Endings: Finishing the Edges of Your Quilt (10 page)
Read Happy Endings: Finishing the Edges of Your Quilt Online
Authors: Mimi Dietrich
Tags: #Crafts & Hobbies, #Quilts & Quilting
3.
Fold the backing once more to create the “binding,” and a miter will form at the corner.

4.
Carefully trim the small square that extends onto the quilt. Pin the folds securely and then stitch in place.

Happy Ending Hint
If you get a blunt corner on your finished quilt, try this: Relax! Then, when folding the corner, don’t fold the backing fabric tight against the corner of the quilt. Fold it ⅛" outside the point and you’ll be able to make a nice, pointed binding corner.
Stitching the Edges
Once your backing edges are folded and pinned, you can stitch them in place by hand or machine.
Finishing by Hand
1.
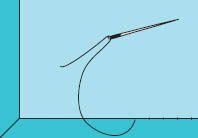
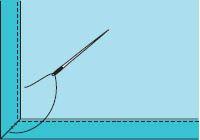
Use an 18" length of thread that matches the backing fabric. Use a blind stitch or a slip stitch to sew the folded edge to the front of the quilt. The stitches should not go all the way through to the back of the quilt.
2.
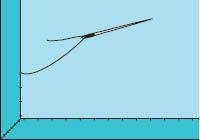
At each mitered corner, sew along the mitered fold with four or five stitches, and then continue to sew the next side of the quilt.
3.
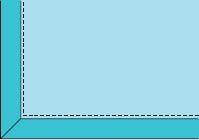
After you stitch the backing in place, quilt a row of stitches next to the binding, sewing through all three layers of your quilt to secure the edges and give the illusion of binding on the back of the quilt. Remove any basting stitches.
Finishing by Machine
1.
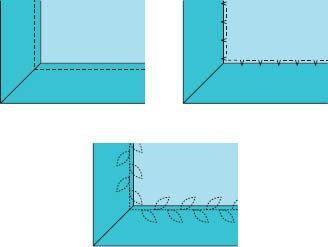
To finish the edges by machine, simply sew around the edges of the backing fabric close to the pinned fold. You can use a straight stitch, a machine blind stitch, or a decorative stitch to finish the edges. This stitching sews through all layers of the quilt, so it isn’t necessary to add a row of quilting stitches.
2.
Close the overlapped or mitered corners with a few small blind stitches, and then remove any basting stitches.
Finishing Edges with Binding
For a more professional finish, you can make a separate binding and apply it to the quilt. You’ll need extra fabric to make the binding, so plan ahead and save fabric for this last step. Or you can wait until the quilt is finished and then take it to your favorite quilt shop to audition possible binding fabrics to see which one suits your quilt best
.
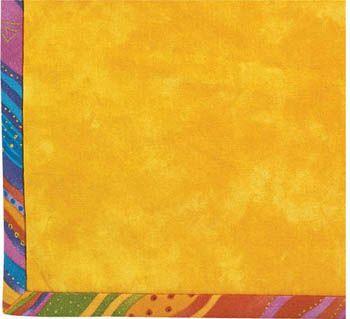
Applied binding can complement your design by framing the edge of the quilt or matching the background fabric in the design. It can accent a solid border with print binding or simply create a perfect match to your favorite fabric in the quilt. Use a straight or diagonal design in a fabric to create a special binding. Cut fabric with little flowers or hearts printed in a row so that they line up along the edges of your binding. Cut striped fabric so that a single stripe accents your design or so that the stripes spiral around the edge of your quilt. Sew a variety of fabrics together to create a scrappy binding. Unique finishing touches are possible when you make your own binding.
Binding can be cut on the straight grain of your fabric or, when some flexibility is needed to ease around curves, it can be cut on the bias or diagonal grain of the fabric.
Binding can also be applied using various techniques. Single-fold binding works best for some situations, while the more common double-fold binding makes a durable edge finish. These methods, as well as tips and tricks for finishing irregular edges, are all covered in this chapter.
Applying binding to the edges of a quilt is probably the most common way to finish a quilt today. Making your own binding is both fun and creative.
Following are some options for choosing the right fabric for your binding:
Choose binding fabrics that complement the design and color in your quilt.

