Happy Endings: Finishing the Edges of Your Quilt (13 page)
Read Happy Endings: Finishing the Edges of Your Quilt Online
Authors: Mimi Dietrich
Tags: #Crafts & Hobbies, #Quilts & Quilting
3.
Press the seam open and trim off the part of the seam allowance that extends beyond the edge of the binding. This will help reduce bulk in the finished binding.

4.
Continue adding strips in the same manner until you have enough binding to go around your quilt, plus 10".
M
IMI
’
S
F
AVORITE
The ends of straight-grain binding strips are square, not diagonal. You can take the time to trim them at a 45° angle and stitch them together as for bias-binding strips. But I find the following method is quick and accurate. You simply trim the excess fabric after sewing.
Joining Straight-Grain Strips
1.
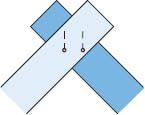
Place two strips right sides together, crossing the ends at right angles. Lay them on a flat surface and pin securely.
2.
Imagine the strips as the capital letter
A
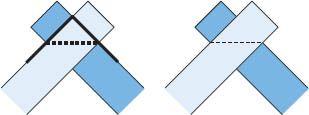
. Draw a line across the pieces to connect the points where they intersect, just like crossing the
A
, and then sew along the line.
3.
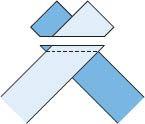
Trim the excess fabric, leaving a ¼" seam allowance, and press the seams open.
4.
Continue adding strips in the same manner until you have enough binding to go around your quilt, plus 10".
Happy Ending Hint
If you do not plan to use your binding immediately after you make it, store it by winding it carefully around a cardboard tube, such as from paper towels or gift wrap. Wind it flat, not folded, and try not to stretch it.
Cutting Continuous Binding
Some quilters like the continuous binding method, which allows you to start with a large piece of fabric, sew one or two seams, and then do the cutting. The result is one long (continuous) piece of binding. It eliminates the process of sewing many separate strips together. You can use this method for both straight-grain and bias binding.
Continuous Straight-Grain Binding
For this method, you sew only one seam, and then cut one long, continuous binding strip. It takes time to mark the cutting lines, but if you don’t like sewing many individual strips together, this method may be for you. Because this binding is cut on the straight grain of the fabric, it should be used only to bind quilts with straight edges and square corners.
1.
Using one of the charts on
page 32
, determine the rectangle or square size that will yield enough binding for your project.
2.
Lay your fabric on a flat surface, and trim off any selvages. Mark lines 2" apart, parallel to one long edge. If the fabric beyond the last line measures less than 2" wide, trim it off. (You shouldn’t have to trim if the measurement of the fabric can be divided by your binding width).

3.
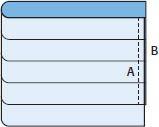
Place side A and side B right sides together. Shift side A so that the top cut edge of side A matches up with the first line marked on side B. At the other end of the seam, the lower cut edge of side B should match the last line on side A. Pin in place and then sew a ¼" seam. It’s good to use a smaller-than-normal stitch length (about 12 to 15 stitches per inch) since you’ll be cutting through the seam. Press the seam allowances open.
4.
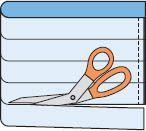
Using sharp scissors, start at one uneven end and cut along the marked line. When you get to the seam, you will have moved up one line and can continue cutting, creating one piece of binding long enough to bind your quilt.
Continuous Bias Binding
This method is similar to the continuous straight-grain binding in that you mark and sew first, and then cut one long piece of continuous binding. In this case, the binding is cut on the bias, making it suitable for any finishing situation, including curved or scalloped edges as well as rounded or mitered corners.
1.
Using one of the charts on
page 32
, determine the square or rectangle size that will yield enough binding for your project.
2.
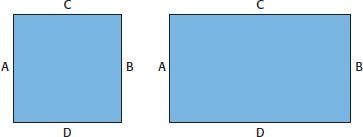
Lay your fabric on a flat surface, right side up, and label the sides A, B, C, and D as shown. Use a water-soluble pen or write on masking tape.
