Happy Endings: Finishing the Edges of Your Quilt (29 page)
Read Happy Endings: Finishing the Edges of Your Quilt Online
Authors: Mimi Dietrich
Tags: #Crafts & Hobbies, #Quilts & Quilting
4.
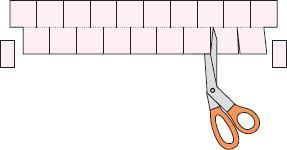
Using scissors, cut on the marked side lines. Cut off the 1½" segments. Do not cut through the center fold line.
5.
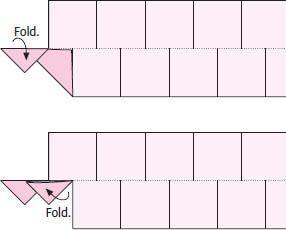
Working on an ironing board, start on one side of the strip and fold the first square in half diagonally, and then in half again, as shown, to form a prairie point. Press each square as you fold it.

6.
Move to the other side of the center line and fold the next square once diagonally, starting with the edge near the last prairie point.

7.
Flip the first prairie point over the folded square. Press the second diagonal fold in the second prairie point, overlapping the first one. Place a pin at the bottom edge of the point to hold it in place.
8.
Continue folding and nesting the squares on the strip until the entire strip is folded. Machine baste ⅛" from the edge of the strip to secure the points.

9.
Attach the strips of prairie points to the edges of the quilt, aligning the straight edge of the prairie points with the raw edge of the quilt and overlapping segments as needed. Make sure that the prairie points meet at the corners (see
page 61
). To attach the strips, sew around all four edges of the quilt front using a ¼" seam allowance. To finish sewing your quilt together, refer to “Attaching Special Finishes” on
page 55
.
Adding Gathered Lace or Ruffles
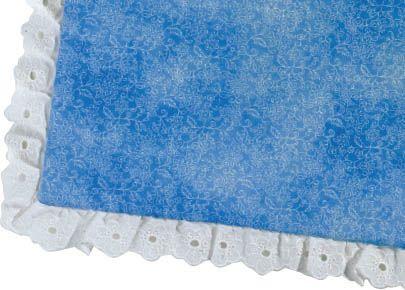
For a feminine touch, you can add gathered lace or ruffles to the edge of a quilt. Look for lace that is pregathered rather than flat. Sometimes you can find premade fabric ruffles, too. But more than likely, you’ll need to make your own ruffles if that’s the look you want. Besides, that way, you can match the ruffles perfectly to your quilt fabrics. When you purchase pregathered trim, use the distance around the quilt, plus ¼ yard. If you plan to make your own ruffles, see “Making Your Own Ruffles” on
page 66
.
1.
Place the ruffles or gathered-lace trim, right sides together, on the quilt top, matching the cut edge of the quilt and the raw edge or binding edge of the trim.
2.
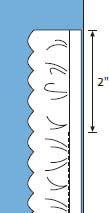
Using a ¼" seam allowance, sew just to the left of the gathering line or bound edge of the trim so that any gathering stitches will be captured in the seam allowance and won’t show on the finished quilt. Leave the first 2" of trim free so that you’ll have a “tail” for finishing later.
3.
Sew along the first edge of the quilt, stopping 1" from the corner. For this last inch, as you approach the square corner, use a long straight pin to push the ruffle or lace under the presser foot, adding more fullness to the gathers.
When you get to the corner, leave the needle in the fabric, lift the presser foot, and pivot to stitch the next side. Continue adding fullness to the gathers for another inch. This will give your ruffle enough fullness to “fan out” around the corner when it is turned right side out. Even if your corners are rounded off, it is still helpful to add some fullness as you sew the ruffle or lace around the curve.

4.
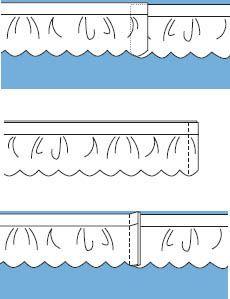
After you’ve stitched around the entire quilt and are approaching the starting point, you have a few options for finishing the ruffle or lace. To make a seam in the ruffle, cut the two ends so that they overlap ½". Place the two ends right sides together and sew a ¼" seam. Press the seam to one side and then finish sewing the ruffle or lace to the quilt.
5.
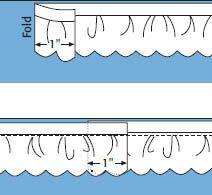
For a quicker finish, you can fold the beginning tail back 1". Cut the ending tail so that it overlaps the first one by 1". Sew over these folds, and the completed ruffle or lace will show no raw edges on the right side. The fullness of the ruffles will hide the cut edges.
6.
If your pregathered ruffle is doubled, you can conceal the cut edges by trimming the tails so that they overlap 2". Fold the raw edges of one tail ½" to the inside and then slip the other tail inside the fold, too. This will provide a finished edge on the front and the back.
Other books
When First They Met by Debbie Macomber
Love Letters by Larry, Jane
Manifest (The Darkening Trilogy) by Stanley, Jonathan R.
Mistress of Mourning by Karen Harper
Stranger Danger by Lee Ann Sontheimer Murphy
Mrs. Lizzy Is Dizzy! by Dan Gutman
Cato 04 - The Eagle and the Wolves by Simon Scarrow
The Butcherbird by Geoffrey Cousins
Chaos by Nia Davenport
The Deceived by Brett Battles