The Art of Manliness: Classic Skills and Manners for the Modern Man (28 page)
Read The Art of Manliness: Classic Skills and Manners for the Modern Man Online
Authors: Brett Mckay,Kate Mckay
Tags: #Etiquette, #Humor, #Psychology, #Reference, #Men's Studies, #Men, #Men - Identity, #Gender Studies, #Sex Role, #Masculinity, #Personal & Practical Guides, #Array, #General, #Identity, #Social Science
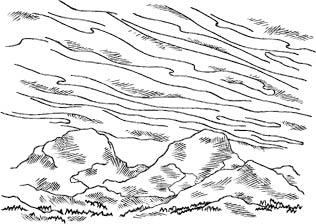
Figure 6.7 Stratus clouds that are hanging medium to high in the sky can mean rain in the next thirty-six hours.
Clouds on a winter night.
If you see clouds on a winter night, you can expect warmer weather.
Check out the Moon
A ring around the moon.
Cirrostratus clouds can sometimes create the appearance of a ring or halo around the moon. Ice crystals in the clouds refract light and produce this illusion. Cirrostratus clouds often precede a warm front and indicate that rain or snow will fall within thirty-six hours.
Moon in the sky like a big pizza pie.
The forecast calls for
amore
.
Observe the Plants
Pinecones. Pinecones will remain closed if humidity is high. High humidity often means precipitation is likely. If the weather is dry, pinecones will open up.
Plants.
A plant’s leaves will often curl in high humidity, foretelling a chance for rain. Additionally plants release waste in low pressure atmospheres, so if it smells like compost in your neck of the woods, bring a poncho.
Observe Animals
Cows.
Cloudy weather apparently makes our bovine friends melancholy. When rain’s on the way, they lay down, sulk and read
Catcher in the Rye.
Birds.
If you see birds flying high in the sky, it means clear weather. However, if you see a lot of birds roosting on power lines and trees, this either means they’re conspiring against you or falling air pressure and bad weather are on the way. Expect rain and/or a killer seagull attack in the next twelve hours.
Bees.
Bees stay near their hive when rain is imminent.
Manly Advice: Clean a Fish
There’s nothing like fishing to help reconnect you with the rhythms of life. The gurgling of a running stream, the chirping of insects and the rhythmic casting of your rod can all bring you to a Zen-like state. When you catch a fish, your meditative trance is broken with excitement, and you have a choice to make: whether to release the fish or keep it and cook it. If you choose the latter, you’re going to have to clean it before it can become your dinner. It takes a little work, but nothing is as satisfying as preparing a meal from something you caught in the wild.
Wash. Before you start slicing up your fish, wash it with some clear running water. You can do this underneath a faucet, but you get more man points for washing the fish in a clear mountain stream.
Cut the fins. Take a knife and cut off the pectoral fins on both sides of the fish.
Scale it. With a dull knife or the back of the sharp knife you used to cut the fins off, scale the fish. This is done by holding the blunt knife at a 90 degree angle to the body of the fish and dragging it across the fish from tail to head. Continue scraping until the body is smooth.
Figure 6.8 Scale the fish by holding the blunt knife at a 90 degree angle to the body of the fish and dragging it across the fish from tail to head.

Gut it. Make a cut down the middle of the fish’s belly from the gills to the anal vent. Holding onto the jaws of the fish, pull the gills and guts from the fish’s insides. Make sure everything is cleaned out of it. You may need to get a spoon and scoop out the kidney. It’s the dark red line on the backbone of the fish.
Rinse. After you’ve scraped it clean, give the cavity of the fish a good rinsing.
Remove the dorsal fin. Remove the dorsal fin by cutting both sides of it and removing it with pliers. You can cook the fish whole or you can remove the head and the tail. It comes down to personal preference and whether you mind having your dinner eyeball you.
Navigate Without a Compass
“Everybody needs beauty as well as bread, places to play in and pray in where nature may heal and cheer and give strength to the body and soul. Keep close to Nature’s heart … and break clear away, once in awhile, and climb a mountain or spend a week in the woods. Wash your spirit clean.”
—John Muir
Before GPS and even before maps and compasses, man was able to navigate his world simply by looking to the sky and his natural surroundings. Sadly, because of a dependence on technology, the ability to navigate without tools has become a forgotten skill. While technology is accurate, it can let you down when you need it most.
Don’t be the man who freaks out just because he lost his precious directional gadget. A real man knows how to find his way in the world with only his wits and savvy. Compass? We don’t need no stinking compass.
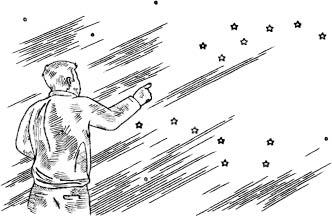
Use the North Star to Navigate
Note: The tips below will only work if you’re in the Northern Hemisphere.
The North Star, or Polaris, has served as a beacon for generations of lost sailors and explorers. Once you find it, you can easily orient yourself and start heading in the right direction.
To locate Polaris, you must first find the ladle-shaped Big and Little Dipper constellations. Then train your eyes on the star that makes up the lip of the ladle of the Big Dipper. Draw an imaginary line from it to the last, brightest star of the handle of the Little Dipper. This is the North Star. Now with a simple Never Eat Shredded Wheat, you’re on your way.
Figure 6.9 Then train your eyes on the star that makes up the lip of the ladle of the Big Dipper. Draw an imaginary line from it to the last, brightest star of the handle of the Little Dipper. This is the North Star.
Use the Sun to Navigate
Shadow Stick.
Place a stick into the ground and angle it so it points toward the sun. You shouldn’t see the stick’s shadow at this point. Now wait. Dig for arrowheads or wrestle a grizzly. When the stick casts a shadow that’s at least 6 inches long, you’ll know it’s pointing east. Draw an imaginary perpendicular line across the shadow. That’s north and south.
Watch Method.
This will only work if you have an analog watch. Your Casio calculator watch unfortunately won’t cut it. Also, your watch must be set to standard time, so turn it back if it’s on daylight savings time. Take off your watch and hold it level. Grab a short straight twig and place it perpendicular to the watch, lining up the bottom end of the twig with the hour hand. Now move the watch and twig together until the twig’s shadow falls along the hour hand. The spot midway between the hour hand and the number twelve on your watch points south.
Finally, forget what you saw in the movies about finding moss on only the north sides of trees. Moss can grow on every side of a tree. Curse that wily moss!
Four Knots Every Man Should Know
Whether you’re tying down a rain fly on your tent or rescuing your friend from a ravine, knowing a few essential knots will help you get the job done safely and correctly. Unfortunately many men don’t know how to tie real knots and end up just looping and weaving rope into a jumbled mess that only appears secure. If you don’t want to see your canoe fall off the top of your car as your cruise the interstate, learn to tie knots correctly. To get you started, here’s a run down of four basic knots every man should know.
Square Knot
(figure 6.10)
Also known as the “reef knot” to our British friends, the square knot is a good solid general-purpose binding knot. Sailors use it on a boat to tie sails down. You use it everyday when you tie your shoe. The square knot should not be used to tie ropes together. However, if you need to tie something down with a piece of rope, this is a good one to use.
1. Hold one end of each rope in each hand.
2. Take the end in your left hand and cross it over the right end. You should now have an “X.”
3. Take that same left end (which is now on your right) and wrap it around the right end. You now have something that kind of resembles a “W.”
4. Cross the right end over the left to make a knot. Pull it tightly.
Bowline Knot
(figure 6.11)
The bowline knot makes a secure loop at the end of a rope. When there’s load on it, it doesn’t slip or bind. A bowline is a good knot to use when you want to fasten a mooring line to a post. Because the knot doesn’t slip, the bowline can be used to lift a victim who’s fallen down a ravine or hole.
1. Form a small loop near the end of the rope.
2. Take the other end of the rope and pull it up through the loop. Pull it through until you form the right size loop for the object that it will be going around.
3. Wrap it around the standing part of the rope.
4. Bring that same end back down through the same loop you came up through. Pull it tight to form a knot.
An easy mnemonic device to remember how to tie this knot is to imagine the end of the rope is a rabbit, the loop is the rabbit hole, and the standing part of the rope is a tree. The rabbit goes up the hole, around the tree, back down the hole and boom! You’ve got yourself a bowline.

Figure 6.10 Square knot.
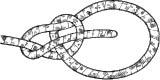
Figure 6.11 Bowline knot.